background image

3

IMPORTANT SAFETY INSTRUCTIONS

Read before operating equipment

1.

Read these instructions.

2.

Keep these instructions.

3.

Heed all warnings.

4.

Follow all instructions.

5. 

Do not use this apparatus near water.

6. 

Clean only with a dry cloth.

7.

Do not block any of the ventilation openings. Install in accordance
with the manufacturers instructions.

8. 

Do not install near any heat sources such as radiators, heat regis-
ters, stoves, or other apparatus (including amplifiers) that produce
heat.

9. 

Do not defeat the safety purpose of the polarized or grounding-
type plug. A polarized plug has two blades with one wider than
the other. A grounding type plug has two blades and third ground-
ing prong. The wide blade or third prong are provided for your
safety. When the provided plug does not fit into your outlet, con-
sult an electrician for replacement of the obsolete outlet.

10.

Protect the power cord from being walked on or pinched particu-
larly at plugs, convenience receptacles, and the point where they
exit from the apparatus.

11.

Only use attachments/accessories specified by the manufacturer.

12.

Use only with a cart, stand, tripod, bracket, or table 

specified by the manufacturer, or sold with the app-

aratus. When a cart is used, use caution when moving      

the cart/apparatus combination to avoid injury from tip-over.

13.

Unplug this apparatus during lightning storms or when unused for
long periods of time.

14. 

Refer all servicing to qualified service personnel. Servicing is
required when the apparatus has been damaged in any way, such
as power-supply cord or plug is damaged, liquid has been spilled
or objects have fallen into apparatus, the apparatus has been
exposed to rain or moisture, does not operate normally, or has
been dropped.

15.

This product may contain lead and mercury. Disposal of these
materials may be regulated due to environmental considerations.
For disposal or recycling information, please contact your local
authorities or the Electronic Industries Alliance: www.eiae.org

16. Damage Requiring Service 

- The appliance should be serviced

by qualified service personnel when:

A.

The power supply cord or the plug has been damaged; or

B.

Objects have fallen, or liquid has been spilled into the appli-
ance; or

C.

The appliance has been exposed to rain; or

D.

The appliance does not appear to operate normally or
exhibits a marked change in performance; or

E.

The appliance has been dropped, or the enclosure damaged.

17. Tilt/Stability

- All televisions must comply with recommended

international global safety standards for tilt and stability properties
of its cabinet design.
• Do not compromise these design standards by applying exces-
sive pull force to the front, or top, of the cabinet which could ulti-
mately overturn the product.
• Also, do not endanger yourself, or children, by placing electron-
ic equipment/toys on the top of the cabinet. Such items could
unsuspectingly fall from the top of the set and cause product dam-
age and/or personal injury. 

18. Wall or Ceiling Mounting 

- The appliance should be mounted to

a wall or ceiling only as recommended by the manufacturer.

19. Power Lines 

- An outdoor antenna should be located away from

power lines.

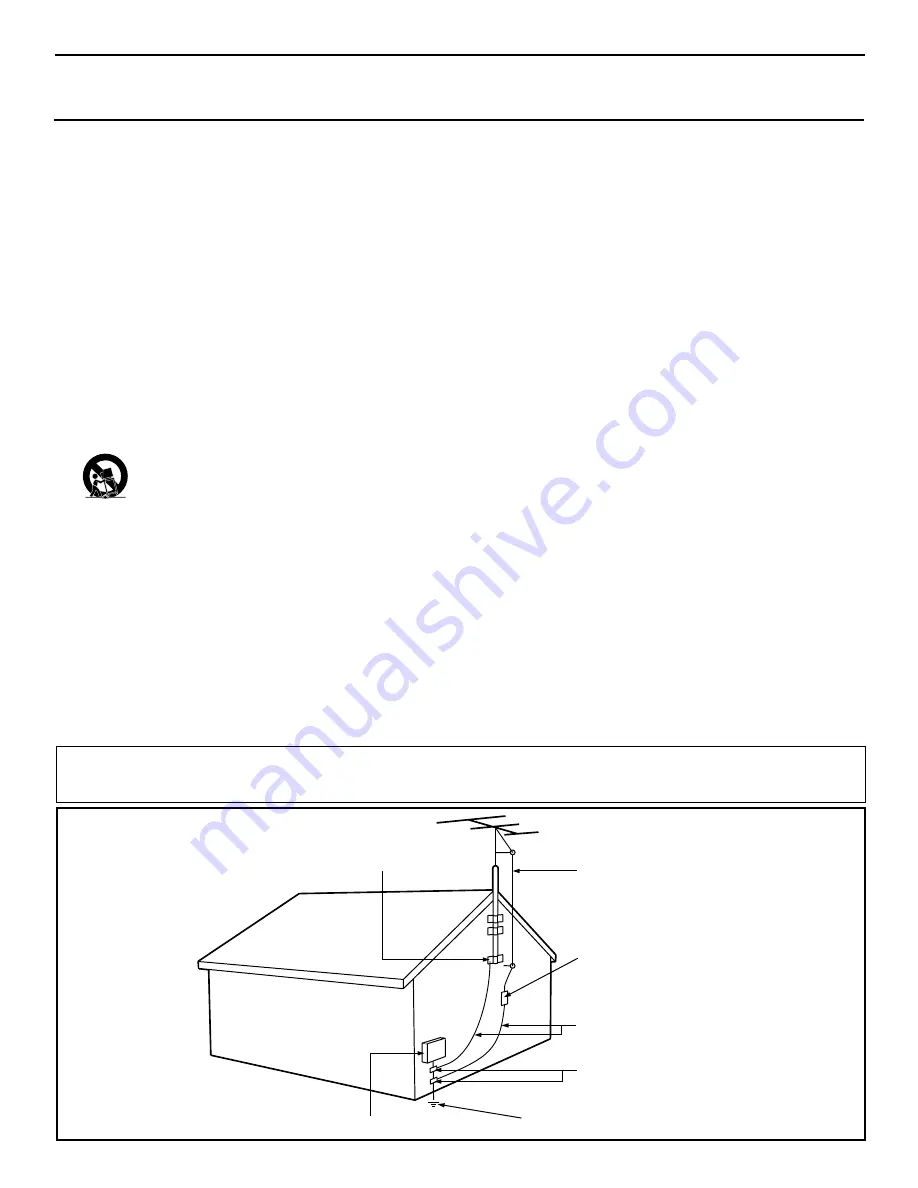
20. Outdoor Antenna Grounding 

- If an outside antenna is connected to

the receiver, be sure the antenna system is grounded so as to provide
some protection against voltage surges and built up static charges.
Section 810 of the National Electric Code, ANSI/NFPA No. 70-
1984, provides information with respect to proper grounding of
the mast and supporting structure, grounding of the lead-in wire to
an antenna discharge unit, size of grounding connectors, location
of antenna-discharge unit, connection to grounding electrodes, and
requirements for the grounding electrode. See Figure below.

21.   Object and Liquid Entry

- Care should be taken so that objects

do not fall and liquids are not spilled into the enclosure through
openings.
a) Warning: To reduce the risk of fire or electric shock, this appa-
ratus should not be exposed to rain or moisture and objects filled
with liquids, such as vases, should not be placed on this apparatus.

22.   Battery Usage CAUTION - 

To prevent battery leakage that may 

result in bodily injury, property damage, or damage to the unit:
• Install all batteries correctly, with + and - aligned as marked on
the unit.
• Do not mix batteries (old and new or carbon and alkaline, etc.).
• Remove batteries when the unit is not used for a long time.

ANTENNA LEAD IN WIRE

ANTENNA DISCHARGE UNIT 

(NEC SECTION 810-20)

GROUNDING CONDUCTORS 

(NEC SECTION 810-21)

GROUND CLAMPS

POWER SERVICE GROUNDING ELECTRODE SYSTEM 

(NEC ART 250, PART H)

GROUND CLAMP

ELECTRIC SERVICE EQUIPMENT

Example of Antenna Grounding
as per NEC - National Electric Code

Note to the CATV system installer:

This reminder is provided to call the CATV system installer's attention to Article 820-40 of the NEC

that provides guidelines for proper grounding and, in particular, specifies that the cable ground shall be connected to the grounding system of the
building, as close to the point of cable entry as practical.

Содержание 27MS5402/17

Страница 1: ...uct more enjoyable If you have read your instructions and still need assistance you may access our online help at www magnavox com or call 1 800 705 2000 while with your product 3121 235 21821 Model N...

Страница 2: ...ing the enclosed card guarantees that your date of purchase will be on file so no additional paperwork will be required from you to obtain warranty service Product Safety Notification By registering y...

Страница 3: ...aged 17 Tilt Stability All televisions must comply with recommended international global safety standards for tilt and stability properties of its cabinet design Do not compromise these design standar...

Страница 4: ...t to the CABLE option AUTOPROGRAM can be set to program all the available channels on your cable signal into the televi sion s memory CABLE TV OUTPUT INPUT b P 5 6 3 4 Direct Cable Connection Cable Bo...

Страница 5: ...change the other onscreen text features such as Closed Captioning CC with TV shows HELPFUL HINT TUNER MODE The Tuner Mode allows you to change the Tv s signal input to Cable Antenna or Auto Mode It s...

Страница 6: ...Quick Use Guide for making connections HELPFUL HINT CH VOL MENU SURF 1 3 2 4 6 5 7 9 8 0 SMART A CH STATUS EXIT CC CLOCK RECORD TV VCR SLEEP SMART SOUND PICTURE MUTE POWER TV VCR ACC 3 5 7 2 4 6 8 1...

Страница 7: ...tions 7 Press the CURSOR UP or CURSOR DOWN buttons to scroll through a list of options 8 After you have selected a name for the channel press the CURSOR RIGHT button to save the name in the TV s memo...

Страница 8: ...roll through a list of options for the first character A through Z 0 through 9 Press the CURSOR RIGHT but ton and repeat for the second third fourth and fifth characters 8 Press the STATUS EXIT button...

Страница 9: ...The Tint Controls will not be available for adjustments when tuned to the AV1 AV2 AV3 Inputs Brightness adds or subtracts light from the darkest part of the picture Color adds or eliminates color Cont...

Страница 10: ...CORD TV VCR SLEEP SMART SOUND PICTURE MUTE POWER TV VCR ACC 3 4 5 2 4 5 2 4 5 6 5 1 Menu Picture Brightness Sound Color Features Contrast Install Sharpness Color Temp Menu Sound Treble 65 Bass Balance...

Страница 11: ...ERED buttons or the CH or CH buttons to enter the desired start up channel You can also press the CUR SOR RIGHT or CURSOR LEFT buttons to enter the desired start up channel Activate Set the timer to t...

Страница 12: ...y local channel that transmits the current time You can also use the CURSOR RIGHT or CURSOR LEFT but tons to change channels one at a time If TIME FOUND appears the process is finished If not follow t...

Страница 13: ...e of pro gramming contains one or more of the follow ing Moderate violence V some sexual situa tions S infrequent coarse language L or some suggestive dialogue D TV 14 Parents Strongly Cautioned This...

Страница 14: ...ntering your new code Correct will flash on the screen briefly and the highlight bar goes back to AutoLock Press the STATUS EXIT button to remove the menu from the screen SETTING UP AN AUTOLOCK ACCESS...

Страница 15: ...the onscreen menu 2 Press the CURSOR UP or CURSOR DOWN button to highlight Features 3 Press the CURSOR RIGHT button to display the Features menu 4 Press the CURSOR DOWN button to highlight the AutoLo...

Страница 16: ...by using the Clear All control or by entering your access code 1 Press the MENU SELECT button on the remote control to show the onscreen menu 2 Press the CURSOR UP or CURSOR DOWN button to highlight...

Страница 17: ...OR UP or CURSOR DOWN button to highlight Features 3 Press the CURSOR RIGHT button to display the Features menu 4 Press the CURSOR DOWN button to highlight the AutoLock control 5 Press the CURSOR RIGHT...

Страница 18: ...tton to display the Features menu 4 Press the CURSOR DOWN button to highlight the AutoLock control 5 Press the CURSOR RIGHT button again to highlight Access Code 6 Enter your four digit Access Code Co...

Страница 19: ...enu 4 Press the CURSOR DOWN button to highlight the AutoLock control 5 Press the CURSOR RIGHT button again to highlight Access Code 6 Enter your four digit Access Code Correct will flash very briefly...

Страница 20: ...he remote control TWICE Your AutoLock settings will appear on the screen NOTE If you have blocked specific subratings such as V for violence in the TV PG category these blocked subratings will not app...

Страница 21: ...e 1 Press the MENU SELECT button on the remote control to show the on screen menu 2 Press the CURSOR UP or CURSOR DOWN twice to highlight Features 3 Press the CURSOR RIGHT and the menu will shift to t...

Страница 22: ...ow dialogue and conversa tions while the TV program is in progress 1 Press the MENU SELECT button on the remote control to show the on screen menu 2 Press the CURSOR UP or CURSOR DOWN twice to highlig...

Страница 23: ...screen might show slightly tilted one way or another The Tilt Adjust control will allow you to correct the problem by adjusting the screen in a clockwise or counterclockwise direction 1 Press the MENU...

Страница 24: ...n the pic ture 1 Press the MENU SELECT button on the remote control to show the onscreen menu 2 Press the CURSOR UP or CURSOR DOWN twice to highlight Features 3 Press the CURSOR RIGHT button to displa...

Страница 25: ...displayed with the word ADD to the right 3 Press the button to ADD the chan nel to the Surf list The display will change from ADD to DELETE Repeat steps 1 through 3 to add additional channels up to e...

Страница 26: ...up to 90 minutes then 60 minute increments up to 240 minutes 1 Press the SLEEP button on the remote control The SLEEP timer onscreen display will appear in the upper part of the screen 2 Within five s...

Страница 27: ...nditions that you may have in your home The Movies Sports Weak Signal and Multimedia SmartPicture controls have been preset at the factory to automatically adjust the TV s brightness color picture sha...

Страница 28: ...tailor the TV sound so as to enhance the particular program you are watching You can change the Personal setting to your preference Follow these steps to select any of the options 1 Press the SMART SO...

Страница 29: ...e control at the device and press the POWER button 3 Does the remote turn the device ON If YES stop and try other function buttons on the remote If they also work the device then the remote is ready a...

Страница 30: ...the SMART SOUND button on the remote within 30 seconds then release 4 Press the Number buttons to enter the THREE DIGIT CODE for your desired device The remote is now ready to oper ate the device 5 P...

Страница 31: ...listed below Please read steps 1 4 before beginning 1 Press the POWER button on the accessory device to turn it ON 2 Place the TV VCR ACC Mode Switch in the proper position for the device you want to...

Страница 32: ...297 320 321 Okano 346 Olympus 035 226 Optimus 037 048 058 104 162 432 454 Optonica 062 Orion 004 295 348 352 479 Panasonic 035 077 162 225 226 378 454 Penney 035 037 038 040 042 065 105 Pentax 042 06...

Страница 33: ...Network System 749 Jerrold 627 Magnavox 722 724 Memorex 724 Panasonic 701 Philips 722 724 Primestar 627 RCA 566 Sony 639 Toshiba 790 Uniden 724 SATELLITE CODE NO AST 351 Akai 515 Alba 352 515 613 Ald...

Страница 34: ...n up or down through the VCR channels A CH RECORD BUTTON Press and hold to begin a VCR recording TV VCR ACC SWITCH Set to VCR to send commands to the VCR PLAY BUTTON Press to play a videotape REWIND B...

Страница 35: ...batteries Remote Does Not Work Continued Clean the remote control and the remote control sensor window on the TV Check the TV power cord Unplug the TV wait 10 seconds then reinsert the plug into the o...

Страница 36: ...neven aging of the picture tube Stock market tickers presented at the bottom of the TV screen Shopping channel logos and pricing displays bright and shown constantly or repeatedly in the same location...

Страница 37: ...ble for adjustment On screen Displays OSD The wording or messages generat ed by the television to help the user with specific feature con trols color adjustment programming etc Remote Sensor A window...

Страница 38: ...e Highlights 4 Format Controls 21 Glossary 38 Incr edible Surround Control 10 Index 39 Language Control 5 Name Conrol 7 8 Permanent OSD 24 Picture Control 9 Registration of TV Information 2 Remote Con...

Страница 39: ...39 NOTES...

Страница 40: ...nt because of improper installation connections to improper voltage supply abuse neglect misuse accident unauthorized repair or other cause not within the control of Magnavox A product that requires m...

Отзывы: