Getting Started
ProMARK X
2-11
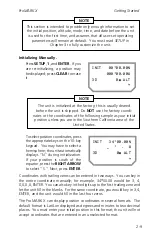
Press the
DOWN ARROW
and
ENTER
to enter in the initial date
and time. The default format for
the date is month/day/year. Enter
in the date then press
ENTER
.
You are then prompted to enter
the time in UT (Universal Coordi-
nated Time) which is the time at
Greenwich, England. If you know
the current UT time enter it and
press
ENTER
, otherwise press
EN-
TER
to select the default value.
NOTE
Entering the correct date is the important step here. The
ProMARK X will obtain the correct UT from the satellites.
After the date and time have been entered the initialization process is
complete and the SETUP menu can be exited by pressing any function key.
Self-Initializing.
The unit will initialize itself when AUX 9 or POS is accessed
and the unit has no initial position. At the same time, the unit will also collect
a new almanac. Under certain circumstances, the unit will also self-initialize
when NAV is pressed.
Although self initializing may be very helpful when you are unsure of your
position, there are also several drawbacks to allowing the unit to initialize
itself. During self-initialization, the unit calculates a position fix in 3D using
0 meters altitude. If you are not at sea level during initialization, this may
result in position fixes that are not as accurate for a short period. Also, the
unit will compute a position fix as soon as it has acquired four satellites, which
will usually occur before the unit has acquired a complete almanac. The first
available satellites may not be the satellites that provide the best position
solution. Subsequent fixes will use the best satellite set, based on the initial
position and the almanac, and should have better accuracy.
From start to finish, it takes about 15 to 30 minutes to self-initialize. The unit
will obtain a first position fix much more quickly if the unit is initialized
manually, even if an almanac must be collected.
INIT TIME: UT
01/05/94
_ : UT
INIT TIME: UT
01/05/94
17:15 UT
~!
Содержание GPS PROMARK X
Страница 4: ......
Страница 10: ...vi...
Страница 14: ...Introduction ProMARK X 1 4...
Страница 92: ...Attributes ProMARK X 6 8...
Страница 188: ......

