background image

Owner’

s Manual

3

Owner’s Manual

Part No. SW0934 Rev. A  06/12

©2012 LOUD Technologies Inc.  All Rights Reserved.

Offering sophisticated EQ, crossover, dynamics 

processing and system protection, the Mackie SP260 
2x6 Speaker Processor provides complete system 
optimization for both passive and powered systems. 

Five different operating modes cover a wide range 

of systems. Each of the six outputs feature dedicated 
level control, mute, polarity invert, high / low-pass 
filters, 7-band parametric / shelving EQ, 600ms delay 
and limiting. Two input channels provide independent 
level control, mute, 600ms delay and a flexible 5-band 
parametric / shelving EQ. 

The convenient front-panel control also includes 

7-segment LED metering per channel. The SP260 
utilizes high-end 24-bit AKM

®

 AD/DA converters with 

120 dB dynamic range for class-leading sound quality. 
With 24 user-definable presets and flexible I/O for 
simple routing and configuration, the SP260 is an  
ultra-flexible processor, ideal for a wide range of 
portable and permanent applications.

Introduction

Contents

IMPORTANT SAFETY INSTRUCTIONS ........................ 2
CONTENTS .............................................................. 3
INTRODUCTION ...................................................... 3
FEATURES ............................................................... 4
HOW TO USE THIS MANUAL .................................... 4
GETTING STARTED ................................................... 5
THINGS TO REMEMBER ........................................... 5
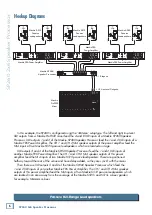
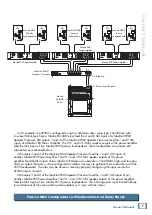
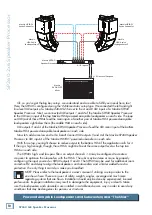
HOOKUP DIAGRAMS............................................... 6

FEATURES: REAR PANEL ........................................ 11
  1. Power ........................................................ 11
  2. Power Cord Socket and Fuse ........................ 11
  3. Main: Lift / Gnd ......................................... 11
  4. XLR Outputs ............................................... 11
  5. XLR Inputs ................................................. 11

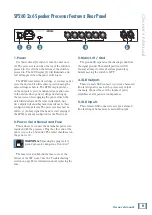
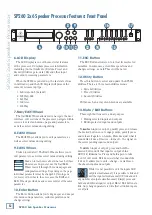
FEATURES: FRONT PANEL ...................................... 12
  6. LCD DIsplay ................................................ 12
  7. Nav/Edit1 Wheel ........................................ 12
  8. Edit2 Wheel ................................................ 12
  9. Edit3 Wheel ................................................ 12
  10. Enter Button ............................................. 12
  11. ESC Button ............................................... 12
  12. Utility Button ............................................ 12
  13. Mute / Edit Buttons .................................. 12
  14. Edit LEDs .................................................. 13
  15. Mute LEDs ................................................ 13
  16. Meters ..................................................... 13
  17. USB ......................................................... 13
  Factory Reset ................................................. 13

UTILITIES .............................................................. 14
  System Utilities .............................................. 14
  System 

Setup ........................................... 14

  Delay 

Units .............................................. 14

    Ramps on changes .................................... 15
  Software 

Version ...................................... 15

  Preset Utilities ................................................ 15
    Recall a Preset ......................................... 15
    Save a Preset ........................................... 15
    Delete a Preset ......................................... 15
  Security Utilities ............................................. 16
  Show 

Parameter ....................................... 16

  Lock 

Unit .................................................. 16

  User 

Password ......................................... 16

  Enable 

Password ...................................... 16

EDITING ............................................................... 17
  Inputs A / B ................................................... 17
  Gain ......................................................... 17
  Delay ....................................................... 17
  EQ 

Bypass ................................................ 18

  5-Band 

EQ ................................................ 18

  Outputs 1 – 6 ................................................. 18
  Name ....................................................... 18
  Source ...................................................... 19
  Polarity .................................................... 19
  Gain ......................................................... 19
  EQ 

Bypass ................................................ 19

  7-Band 

EQ ................................................ 19

  Delay ....................................................... 20
    High Pass Filter ........................................ 20
    Low Pass Filter ......................................... 20
  Limiter ..................................................... 21
  VU 

Meter ................................................. 21

  Linking Inputs or Outputs ................................ 21
 Wrap-Up ........................................................ 21
APPENDIX A: SERVICE INFORMATION .................... 22
APPENDIX B: CONNECTIONS ................................. 24
APPENDIX C: SP260 CONTROL APPLICATION ......... 25
APPENDIX D: SP260 PROCESSING PARAMETERS .... 30
APPENDIX E: SP260 SPECIFICATIONS ..................... 31
SP260 DIMENSIONS ............................................. 32
SP260 BLOCK DIAGRAM ....................................... 33
MACKIE LIMITED WARRANTY ................................ 34

Содержание SP260

Страница 1: ...LIMIT CLIP 15 9 3 0 15 2 EDIT MUTE LIMIT CLIP 15 9 3 0 15 3 EDIT MUTE LIMIT CLIP 15 9 3 0 15 4 EDIT MUTE LIMIT CLIP 15 9 3 0 15 5 EDIT MUTE LIMIT CLIP 15 9 3 0 15 6 EDIT MUTE 2x6 SPEAKER P R O C E S S...

Страница 2: ...ules These limits are designed to provide reasonable protection against harmful interference in a residential installation This equipment generates uses and can radiate radio frequency energy and if n...

Страница 3: ...NS 2 CONTENTS 3 INTRODUCTION 3 FEATURES 4 HOW TO USE THIS MANUAL 4 GETTING STARTED 5 THINGS TO REMEMBER 5 HOOKUP DIAGRAMS 6 FEATURES REAR PANEL 11 1 Power 11 2 Power Cord Socket and Fuse 11 3 Main Lif...

Страница 4: ...ts and outputs for easy stereo configuration 7 segment LED metering for input output level or limiter activity 5 operating modes 2 x stereo sub 3 x stereo 2 x 2 way sub 2 x 3 way and 1 x 6 way 24 pres...

Страница 5: ...ifiers OR directly to the inputs of POWERED loudspeakers and or subwoofers 4 If using amplifiers connect the outputs from the power amplifier s to the inputs of PASSIVE loudspeakers 5 Turn on the mixi...

Страница 6: ...ETURN TAPE USB OUT MAIN LEVEL U 15 O O INT FX MUTE SIG OL PROFESSIONAL MIC LINE MIXER WITH FX FX SEND FOOTSWITCH MON SEND BALANCED BALANCED AUX RETURN CR OUT SUB OUT MAIN OUT IN OUT TAPE L R dB 30 20...

Страница 7: ...MOVE COVER NO USER SERVICEABLE PARTS INSIDE REFER SERVICINGTO QUALIFIED PERSONNEL AVIS N OUVREZ PAS LA COUVERTURE N EXPOSEZ PAS CET QUIPEMENT LA PLUIE OU L HUMIDIT IMPEDANCE 8 OHMS S518S PASSIVE SUBWO...

Страница 8: ...D INCLUDING INTERFERENCE THAT MAY CAUSE UNDESIRED OPERATION AVIS RISQUE DE CHOC ELECTRIQUE NE PAS OUVRIR WARNING TO REDUCETHE RISK OF FIRE OR ELECTRIC SHOCK DO NOT EXPOSETHIS EQUIPMENTTO RAIN OR MOIST...

Страница 9: ...uts of a Mackie SP260 Speaker Processor XLR outputs 1 and 2 of the Mackie SP260 Speaker Processor feed the XLR inputs of two Mackie SRM450v2 powered loudspeakers These loudspeakers are located on stag...

Страница 10: ...10 U 15 O O U 15 O O U 15 O O U 15 O O U 15 O O U 15 O O 2k 0 60 45dB 15dB U 800 200 8k 100 U 15 U 15 15 15 15 15 U U U MIC GAIN 10dBV MIC GAIN U 15 O O U 15 O O U 15 O O U 15 O O U 15 O O U 15 O O 2k...

Страница 11: ...lence to their configured output levels The processor may now be edited or you may signal the band to start playing if the SP260 is already configured for the PA system 2 Power Cord Socket and Fuse Th...

Страница 12: ...CLIP 15 9 3 0 15 USB EDIT MUTE UTILITY A CLIP 15 9 3 0 10 20 EDIT MUTE B 1 EDIT MUTE LIMIT CLIP 15 9 3 0 15 2 EDIT MUTE LIMIT CLIP 15 9 3 0 15 3 EDIT MUTE LIMIT CLIP 15 9 3 0 15 4 EDIT MUTE LIMIT CLI...

Страница 13: ...e top show Clip 15 dBu 9 dBu 3 dBu 0 dBu 10 dBu and 20 dBu Output meters starting at the top show Limit Clip 15 dBu 9 dBu 3 dBu 0 dBu and 15 dBu when in Level mode If the VU meter mode is Limit the ou...

Страница 14: ...m Utility Without further ado press the Enter Button 10 to enter System Setup System Setup System Setup is where the processor is configured for your particular loudspeaker system It configures channe...

Страница 15: ...to the Preset Utilities menu 3 The Enter Button 10 is used to enter and edit the chosen Preset Utility Without further ado press the Enter Button 10 to enter Recall a Preset Recall a Preset If a pres...

Страница 16: ...For the ultimate protection from accidental and intentional parameter adjustments set up a user password here Only those with the password will be allowed access to edit processor settings The Nav Ed...

Страница 17: ...be edited Gain Delay EQ Bypass or EQ Bands 1 5 Gain The input gain allows you to adjust the entire PA levels up and down This is where to calibrate the signal level coming in from the mixer Press the...

Страница 18: ...fecting the system By toggling the EQ Bypass on and off you may quickly compare the sound with and without EQ Turn the Edit2 8 or Edit3 9 Wheel to scroll between Bypass Off default and Bypass On Press...

Страница 19: ...ens the 7 Band EQ on the output so you may hear exactly how it is affecting the system By toggling the EQ Bypass on and off you may quickly compare the sound with and without EQ Turn the Edit2 8 or Ed...

Страница 20: ...g it counter clockwise decreases the frequency The frequency ranges from 20 0 Hz to 20 0 kHz Turn the Edit3 9 Wheel to see the various filter type and slope options No Cut Off Butterworth 6 dB Butterw...

Страница 21: ...s 16 Turn the Edit2 8 or Edit3 9 Wheel to scroll between VU Meter Level default and VU Meter Limiter Act If the latter is selected the Clip LED on the selected output s will illuminate to indicate 0 d...

Страница 22: ...the position of the main ground lift switch 3 on the rear panel of the SP260 Check the signal cables between the mixer and the processor and the processor amps and loudspeakers Disconnect them one by...

Страница 23: ...rocessor Have you gone a tad overboard with the gain and EQ settings Cut is our friend and boost should be used wisely Has the band been together long Factory Reset As a last ditch effort you can rese...

Страница 24: ...P260 High quality microphone cables work well Foil shielded cables are commonly used for audio wiring The better the shield the better the immunity from externally induced noise like EMI and RFI Route...

Страница 25: ...rough of the menus and the three different screens types that are avialable in the application Appendix C SP260 Control Application Menus File Menu The File menu is where you manage presets on your de...

Страница 26: ...t of measure when adjusting input and output delays Change password If you want to setup a password so you can lock your SP260 and prevent intruders from wrecking your show you ve come to the right pl...

Страница 27: ...oftware application without closing the application Input and Output Tabs Below the menus are nine tabs that give you quick access to an overview of the whole processor or all of the processing option...

Страница 28: ...the polarity invert buttons for each output followed by input and output gain controls Input Screens There are 2 input tabs one for Input A and one for Input B The top of the screen shows you the EQ...

Страница 29: ...nd Low Pass Filter settings Selecting one of the other options Out InA or Out InB will also add the EQ and Gain settings of Input A or Input B giving you a more complete view of the output s gain stru...

Страница 30: ...lving 6 or 12 dB oct Outputs Name User editable Source InA InB InA InB Polarity 180 invert Gain 12 0 dB to 6 0 dB 0 1 dB increments Outputs Continued EQ Bypass On or Off 7 band EQ Frequency 20 Hz 20 k...

Страница 31: ...rve the right to change these specifications at any time without notice Mackie and the Running Man are registered trademarks of LOUD Technologies Inc All other brand names mentioned are trademarks or...

Страница 32: ...SP260 2x6 Speaker Processor 32 SP260 2x6 Speaker Processor 9 0 in 229 mm WEIGHT 5 8 lb 2 6 kg 1 8 in 46 mm 19 0 in 483 mm 17 3 in 439 mm SP260 Dimensions...

Страница 33: ...Delay Low Pass Filter High Pass Filter Limiter DAC Mute Output 2 Polarity Gain 7 Band EQ Bypass Input Source Delay Low Pass Filter High Pass Filter Limiter DAC Mute Output 3 Polarity Gain 7 Band EQ By...

Страница 34: ...ves notice of the noncompliance within the Warranty Period to the Company at www mackie com support or by calling LOUD technical support at 1 800 898 3211 toll free in the U S and Canada during normal...

Страница 35: ...16220 Wood Red Road NE Woodinville WA 98072 USA Phone 425 487 4333 Toll free 800 898 3211 Fax 425 487 4337 www mackie com...

Отзывы: