background image

MachineSense  •  Sales: +1-443-457-1165  •  [email protected]  •  www.feverwarn.com

8    Getting Started with FeverWarn l Models FW1100A and FW1100B

QC-FW005-051821

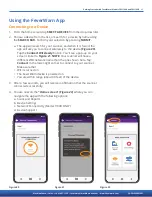
Figure 15

Initial Testing

!


IMPORTANT: The FeverWarn 1100 scanner is preset at the factory. 

It is not necessary to calibrate the device before using.

1.   Plug the USB power adapter, which is wired into the scanner base,  


into a nearby standard 120 VAC outlet to power up the scanner. 

2.   There will be a white screen for less than three (3) seconds.  


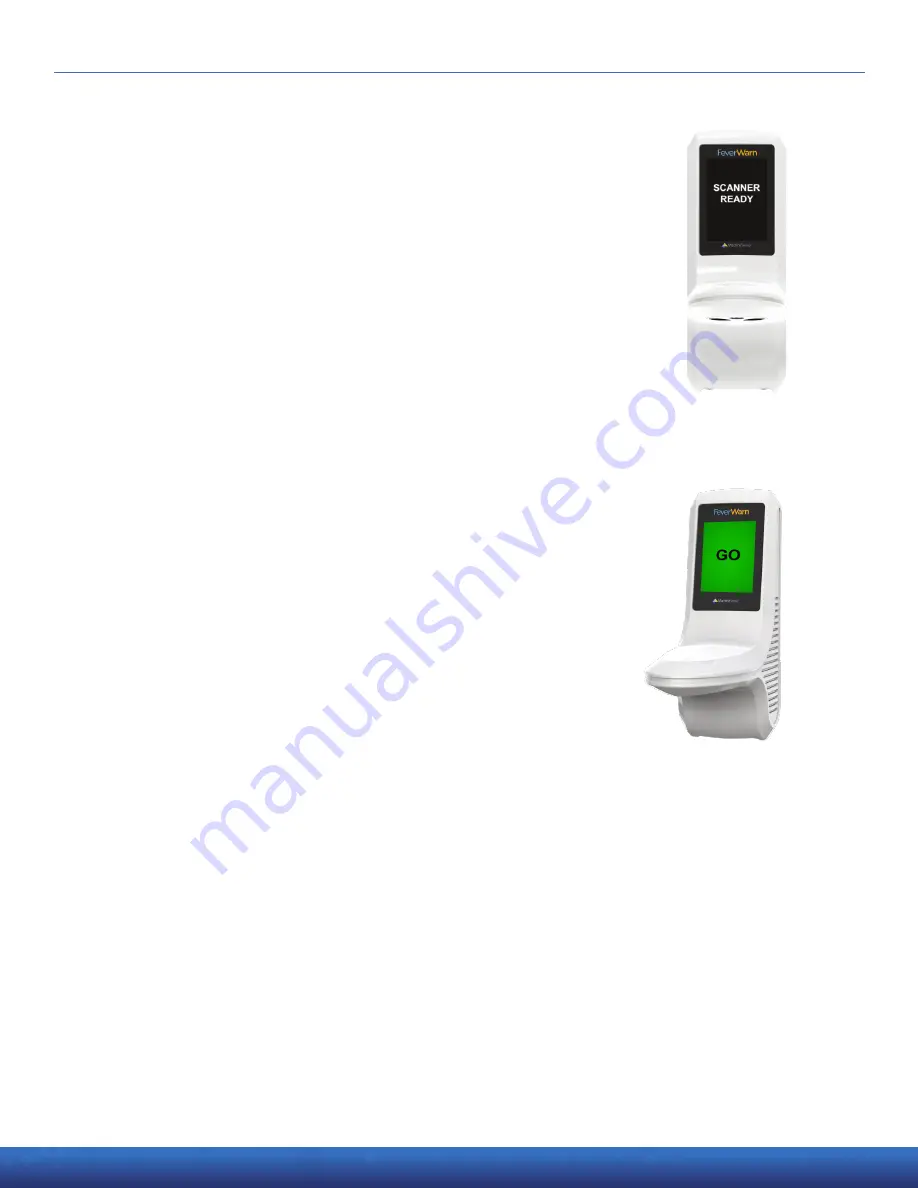
User will see a yellow screen with black writing stating  


“Configuring. Please wait” for approximately 2-3 seconds.  


When the process is complete, you should see a black screen that  

 says, 

“Scanner Ready,” as shown in Figure 15.

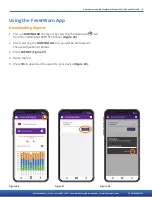
3.   Place your hand about one to four inches from the scanner’s  


snout and hold it there for a few seconds. The screen will display  


‘GO’ in green, and you should hear a beep. 

(Figure 16). If the  

 screen 

 displays ‘STOP’ in red, it indicates that the person being  


scanned has a fever,  and the individual should take the proper  

 precautions. 

!


IMPORTANT: Initially, it may take a few scans to establish the normal 

temperature for that location. If you see any other indications on the 

screen, please call technical support.

 4.  If everything is working as indicated above, take your scanner to  


its final indoor location  and prepare for installation. 

5.  If you have FeverWarn model FW1100B, it will record all scans  


to the Crystalball cloud via WiFi.  FeverWarn model FW1100A  


is a standalone  scanner with no cloud connectivity available.  


FeverWarn 1100A records all scans to the mobile app. Proceed  

 to 

 the section of the manual entitled, “Installing and Using the  


FeverWarn App.”  

Figure 16

Содержание FeverWarn FW1100A

Страница 1: ...6 Initial Testing 8 Installing the FeverWarn App 9 Using the FeverWarn App Connecting to a Device 11 Scans and Reports 12 Downloading Reports 13 Device Settings 14 Calibration 15 Edit Temperature Thr...

Страница 2: ...rn boxes should include 1100 Series FeverWarn 5V 3000mA power cable with switch Getting Started Document Two mounting brackets L shaped bracket for attaching device to optional stand Flat bracket to m...

Страница 3: ...00B FeverWarn scanners Information that applies only to the specific models is noted Please use this document to get your FeverWarn scanner up and running For new FeverWarn customers we suggest you re...

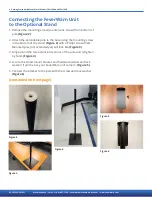
Страница 4: ...e pole to the base using the mounting screw in the bottom of the stand Figure 2 with a Philips screwdriver Mounted pole not extended yet will look like Figure 3 3 Fully extend the two extension sectio...

Страница 5: ...ews which are holding the attached wall bracket to the back of the unit This will remove the wall bracket and allow you to replace it with the stand bracket Hold onto these four 4 screws you will be u...

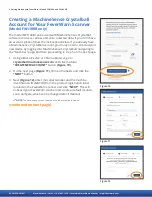
Страница 6: ...ging into MachineSense s Crystalball navigating to the Machines page and then proceeding to step 5 on the next page 1 Using either a Firefox or Chrome browser go to crystalball machinesense com and cl...

Страница 7: ...scanners to onboard do so now by clicking the FEVERWARN QUICK INSTALLATION button on the next screen Figure 14 Up to 20 FeverWarn units can be added That s it You have created your MachineSense Cryst...

Страница 8: ...out one to four inches from the scanner s snout and hold it there for a few seconds The screen will display GO in green and you should hear a beep Figure 16 If the screen displays STOP in red it indic...

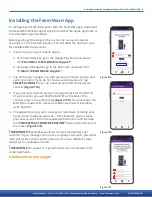
Страница 9: ...ting account If you do not have an existing account tap CREATE ACCOUNT to set up a new account and onboard your scanner Figure 17a 3 If you need to create an account the app will ask for the MAC ID of...

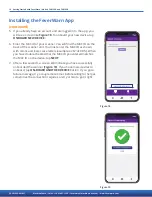
Страница 10: ...ith colons and lower case letters example ac 67 dc 9b fc When you have double checked that the MAC ID you entered matches the MAC ID on the device tap NEXT 7 After a few seconds a screen will indicate...

Страница 11: ...een similar to Figure 21 NOTE Your scanner will have a different WiFi network name than the one shown here Tap Connect in the lower right corner to connect to your scanner Make sure that WiFi is turne...

Страница 12: ...temperature 2 Use the drop down arrow to select your report Figure 24 3 Select an option from the drop down menu 4 The graph will display on the screen 5 You can toggle the graph between Celsius and F...

Страница 13: ...e 26 Figure 27 Figure 28 Using the FeverWarn App Downloading Reports 1 You can DOWNLOAD the report by selecting the download icon from the SCANS AND REPORTS banner Figure 26 2 After selecting the DOWN...

Страница 14: ...een and tap Device Settings Figure 29 2 Because you are attempting to change the parameters of the scanner you will be asked to re enter your user email and password the same that you used to log in t...

Страница 15: ...hould have a second person helping you 1 To begin tap START CALIBRATION 2 A pop up will appear to verify you want to proceed with the calibration Triggering a calibration alert will disable thermal de...

Страница 16: ...can the temperature of your fist Put that value in the Temperature field 7 Once values are selected entered tap Get Realtime Data 8 After clicking Get Realtime Data verify temperature using a medical...

Страница 17: ...443 457 1165 feverwarn machinesense com www feverwarn com 051821 Using the FeverWarn App Calibration continued 11 Once data point 2 is captured click Finish Calibration Figure 38 12 Calibration compl...

Страница 18: ...ure Threshold You can optionally adjust the range of acceptable temperatures through the Device Settings 1 Tap Device Settings from the home screen 2 Scroll to EDIT THRESHOLD from the Device Settings...

Страница 19: ...ARM BASED ON the drop down field Figure 41 3 Select your choice 4 Press SAVE Edit Display Settings 1 You can modify the information displayed on the FeverWarn Scanner unit by changing DISPLAY SETTINGS...

Страница 20: ...oll to DISPLAY MESSAGES Figure 43 2 You can enter up to 5 characters to display after a temperature scan 3 Select the message you want to edit Change the text to your desired message 4 Press SAVE DISP...

Страница 21: ...available networks 2 Choose the network you want to connect to You should choose a network with good signal strength 3 Enter the credentials for the network you want to join ask your system administr...

Страница 22: ...48 1 RESTORE FACTORY SETTINGS This option returns the device to the state it was when you took it from its box THIS WILL DELETE ALL DATA ON THE DEVICE This will not off board the device 2 RESTORE PREV...

Страница 23: ...r by plugging the included power supply into a nearby 120 VAC source The scanner should boot up and the screen should illuminate This can take a few minutes during startup 3 Your sensor is now up and...

Страница 24: ...1 Simply pull up your sleeve approximately 2 inches 5 cm above palm side Figure 50 2 With your arm straight place your inner wrist area 1 inch below the scanner for two seconds 3 GO NO GO instructions...

Страница 25: ...nd zones that you might want to change This section will help you customize your MachineSense Crystalball account 1 Browse to crystalball machinesense com and login with your established credentials 2...

Страница 26: ...here if you re going to change the location name click the three dot menu to the right of the Location header click Rename and then type in the new location name 4 You ll see the new FW1100B scanner D...

Страница 27: ...now 100 operational Browse to crystalball machinesense com and log in with your company s credentials to electronically access this and other helpful documentation and videos Videos are available on...

Страница 28: ...MachineSense Sales 1 443 457 1165 feverwarn machinesense com www feverwarn com QC FW005 051821...

Отзывы: