background image

19

8

2.6.1  PLaybaCk OPeraTION

There are various search modes: video type, channel number or time. The system can max 

display 128 files in one screen. You can use page up/down button to view if there is more 

than one page.

Select the file name and double click mouse (or click enter button), to view file content.

2.6.1.1  Playback Mode

There are two playback modes: 4-ch and all-channel. In 4-ch playback mode, you can select 

the 1/2/3/4-ch playback according to your requirement. In all-channel mode, the system can 

playback in full channels. Please note the 4-ch has no all-channel playback mode.

2.6.2  TIMe SPeCIFIC PLaybaCk

Input time (h/m/s) in the time column and then click playback button, system can operate 

time specific playback.

2.6.3  SyNCHrONIZed PLaybaCk FuNCTION WHeN PLaybaCk

During the playback process, click the numeral key, the system will switch to the video 

channel corresponding to the same time.

2.6.4  dIgITaL ZOOM

When the system is in full-screen playback mode, drag your mouse on the screen to select a 

section and then left click mouse to activate the digital zoom. Right click mouse to exit. 

2.6.5  FILe baCkuP aNd CLIP

System supports backup operation during search. Select a √ in front of the file name 

(multiple choices), click the backup button (Button 14 in Figure 2-13).

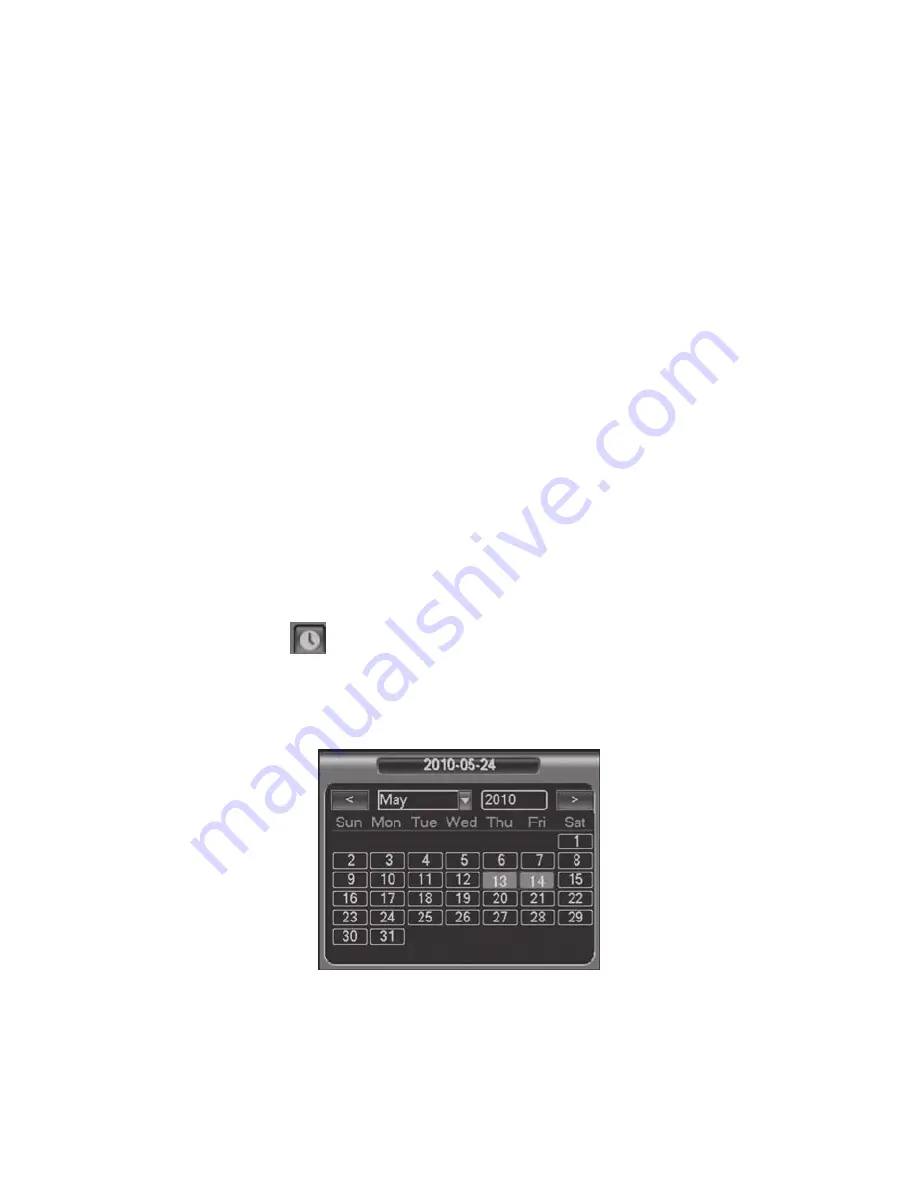
2.6.6  CaLeNdar 

Click the calendar icon          in Figure 2-13. The system pops up a calendar for your 

reference. 

The highlighted date means there are record files on that day. You can click the blue date to 

view the file list. In the following interface you can see there are video files in 13th June and 

14th June. Double click the date to view file list.


 Figure 2-14

1.7  

aLarM INPuT aNd OuTPuT CONNeCTION 

There are two alarm input types for you to select: normal open (NO) and normal close (NC).

1.7.1  aLarM INPuT aNd OuTPuT deTaILS

Refer to the following table and Figure 1-4 for alarm input and output information

Figure 1-4

In the first line, from the left to the right,: 

1, 2, 3, 4, 5, 6, 7, 8, 9, 10, 11, 12, 13, 14, 

15, 16

ALARM 1 to ALARM 16. The alarm 

becomes active in low voltage.

In the second line, from the left to the right: 

NO1 C1, 

NO2 C2, 

NO3 C3, 

NO4 C4,

NO5 C5 NC5

The first four are four groups of normal 

open activation output (on/off button)

NO5 C5 NC5 is a group of NO/NC 

activation output (on/off button)

CTRL 12V

Control power output. You need to close the 

device power to cancel the alarm.

+12V

It is external power input. Need the 

peripheral equipment to p12V 

power (below 1A).

Ground cable

485 A/B

485 communication port. They are used 

to control devices such as PTZ. Please 

parallel connect 120TΩ between A/B cables 

if there are too many PTZ decoders.

Содержание MPR-HQ-1600 Series

Страница 1: ...hank you for purchasing a MacePro HQ Series DVR Please read the instructions completely before installation Please consult a legal expert on the proper use of this equipment in accordance with the law...

Страница 2: ...ve Viewing 12 2 3 Schedule 12 2 4 Manual Record 13 2 5 Encode 14 2 5 1 Snapshot 15 2 5 2 Image FTP 16 2 5 3 Snapshot Disk 16 2 6 Search and Playback 18 2 6 1 Playback Operation 19 2 6 2 Time specific...

Страница 3: ...mproper handling or installation 2 TraNSPOrTaTION SeCurITy Heavy stress violent vibration or water splash are not allowed during transportation storage and installation 3 INSTaLLaTION Keep upwards Han...

Страница 4: ...ssory bag 1 2 abOuT FrONT PaNeL aNd reaL PaNeL For detail information of the function keys in the front panel and the ports in the rear panel please refer to the User s Manual included in the resource...

Страница 5: ...xtbox click this button to switch between Numeral English Small Capitalized Enable or disable tour Up Down Activate current control modify setup and then move up and down Increase decrease numeral Ass...

Страница 6: ...xt In playback mode playback the next video In menu setup go to down ward of the dropdown list Play Pause In normal playback click this button to pause playback In pause mode click this button to resu...

Страница 7: ...input port 3 Fan 4 Loop video output 5 1st to 4th channel audio input 6 Video input 7 DB25 port 5th to 16th channel audio input port 8 Audio output 9 Bidirectional talk input port 10 Bidirectional tal...

Страница 8: ...7 1 6 CONNeCTION SaMPLe Please refer to Figure 1 3 for connection example Figure 1 3...

Страница 9: ...low voltage In the second line from the left to the right NO1 C1 NO2 C2 NO3 C3 NO4 C4 NO5 C5 NC5 The first four are four groups of normal open activation output on off button NO5 C5 NC5 is a group of...

Страница 10: ...of the DVR and the ground of the alarm detector Please connect the NC port of the alarm sensor to the DVR alarm input ALARM Use the same ground with that of DVR if you use external power to the alarm...

Страница 11: ...em consists of four accounts Username admin Password admin administrator local and network Username 888888 Password 888888 administrator local only Username 666666 Passwords 666666 Lower authority use...

Страница 12: ...e sub menu Figure 2 2 2 1 3 LOgOuT There are two ways to log out The first one is from menu option In the main menu click shutdown button you can see an interface is shown as below See Figure 2 3 Figu...

Страница 13: ...e in the schedule interface In the main menu from Setting to Schedule you can go to schedule menu See Figure 2 5 There are a total of six periods Channel Please select the channel number first You can...

Страница 14: ...Please make sure you have the record operation set correctly and you have properly installed the formatted Hdd You can right click the mouse or in the main menu from Advanced Manual Record to go to r...

Страница 15: ...type system supports two types CBR and VBR In VBR mode you can set video quality Quality There are six levels ranging from 1 to 6 The sixth level has the highest image quality Video audio you can enab...

Страница 16: ...se follow the steps listed below to enable activation of the snapshot function After you enabled this function the system can snapshot when the corresponding alarm occurs In the Encode interface click...

Страница 17: ...save button See Figure 2 10 Please refer to the User s Manual included in the resource CD for detailed information Boot up corresponding FTP server Enable schedule snapshot or activation snapshot Chap...

Страница 18: ...Web See Figure 2 12 Figure 2 12 Select a file and then click here to view image content See the results here double click the file name to view the image content There are max 100 files per page Clic...

Страница 19: ...file Figure 2 13 Please refer to the following chart for more information 1 2 4 5 6 7 3 8 9 10 11 15 14 13 12 File List Playback Window File Information Playback Control Select Playback Mode Here Set...

Страница 20: ...ayback 2 6 3 SyNCHrONIZed PLaybaCk FuNCTION WHeN PLaybaCk During the playback process click the numeral key the system will switch to the video channel corresponding to the same time 2 6 4 dIgITaL ZOO...

Страница 21: ...jog Illustration remarks Fast forward outer ring clockwise When playback turn the shuttle outer ring clockwise once you can view in fast level 1 In forward or reverse mode double click Pause Play but...

Страница 22: ...IP Subnet mask Gateway display as 0 You need to disable the DHCP function to view current IP information When PPPoE is operating you can not modify IP Subnet mask Gateway TCP port Default value is 37...

Страница 23: ...first See Figure 2 16 Protocol Select corresponding PTZ protocol such as MSP SD Address Input corresponding PTZ address Baud rate Select baud rate Data bit Select data bit Default value is 8 Stop bit...

Страница 24: ...8 Zoom Focus Iris Click icon and to adjust zoom focus and iris Figure 2 18 In Figure 2 18 please click directional arrows See Figure 2 19 to adjust PTZ position There are a total of 8 directional arr...

Страница 25: ...single screen mode Drag the mouse on the screen to adjust section size It can activate PTZ automatically Figure 2 20 reference chart You can click set button in Figure 2 18 or click REC button in the...

Страница 26: ...ll the web controls please run uninstall webrec2 0 bat to auto delete the control or you can go to C Program Files webrec to delete Single folder 3 2 LOgIN Open IE and input DVR address in the address...

Страница 27: ...ed in the resources CD Figure 3 2 Note For detailed operation introduction please refer to our resource CD included in your package for electronic version of the User s Manual Slight difference may be...

Страница 28: ...Mace Security Products Inc 5101 NW 21st Ave Suite 210 Fort Lauderdale FL 33309 877 585 6223 v 10 27 10...

Отзывы: