D
e
f
G
H
I
J
K
a
c
b
In the next paragraphs we will describe how to configure your GigaCore switch via the build-in web
interface. Alternatively, you can configure your switch using Araneo. Araneo is available for Windows and
MacOS and can be found in the download section of our website:
http://www.luminex.be/download-
PLEASE KEEP IN MIND, THE WEB INTERFACE OF A SWITCH CAN ONLY BE REACHED THROUGH A
PORT ASSIGNED IN THE MANAGEMENT GROUP (FROM THE SWITCH YOU ARE CONNECTED TO, OR
FROM ANOTHER SWITCH THROUGH AN ISL PORT). YOU NEED AT LEAST ONE PORT ASSIGNED TO
THE MANAGEMENT GROUP IN YOUR ENTIRE NETWORK TO REACH THE WEB INTERFACE OF ALL YOUR
GIGACORE SWITCHES.
FACTORY DEFAULT, ALL PORTS ARE ASSIGNED TO THE MANAGEMENT GROUP.
WEB INTERFACE PRESENTATION
Launch your favourite web browser and type the IP address of your GigaCore. Press enter to validate.
Use
admin
in the user field and leave the password field
blank
.
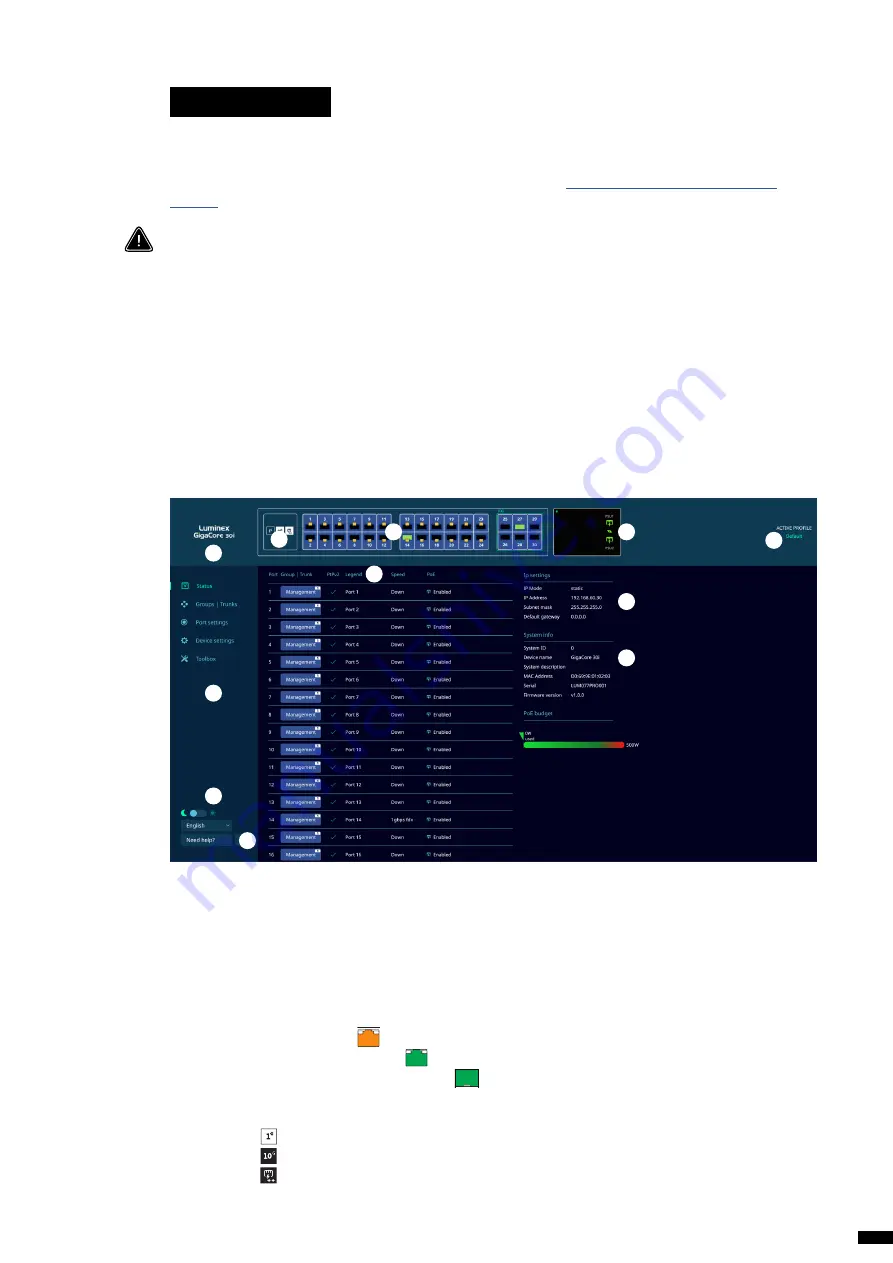
3.1 Status Page
(A) Identify
: Clicking on the Luminex logo will identify your GigaCore in the network. The switch LEDs will
flash green for 5 seconds. In the web-UI, the text “Identified” will be displayed under the logo.
(B) Drawing of your GigaCore
: This product image gives you a quick overview of the switch port status.
Active ports are filled with the following colours:
Orange: 100Mbps link
Green: 1000Mbps (1Gbps) link
Green SFP+: 10000Mbps (10Gbps) link
(C) E-Ink display
: showing all the active options the switch has to offer:
1Gb
10Gb
PoE
Ok
Power RLinkX PoE
Mode
Ok
Power RLinkX PoE
Ok
Power
RLinkX PoE
Ok
Power
RLinkX
PoE
Ok
Power RLinkX
PoE
Ok
Power RLinkX PoE
Mode
Ok
Power RLinkX PoE
Ok
Power
RLinkX PoE
Ok
Power
RLinkX
PoE
Ok
Power RLinkX
PoE
Ok
Power RLinkX PoE
Mode
Ok
Power RLinkX PoE
Ok
Power
RLinkX PoE
Ok
Power
RLinkX
PoE
Ok
Power RLinkX
PoE
19
3. Configuration


