


Chapter 10 Online
10-25
[Password Setting]
1. Input a new password in Edit Box ‘b’ for New Password Input.
2. Input the new password again in Edit Box ‘c’ for Confirm password as identical as in 1 above.
3. Click Change button ‘e’ to set the new password in PLC.
[Password Changes]
1. Input the password saved in PLC in Edit Box for current Password Input.
2. Input a new password in Edit Box ‘b’ for New Password Input.
3. Input the new password again in Edit Box c for Confirm password as identical as in 2 above.
4. Click Change button ‘e’ to change the password of PLC.
[Password Delete]
1. Input the password saved in PLC in Edit Box for current Password Input.
2. Click Clear d to delete the password of PLC.
Notes
-
Up to 8 letters is available for the password.
-
Letters used as password will be classified into capital or small.
-
Special letters can be used for password.
- If password is setup in the PLC, the PLC asks the password when connection is tried and the PLC permit to
connection when password is correct.
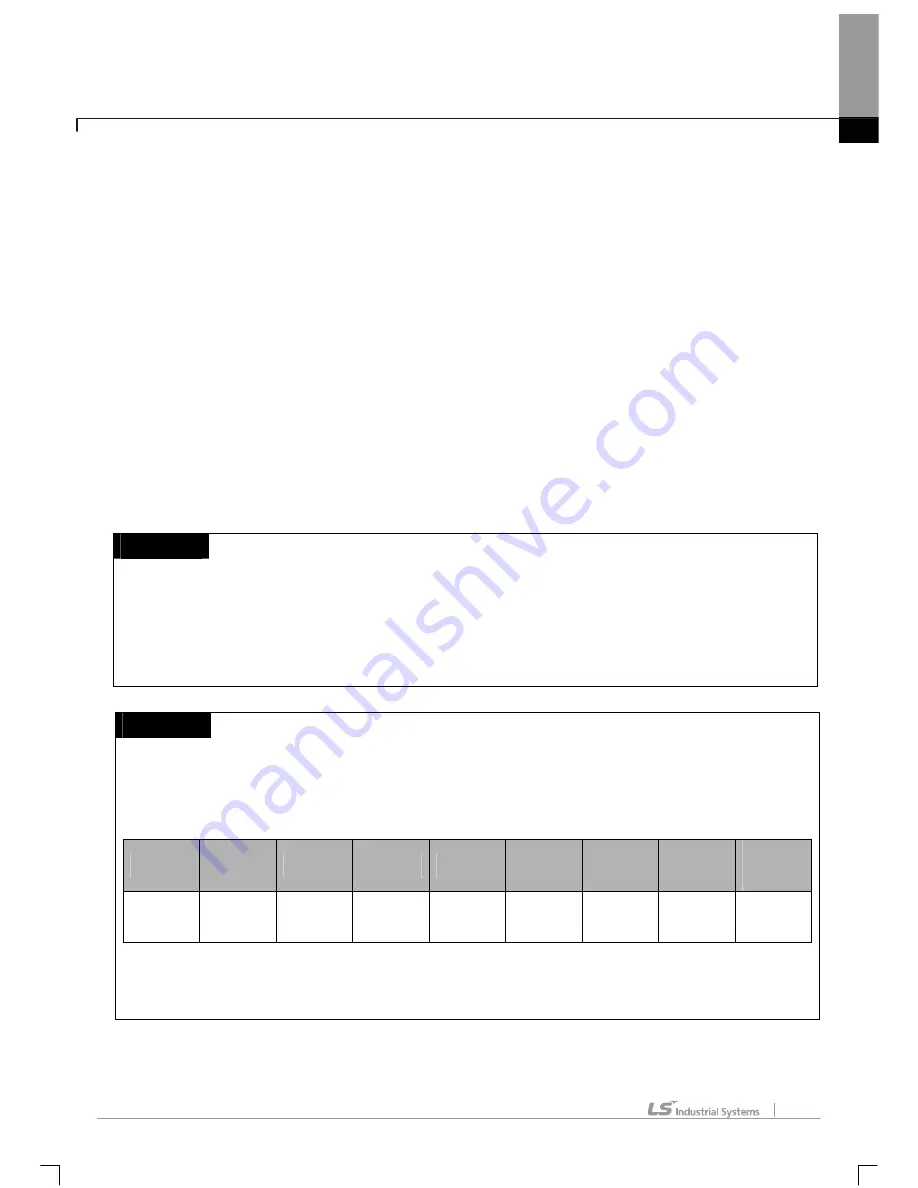
Notes
In order to protect the program in the PLC and user intellectual property, enhanced password function with
new password process is supported at XG5000 V3.4 or above
Enhanced password function is applied to the following CPU OS or above
In case of using the following CPU version or above, you should use the latest XG5000.
CPU
XGK
XGI
XGR
XBM
XEC
XBC
“H” type
XBC
“S” type
XBC
“E” type
OS
version
V3.51 V3.2 V1.8 V2.6 V1.3 V1.9 V1.0 V1.0
In case of using the latest XG5000 (V3.4 or above) and CPU OS lower than above table, previous password
process is applied and enhanced password function is not applied
Содержание XG5000
Страница 24: ...Chapter 1 Introduction 1 8 11 Wait a second for the installation to be complete...
Страница 55: ...Chapter 2 Basic Application 2 19...
Страница 62: ...Chapter 2 Basic Application 2 26...
Страница 129: ...Chapter 4 Variable 4 15...
Страница 131: ...Chapter 4 Variable 4 17...
Страница 154: ...Chapter 4 Variable 4 40 Global variable item All Global variable item General Variable...
Страница 155: ...Chapter 4 Variable 4 41 Global variable item special module related variable...
Страница 166: ...Chapter 4 Variable 4 52...
Страница 168: ...Chapter 4 Variable 4 54...
Страница 172: ...Chapter 4 Variable 4 58 Global variable item All Global variable item General Variable...
Страница 173: ...Chapter 4 Variable 4 59 Global variable item special module related variable...
Страница 182: ...Chapter 4 Variable 4 68 Notes If no cell is selected Delete Line will not be executed...
Страница 198: ...Chapter 4 Variable 4 84...
Страница 200: ...Chapter 4 Variable 4 86...
Страница 204: ...Chapter 4 Variable 4 90 2 Select Project Save Variable Names to File Dialog box a b d e c...
Страница 210: ...Chapter 4 Variable 4 96 5 In High Speed Link window Read area variable variable comment is shown as below...
Страница 257: ...Chapter 5 LD Edit 5 47...
Страница 258: ...Chapter 5 LD Edit 5 48 3 Reset All Bookmark Steps 1 Select Edit Bookmark Remove All on the menu...
Страница 259: ...Chapter 5 LD Edit 5 49 4 Previous Bookmark Steps 1 Select Edit Bookmark Previous Bookmark on the menu...
Страница 289: ...Chapter 6 SFC Edit 6 25 4 Move the cursor to the location you want to paste 5 Select menu Edit Paste...
Страница 291: ...Chapter 6 SFC Edit 6 27 3 Move the cursor to the location to paste 4 Select edit paste on the menu...
Страница 298: ...Chapter 6 SFC Edit 6 34 6 Utilize SFC split window With split window Without split window...
Страница 300: ...Chapter 6 SFC Edit 6 36 Viewing the fix split window contents displays the previous screen 8 Split window position Right...
Страница 317: ...Chapter 7 Programming Convenience 7 4...
Страница 406: ...Chapter 10 Online 10 12 z Check if the status of PLC is normal...
Страница 417: ...Chapter 10 Online 10 23 Dialog Box Description of Dialog Box a List shows the list and size of the programs saved a...
Страница 429: ...Chapter 10 Online 10 35 Dialog Box a b c d f i e h k g j l...
Страница 433: ...Chapter 10 Online 10 39 2 Select the flag and data of the bit 3 QW0 0 0 is registered to the established device...
Страница 531: ...Chapter 11 Monitoring 11 59...
Страница 532: ...Chapter 11 Monitoring 11 60...
Страница 543: ...Chapter 11 Monitoring 11 71...
Страница 575: ...Chapter 11 Monitoring 11 103 Dialog Box a c d b e...
Страница 600: ...Chapter 12 Debugging 12 8 1 Select Debug Step Into on the menu...
Страница 602: ...Chapter 12 Debugging 12 10 Sequence 1 Select Debug Step Out on the menu...
Страница 604: ...Chapter 12 Debugging 12 12...
Страница 611: ...Chapter 12 Debugging 12 19...
Страница 632: ...Chapter 15 User Function Function Block 15 6 2 Create a program based on the variable input in the local variable screen...
Страница 668: ...Chapter 17 ST Edition 17 5 2 Select ST as Language in theAdd Program window...
Страница 689: ...Chapter 17 ST Edition 17 26 2 Press TAB 2 Outdent 1 Select area to make outdent...
Страница 690: ...Chapter 17 ST Edition 17 27 2 Press Shift TAB...


