


103
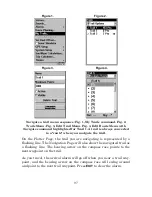
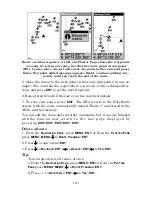
Route creation sequence: At left, the Plotter Page shows the waypoints
we want to visit in our route. Set the first route point at waypoint
(001). Center, move cursor to the next waypoint in the route and press
Enter. Waypoint added message appears. Right, continue adding way-
points until you reach the end of the route.
5. Move the cursor to the next point in the route (waypoint 2 in our ex-
ample; this could also be a spot where you need to turn or change direc-
tion), and press
ENT
to set the next waypoint.
6. Repeat step five until the route reaches your destination.
7. To save your route, press
EXIT
. The M52 reverts to the Edit Route
screen, with the route automatically named "Route 1" and stored in the
M52's internal memory.
You can edit the route and run other commands, but if you are finished
with the route for now, r e t u r n t o t h e l a s t p a g e d i s p l a y e d b y
p r e s s i n g
EXIT
|
EXIT
|
EXIT
|
EXIT
|
EXIT
.
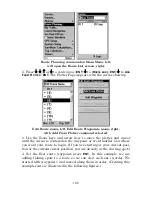
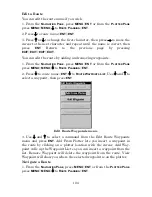
Delete a Route
1. From the
N
AVIGATION
P
AGE
, press
MENU
|
ENT
or from the
P
LOTTER
P
AGE
press
MENU
|
MENU
|
↓
to
R
OUTE
P
LANNING
|
ENT
.
2. Press
↓
to
route name
|
ENT
.
3. Press
↓
to
N
AVIGATE
|
ENT
|
→
to
D
ELETE
|
ENT
|
←
to
Y
ES
|
ENT
.
Tip:
You can also delete all routes at once:
1. From the
N
AVIGATION
P
AGE
, press
MENU
|
ENT
or from the
P
LOTTER
P
AGE
press
MENU
|
MENU
|
↓
to
R
OUTE
P
LANNING
|
ENT
.
2. Press
→
to
D
ELETE
A
LL
|
ENT
|
←
to
Y
ES
|
ENT
.
Содержание M52 S/GPS
Страница 48: ...42 Notes ...
Страница 72: ...66 Notes ...
Страница 76: ...70 Notes ...
Страница 134: ...128 Notes ...
Страница 137: ...131 Notes ...
Страница 138: ...132 Notes ...


