background image

72 


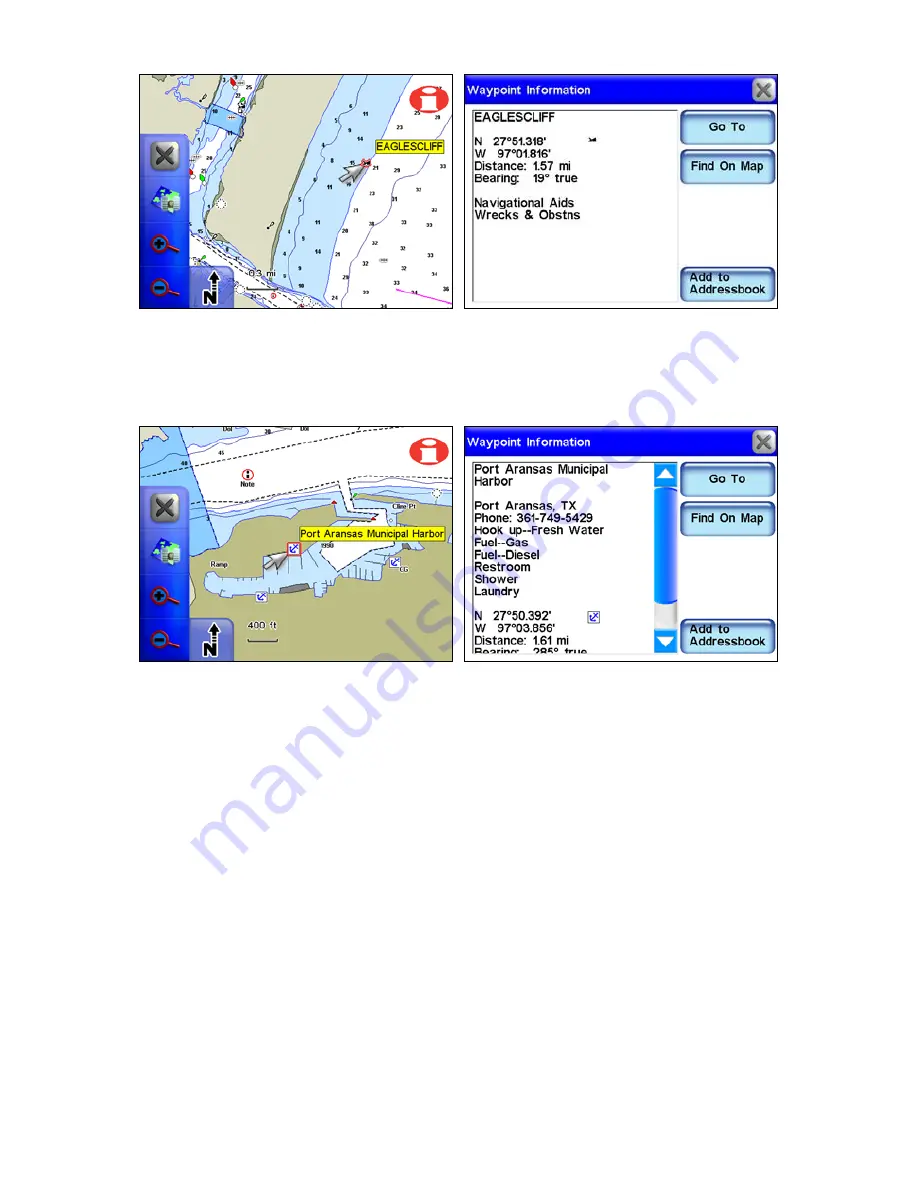
The cursor has been used to highlight a shipwreck symbol, and a 

popup box appeared describing the selected item. The Information 

button was then selected to view waypoint information on the wreck. 


The cursor has selected the Port Aransas Municipal Harbor marina 

symbol. In the right figure the Information button has been selected to 

view information on the marina, including available amenities. 

Enhanced Lake Maps 

The Standard map data is based on our MapCreate series 7 software 

which covers all 50 states in the U.S.A. The data includes land-based 

topographic contour lines, public hunting areas and depth contours for 

more than 3,000 U.S. inland lakes. 

Содержание iWAY 600C

Страница 1: ...Pub 988 0160 191 Turn by Turn Mapping GPS and MP3 Player Operation Instructions ...

Страница 2: ...2001 2007 All Rights Reserved infoUSA is a trademark of infoUSA Inc Mapping Database copyright 2007 NAVTEQ NAVTEQ ON BOARD is a trademark of NAVTEQ Lowrance Electronics may find it necessary to change or end our poli cies regulations and special offers at any time We reserve the right to do so without notice All features and specifications subject to change without notice All screens in this manua...

Страница 3: ...tion Information 12 Map Mode Practice Run 13 Creating and Saving Contacts 14 Section 3 Music Mode Operation 19 Getting Music on the iWAY 19 Music Mode Display and On Screen Commands 19 Visualization effects screen 20 Output Mode button 20 Audio Search Browse Music Files 22 Music Mode Practice Run 23 Section 4 Main Menu 25 Directions List 25 Trip Calculator 26 Route Via Destinations 27 Cancel Navig...

Страница 4: ... Destinations 55 Address Book 56 Choosing New Destinations while Navigating 57 Considering Temporary or Local Conditions 58 Section 6 Point to Point Navigation 59 About Straight line Navigation Mode Point to Point 59 Switch Between Navigation Modes 60 Straight line Navigation Commands 61 Waypoints Contacts 61 Set a Waypoint 61 Create Waypoint at Current Position 61 Create Waypoint on Map 62 Naviga...

Страница 5: ...iii Notes ...

Страница 6: ... of all available navigation tools and must visually check to make sure a clear safe path to the next destination is available WARNING When a GPS unit is used in a vehicle the vehicle operator is solely responsible for operating the vehicle in a safe manner Vehicle operators must maintain full sur veillance of all pertinent driving condi tions at all times An accident or collision resulting in dam...

Страница 7: ...cable to connect the iWAY to your PC We will finish by describing some of the available accessories Section 2 covers Mapping Mode Operation It will show you how easy it is to run the iWAY right out of the box This section features a one page GPS Practice Run If you have already jumped ahead and figured out how to install the unit yourself turn to the Map Mode Practice Run and head for the road wit...

Страница 8: ...k the unit must have a clear view of the satellites Unlike radio or television signals GPS works at very high frequencies These signals can be easily blocked by trees buildings an automobile roof even your body The iWAY s hard drive contains highly detailed road and highway mapping data for Hawaii Alaska the 48 contiguous United States and most of Canada The iWAY 600c is the world s first portable...

Страница 9: ...esigned to plug into a car s cigarette lighter An optional wall power adapter for home use is available Power cable speaker left and optional wall power adapter right for indoor use To use the power cable plug the cable s cigarette lighter adapter into the cigarette lighter receptacle Then insert the other end of the cable into the power socket on the back of the unit External Connections On the b...

Страница 10: ...owner s manual or the vehi cle dealer If the unit has difficulty receiving satellite signals you can use an optional external antenna Some of these windshields have a specific location where the external antenna will work Oth erwise you must place the external antenna near a side window a rear window or on the car exterior with the magnet mount To buy an external antenna see the accessory ordering...

Страница 11: ...you can copy files from your computer to the unit s hard drive USB to PC cable connect Other Accessories The iWAY package includes a soft fabric face cover to protect the screen from damage when the unit is not in use Use a microfiber towel to clean the unit s screen Check your local re tailer as they are often available where shop towels or auto cleaning towels are sold Caution Do not use any che...

Страница 12: ...Extras Permanent and temporary mounts suitable for boat aircraft and mo torcycle handlebars are available Each of these mounts work without screws or adhesives To safely install any GPS unit please refer to the instruction sheet packed with the mounting bracket To check the availability of optional accessories go to our web site at www lei extras com Automotive mounting bracket shipped with the GP...

Страница 13: ...hows your current position on a moving map as well as information on your current route Use Music Mode to select an audio play list adjust volume and set various music play con trols 3 MENU Press this button to access the menus and submenus The four Main Menu screens contain settings that control operations or pro vide additional information The unit is designed to work great right out of the box ...

Страница 14: ...elay after pressing an on screen button and seeing the unit respond The delay may be necessary while the unit retrieves information from the hard drive On screen menus and dialogs have an X icon in the top right corner just like you are used to seeing on your home computer Exit all menus and dia logs by pressing X Opening Warning Dialog and Language Menus When first powering the unit up you will s...

Страница 15: ...Map Mode and On Screen Commands The map display shows your position and route from an overhead view By default the unit displays the map in 3D view The unit s map screen is the main display mode It shows your position as well as your sur roundings The black arrow icon represents you on screen The black arrow icon always points in the direction you are traveling While the unit is tracking your posi...

Страница 16: ...r current position Map Mode toggles between three different map screen modes You can view the regular map screen or if you are in an area covered by a satel lite image you can view the screen in two different satellite modes When traveling in a metropolitan area covered by satellite imagery you can view the satellite image with or without map overlay The satellite map screens are for select metrop...

Страница 17: ...n You can turn this feature back on in the same way Press the Auto Zoom button to toggle the feature on and off The Over lay Data Hide button will clear overlay data boxes from the map screen Select it again to bring them back Use the Map Orientation button to select between three different map views When the Auto Zoom feature is on it will take control any time the map cursor isn t on screen When...

Страница 18: ...s Book Press the button to bring up the Location Information screen for your current position now select ADD TO ADDRESSBOOK to save your position as a contact Location Information screen Get Location Information You can use the Location Information button to get information for on screen items Touch the map screen to bring up the cursor Now high light a street a landmark or POI Point Of Interest s...

Страница 19: ...y Toolbar 3 Use the cursor to select a destination on the map screen a location a short distance away 4 Once your desired location is selected with the map cursor press the Location Information button in the top right corner of the map screen 5 The Location Information screen should appear showing details about the location you selected including its distance from your current position and its lat...

Страница 20: ...SSBOOK from the information screen to save a contact at the selected location The cursor has been used to highlight a location on screen at left Once the Location Information button is pressed the POI Information screen right will appear When you select ADD TO ADDRESSBOOK in the information screen the Edit Contact screen will appear From this screen you can choose to GO TO the location or add an o...

Страница 21: ...The Contact Information screen right will appear when you highlight and select one of your Address Book entries in the Find By Name screen The symbol should appear on the map screen The symbol should also appear in the Contact Information screen You can create a contact in the Address Book at your current position If the cursor and map dis play toolbar are on screen press X and clear them from the...

Страница 22: ...ntry is shown at right If you want to manually enter the latitude or longitude for a contact press and highlight either the Latitude or Longitude entries in the Edit Contact screen When you do a keyboard will appear Use the keyboard to enter the specific latitude or longitude then press DONE Pressing the arrow button in the keyboard screen will set the selected coordinate values to zero The Move b...

Страница 23: ...t Contact screen at left When Latitude is highlighted and selected it will bring up the Edit Contact screen keyboard for the Latitude entry shown at right You can use the keyboard to manually enter the latitude The Longitude entry works the same way ...

Страница 24: ...18 Notes ...

Страница 25: ...r you prefer to arrange your music Music Mode Display and On Screen Commands The Music Mode screen contains an area for visualization effects with a set of play control buttons along the right side and bottom of the main music screen WARNING Listening to music or even the verbal turn by turn in structions with headphones can seriously impede your ability to drive Be sure to check your local laws b...

Страница 26: ... waveform or spec trum analyzer effect in time with the music that s playing To switch between the available visualization effects press the screen inside the Visualization area Output Mode button To hear MP3 music and turn by turn instructions through your car s FM radio press the OUTPUT MODE button The volume slider is replaced by two up and down arrow buttons Tune the radio to a vacant FM radio...

Страница 27: ...s yellow when the option is turned on and white when the option is turned off Equalizer The Equalizer is used to customize the audio levels of music playback To adjust levels press and drag the slider for the control you want to adjust moving it up to increase the level and down to decrease it Sig nificantly increasing any of the equalizer levels may cause audio distor tion If you have problems wi...

Страница 28: ...atch the text you entered in the Name Filter box Choose the music file you want and select PLAY to begin playing the song or select BROWSE to open the Browse Music Files screen containing all your music files If you make a mistake while entering a song name in the Name Filter box press the CLEAR button to start over Press the Find Music button in the top right corner of the Music screen to bring u...

Страница 29: ...a Mac the iWAY should show up as a disc on the desktop Now copy the music files to the unit by either dragging or dropping the files straight to the unit or you can copy and paste them With Mac systems when you are done browsing you should eject the disc before unplugging the unit from the computer or you can turn off the iWAY An easy way to eject the disc is to drag it to the trash 3 Once the mus...

Страница 30: ...requency on your car s radio and use the up and down arrow buttons to tune the unit to the same frequency as the radio 9 To have the unit create a play list of all songs in the music folder press the PLAY button with no song selected The unit will begin playing the first song in the music directory 10 If you press SHUFFLE the unit will play songs in the music folder in random order To stop the mus...

Страница 31: ...gating to a destination It is a list of all the turns from the start of a route to the end including an arrow icon indicating the direction of each turn You can view the list by pressing and dragging the blue slider bar at the right of the Directions list screen You can select any individual instruction on screen for more detailed information If Turn Preview is on the Directions list will be displ...

Страница 32: ...t OVERLAY DATA SETUP from Menu 1 to choose which information to display on screen Overlay data appears in semi transparent boxes on the map screen The transpar ency level of overlay data boxes can be controlled from the Interface Options screen Map screen with overlay data boxes To get to the Interface Options screen press INTERFACE OPTIONS in Menu 2 Overlay data can be used to show information su...

Страница 33: ...a feature is activated center figure above a check mark will ap pear in the box next to it The size of on screen overlay data boxes can be controlled by using the slider in the Data Information screen right figure above Each Data Viewer category has its own Data Information screen Bring up the Data Information screen by highlighting and pressing on the category in the Overlay Data Shown screen Rou...

Страница 34: ...position Once the unit has pin pointed your location select ROUTE VIA DESTINATIONS from Menu 1 This will bring up the Routes menu Select NEW ROUTE and the Edit Route screen will appear From the Edit Route screen you have two options to choose from in or der to find a specific location and begin to generate a route Select ei ther the FROM MAP button or the FROM FIND button If you select FROM MAP th...

Страница 35: ...location while navigating is explained under the heading Choosing New Destination while Navigating in Section 5 To view the destinations in a particular route select OPEN and the Edit Route screen will appear You will be able to see all the locations in a route in this screen To de lete a route from the Routes menu press DELETE If you select FROM FIND in the Edit Route screen the Find menu will ap...

Страница 36: ...wer in the list The other Edit Route screen buttons and their function Use the Direct To button in the Edit Route screen to go directly to any leg in a route Highlight a specific leg from the route and press DIRECT TO and the unit will begin navigating to that destination or leg When you highlight a specific leg in a route and press the VIEW VIA button in the Edit Route screen it will bring up the...

Страница 37: ...avigation When you have reached your destination the unit will display a dialog box asking if you want to cancel navigation Select YES to stop receiving navigation instructions You can also cancel navigation to a destination at any time using the Cancel Navigation command From Menu 1 select CANCEL NAVIGATION Again the unit will display a dialog box to confirm your choice Choose YES and the unit wi...

Страница 38: ...eft or right the more it will affect the routes generated by the unit If you change these values significantly and notice the unit has begun generating poor routes try using the RESET TO DEFAULTS button to see if that helps You can use the RECALCULATE ROUTE button to automatically generate a new route to the same destination using the new prefer ences Take advantage of this option when you are try...

Страница 39: ...less attractive especially for short trips across town The default setting is designed to avoid Interstates for very short trips but if you feel like it s sending you to the highway too often try setting the unit to Avoid Interstates Press and drag the INTER STATES slider to the right Like toll roads you might prefer the speed of Interstate travel You can set the unit to prefer Interstates by pres...

Страница 40: ...ure off by unchecking the box The Turn Preview screen will not show your turn using satellite imagery The Turn Pre view screen always shows your turn in the regular map screen mode Menu 2 Categories Drawn Categories Drawn lets you choose how much map data you want to display on the map screen This information includes contacts points of interest cities highways etc Use the Map Categories Drawn scr...

Страница 41: ...he Trails stored on the unit with icons to indi cate which trail is active that is which one is currently recording your travel and which ones should be displayed Trails Menu left with Trail 2 highlighted Trail 2 is active indicated by the arrow on the right The Edit Trail screen right allows you to modify an existing Trail From the Trails Menu you can start a new Trail or edit or delete an existi...

Страница 42: ...hicle is in motion The unit will navigate and play music while moving The Power button will also work but the touch screen buttons are temporarily disabled whenever Safety Mode is on The screen buttons become responsive when the ve hicle stops However if a passenger is available to act as navigator Safety Mode can be turned off When this feature is disabled a large red X will ap pear on the Safety...

Страница 43: ...ting in damage to property personal in jury or death could occur if the operator of a GPS equipped vehicle fails to pay full attention to travel condi tions and vehicle operation while the vehicle is in motion Do not attempt to configure adjust or enter information into your GPS unit while driving Sound and Voice Setup Much of the information you will receive from the unit will come in the form of...

Страница 44: ...e Music Screen The feature must be checked for the FM Modulator to work Music Volume This setting only affects music playback spoken instruc tions will remain unchanged Periodic Voice 20 min Use this feature to increase or decrease the fre quency of spoken instructions Periodic Voice instructions are repeated at set intervals and are intended as reminders Voice Volume This setting only affects spo...

Страница 45: ...op down box list and make your selection Brightness The Brightness Slider controls the brightness of the screen Use the slider bar to adjust the screen s brightness to your preference Transparency The Transparency Slider controls the transparency of overlay data boxes that appear on the map screen Increasing transparency will make it easier to see the background map but may interfere with the legi...

Страница 46: ...asure including speed and distance statute miles or meters your heading true or magnetic the current time 12 hour or 24 hour format and the date Month Day Year Day Month Year or Year Month Day Highlight the circle next to the format you prefer Press the SET LOCAL TIME button in the Units of Measure screen to bring up the Time Set tings feature Use the Set Local Time feature to adjust the time dis ...

Страница 47: ...e available on the update s page at the Lowrance web site These up grades make the unit perform better or introduce a new feature or function You can find out what software version is running in your unit by using the Device Information command Navigation Mode The iWAY s primary function is to provide turn by turn navigation instructions but it also can display plot trails and perform traditional ...

Страница 48: ...dialog box After you connect the iWAY to your home computer power the unit up To save data to the unit or to unload data from the unit select TRANSFER DATA from Menu 4 A dialog box will appear asking Transfer data which way You will have two choices Save or Load When you press SAVE or LOAD the Transfer My Data screen will appear Select the dropdown box and make sure to select the file name of the ...

Страница 49: ...ator The unit has a GPS Simulator allowing it to simulate the navigation of a route The simulator control buttons are located in the bottom left of the map screen If you are in Simulator Mode while driving and reach a speed of about 15 miles per hour or greater and the unit acquires a satellite lock the unit will leave Simulator Mode If the unit does not have satellite lock it will prompt you to s...

Страница 50: ...and jpg images stored to the hard drive To view images saved to the unit select PICTURE VIEWER from Menu 4 You can play the images as a slideshow or view a single image To view a picture slideshow you must have photo images stored in the unit The unit will automatically search the hard drive for any usable images Use the picture toolbar on the left side of the screen to control the image display T...

Страница 51: ...in the image display to focus on a particular area Play Pause Slideshow allows you to control whether the unit auto matically cycles through the available images or displays a single im age Next Image and Previous Image skips forward or backward among the available images Gauge Page The Gauge Page contains helpful information on one screen including your estimated time of arrival time to destinati...

Страница 52: ... You can access the Satellites screen from any of the four Menu screens by press ing the GPS Status button The GPS Status button from Menu 4 The GPS Status button is located in the top left corner of each Menu screen and is represented by four colored bars that change color de pending on the strength of the satellite lock You can also access the Satellites screen by selecting SATELLITE STATUS from...

Страница 53: ...gnal available EPE Estimated Position Error The Estimated Position Error EPE represents the expected error from a benchmark location If the EPE shows 50 feet then the position shown by the unit is estimated to be within 50 feet of the actual loca tion The smaller the position error number the more accurate the sat ellites fix Satellite Display The Satellite Display located on the right side of the...

Страница 54: ...o matically update when you travel to a different time zone you will need to reset the time manually Use the Config DST button to adjust for Daylight Savings Time When you press this button the Daylight Saving Configuration menu will ap pear Press this feature and scroll through the list of countries to make your selection The Time Settings feature is shown at left Press the Config DST but ton in ...

Страница 55: ...ll generate a route The route will be highlighted by a magenta line on the map screen While the Go To command is an easy way to generate a route several other options are available To access these options press the FIND button on the right side of the unit This will bring up the first of four Find screens The Find 1 menu left and the Find 2 menu at right The Find 3 menu left and the Find 4 menu at...

Страница 56: ...e address State or Province You will use a virtual keyboard to enter letters numbers and symbols When prompted to enter keyboard information the keyboard will ap pear The header of each Find Address screen will display what type of information to enter Notice the button in the bottom right corner of the Find Address keyboard NUM SYM which stands for Numbers Symbols Use this button to toggle betwee...

Страница 57: ...rd will appear Use the keyboard to enter the name of a State or Province The auto complete feature may generate a list of choices for you before you finish making your entry If the Auto Complete feature does not generate a list of choices press DONE when you have finished making your entry Once the unit has determine what State or Province you want to search in another keyboard will appear In this...

Страница 58: ...ound the address it will prompt you to choose one of three options Add to Ad dressbook Find on Map or Go To Once the unit has determined the exact address a dialog box will ap pear with three choices Add to Addressbook Find on Map or Go To If you select GO TO the unit will generate a route to your selected address Selecting ADD TO ADDRESSBOOK will place the address in the unit s Ad dress Book If y...

Страница 59: ... POI Information screen and the unit will generate a route to the gas station Use the Gas command in the Find 1 menu to locate the nearest gas sta tion The Nearest To Current Position screen left will appear Scroll through the list and select a gas station The POI Information screen right will appear Select Go To and the unit will generate a route to the gas station The unit has several ways to pe...

Страница 60: ...st To Current Position screen can help you narrow your search To use the Name Fil ter press the NAME FILTER field and a keyboard will appear Type all or part of the name you are looking for and press DONE The unit will return to the previous list but it will only show those loca tions whose names contain the text you entered in the Name Filter field For example you could significantly narrow a sea...

Страница 61: ... and probably even a phone number That can help when calling ahead to get a table at a restau rant Much more important are the Go To and Find On Map com mands Select FIND ON MAP to have the unit close the POI Information screen and center the map on the selected POI This will help when trying to determine where a POI is in relation to your current position or to some other part of town If want to ...

Страница 62: ... to enter the saved contact s name or you can scroll through your address book using the slide tool You can also use the Find By Name field to search through your entire Address Book Intersection Use the Intersection command from the Find 3 menu to navigate to any street intersection stored in the unit This can be useful when you don t have a specific street address When INTERSECTION is selected t...

Страница 63: ...o Choosing New Destinations while Navigating No matter which method the unit uses to generate a route it responds the same It generates a route from your current position to a chosen destination If you select an alternate destination or a new destination while driving whether you use the cursor on screen or the Address feature in the Find menu a dialog box will appear asking Which would you like t...

Страница 64: ...ng Temporary or Local Conditions Unfortunately the unit cannot be aware of any temporary or local con ditions that could affect your course Short term construction traffic jams or local bans on U turns could affect a generated route If you are following a route and conditions make it impossible or incon venient to follow the routing instructions use your best judgment When you deviate from your ro...

Страница 65: ...r NauticPath map data you must search for POIs with the SEARCH ALL POIS BY NAME button The other search categories do not work with these point to point maps On the map if a symbol for a POI or other item is selected with the cursor pressing the Location Information button displays a POI in formation screen for that item Caution The iWAY 600C is designed for primary use inside automobiles but the ...

Страница 66: ...unit s two different navigation modes Turn by Turn car image is selected as the default setting Choose Point to Point A to B image and a warning message appears asking if you are sure you want to change modes Choose YES and close the Navi gation Mode screen NOTE When you switch to line navigation there is no need to change set tings in the Map Data pull down menu unless you are using nauti cal cha...

Страница 67: ...you must first mark the spot by making a waypoint there Waypoints Contacts If you have been creating contacts and adding them to the Address Book in turn by turn mode you already understand the waypoint con cept A turn by turn contact is actually a waypoint in point to point mode and vice versa The Address Book in your iWAY is essentially a waypoint list with additional features like places to rec...

Страница 68: ...re Create Waypoint on Map Let s say you re headed for a place you ve never been before but you know approximately where it is on a map You can use the cursor and the Location Information button to set a waypoint there so you can navigate to it Touch the screen to launch the Map Display Toolbar and the cursor ar row Use the cursor and the Zoom In and Zoom Out buttons to move around the map and find...

Страница 69: ...IND BY button which gives you the option to search by name or narrow the search by looking near your current loca tion or near the cursor location When you find and select the desired waypoint the Waypoint Informa tion screen appears Choose GO TO and the iWAY draws a red course line straight from your current position to the waypoint We ll describe how to use the course line for guidance in a few ...

Страница 70: ...r rent position arrow still points in the direction you are headed But the textual and audible turn instructions are gone Course Line Text and audio instructions have been replaced with the red course line which is shown in the preceding two figures When you navigate some where an S symbol is placed at your starting position and your desti nation is highlighted The course line connects the start a...

Страница 71: ...n to the destination In the example figure above the boat is headed straight toward a fish ing spot so the steering arrow is pointing straight ahead Select an overlay data item left to display its information screen In addition to the steer arrow the most commonly used Overlay Data for point to point navigation are described below Track The actual direction you are traveling over the ground Shown ...

Страница 72: ...built in memory can save 100 trails with up to 10 000 points recorded per trail The de fault setting is 2 000 points per trail When trail length exceeds the maximum point setting the iWAY will begin recording a trail over itself You can save a set of up to 100 trails in a GPS data file usr file for mat on the unit s hard drive The trails can then be deleted from the unit s memory and you can recor...

Страница 73: ... trail which he will save Then he can safely re trace his path through the woods before dawn and after dusk If you want to preserve a specific trail from Point A to Point B you should first create a new trail at Point A Go to MENU 2 select MY TRAILS then press the NEW TRAIL button In the example shown below any old trails have been deleted and a new trail is already started The My Trails button on...

Страница 74: ...ition arrow traces along the trail you have saved The Navigate Trail command converts a trail into a route and then shows navigation information along the route Since the unit is actually performing point to point navigation the Steer Arrow and other Over lay Data are working and can give you guidance Go to MENU 2 and press the MY TRAILS button On the Trails Menu select the trail you want to navig...

Страница 75: ...nt to ending point forward order You can also back track a trail or follow it in reverse order from ending point to starting point However this requires you to manually edit the route to change the point order To back track you begin with the same steps for navigating a trail for ward When you get to the Edit Route menu you must change the route order The following figures will guide you through t...

Страница 76: ...provides electronic charts covering the U S East and West coasts Hawaii Gulf coast Great Lakes Alaska the Bahamas Puerto Rico and the U S Virgin Islands NauticPath features depth contours intertidal zones and spot sound ings navigational aids with view range and coverage You can view extensive object oriented detail including list of lights tides and cur rents wrecks and obstructions marine servic...

Страница 77: ...f the map screen A screen appears with detailed information about the selected item Information for almost any on screen symbol can be accessed as long as you are able to highlight it with the cursor The Port Aransas Texas tide symbol in the left figure has been high lighted with the cursor In the right figure the Information button has been selected to view tidal information for that station The ...

Страница 78: ... Port Aransas Municipal Harbor marina symbol In the right figure the Information button has been selected to view information on the marina including available amenities Enhanced Lake Maps The Standard map data is based on our MapCreate series 7 software which covers all 50 states in the U S A The data includes land based topographic contour lines public hunting areas and depth contours for more t...

Страница 79: ...ion of the lake Each depth contour line is labeled with its actual depth With enhanced lake maps you can identify submerged structures such as rivers and creek channels ponds streams roads foundations rail roads pipelines oil and gas wells foundations bridges etc However the amount of detail varies from one lake to another All lakes do not have this enhanced detail Fishermen will appreciate that u...

Страница 80: ...wn Cursor has selected a contour line launching a pop up box showing the elevation Topographic contour lines are available when the Turn by Turn or Standard map data sets are selected To turn them on you must press the MENU key then press MENU 2 and select the CATEGORIES DRAWN but ton Scroll down the list and check ELEVATION to turn on topo line dis play You must turn on Elevation in Categories Dr...

Страница 81: ...75 Notes ...

Страница 82: ...76 Notes ...

Страница 83: ...d radiates radio frequency energy and if not installed and used in accordance with the instructions may cause harmful interference However there is no guarantee that inter ference will not occur If this equipment does cause interference to ra dio or television reception which can be determined by turning the equipment off and on the user is encouraged to correct the interference by one of the foll...

Страница 84: ...ique de la classe B respecte les exigences du Regle ment sur le material broilleur du Canada This device complies with Class B Limits of Industry Canada Opera tion is subject to the following two conditions 1 This device may not cause harmful interference and 2 This device must accept any interference received including inter ference that may cause undesired operation ...

Страница 85: ...cial purposes shall include use in your in ternal business operations Accordingly but subject to the restric tions set forth in the following paragraphs you may copy this Data only as necessary for your personal use to i view it and ii save it provided that you do not remove any copyright notices that appear and do not modify the Data in any way You agree not to otherwise reproduce copy modify dec...

Страница 86: ...OM THE USE OR POSSESSION OF THE IN FORMATION OR FOR ANY LOSS OF PROFIT REVENUE CONTRACTS OR SAVINGS OR ANY OTHER DIRECT INDI RECT INCIDENTAL SPECIAL OR CONSEQUENTIAL DAM AGES ARISING OUT OF YOUR USE OF OR INABILITY TO USE THIS INFORMATION ANY DEFECT IN THE INFORMATION OR THE BREACH OF THESE TERMS OR CONDITIONS WHETHER IN AN ACTION IN CONTRACT OR TORT OR BASED ON A WARRANTY EVEN IF LOWRANCE OR ITS ...

Страница 87: ...ommercial Items and NAVTEQ Data delivered or otherwise furnished with Limited Rights shall be marked with the Limited Rights Notice set forth at DFARS 252 227 7013 f 3 and shall be treated in accordance with such Notice and ii for civilian agency acquisitions the NAV TEQ Data is licensed in accordance with the rights set forth at FAR 52 227 14 g 1 Rights in Data General Protection of limited right...

Страница 88: ...82 Notes ...

Страница 89: ...MENT OR REFUND AS JUST DESCRIBED IS THE EXCLUSIVE REMEDY AVAILABLE TO YOU AGAINST US FOR ANY DEFECT MALFUNCTION OR NON CONFORMITY CONCERNING THE PRODUCT OR FOR ANY LOSS OR DAMAGE RESULTING FROM ANY OTHER CAUSE WHATSOEVER WE WILL NOT UNDER ANY CIRCUMSTANCES BE LIABLE TO ANYONE FOR ANY SPECIAL CONSEQUENTIAL INCIDENTAL OR OTHER INDIRECT DAMAGE OF ANY KIND Some states do not allow the exclusion or lim...

Страница 90: ...nge or end our ship ping policies regulations and special offers at any time We reserve the right to do so without notice in Canada If you re in Canada and you have technical return or repair questions please contact the Factory Customer Service Department Before any product can be returned you must call customer service to determine if a return is necessary Many times customer service can resolve...

Страница 91: ...s necessary to send a product for repair or replacement you must first receive a return authorization number from Customer Service Products shipped without a return authorization will not be accepted When shipping we recommend you do the following 1 Please do not ship the knobs or mounting bracket with your unit 2 If you are sending a check for repair please place your check in an envelope and tap...

Страница 92: ...Visit our web site Lowrance Pub 988 0160 191 Copyright 2007 All Rights Reserved Printed in USA 020807 Lowrance Electronics Inc ...

Отзывы: