Lorex LHV16212 Скачать руководство пользователя страница 141

Connecting to your System Using Smartphone or Tablet Apps

18

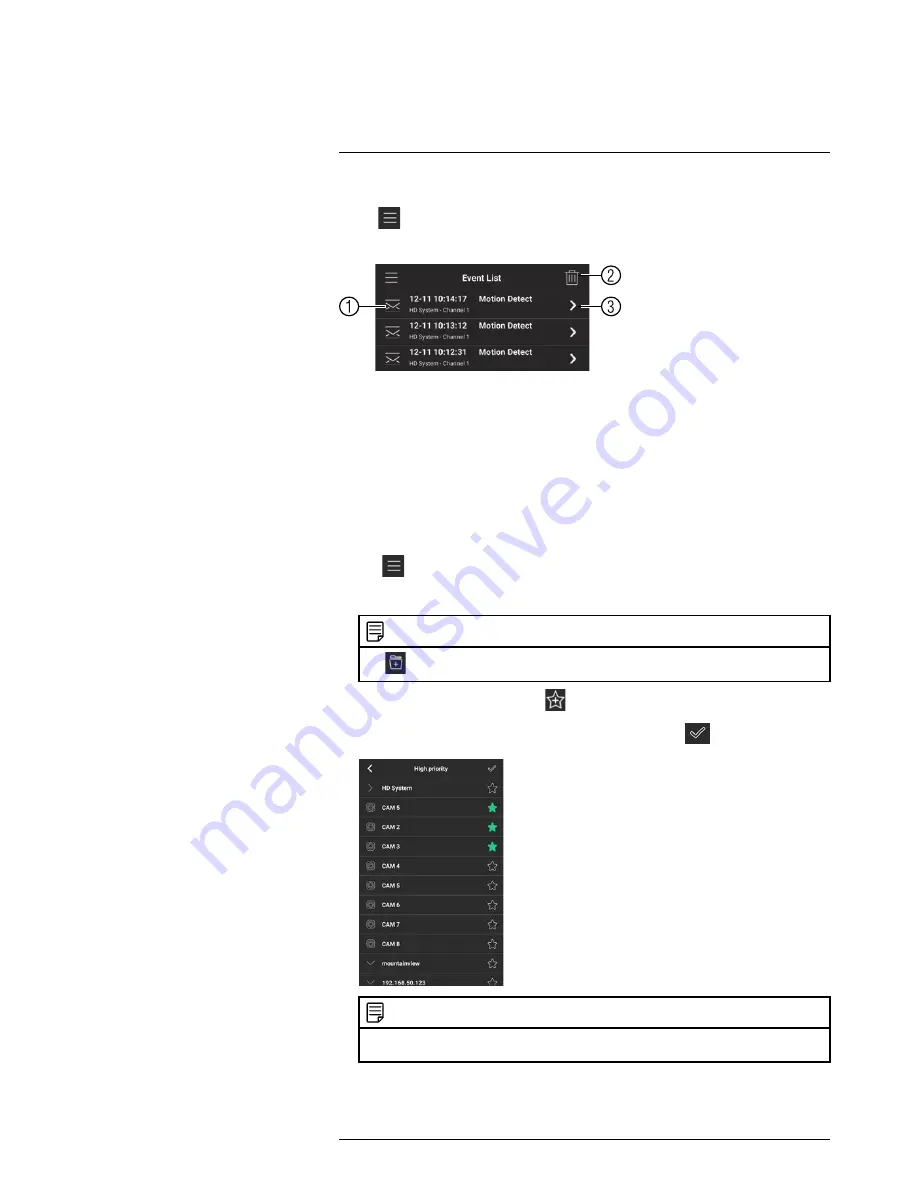
To access the Event List:

• Tap

to access the Menu, and then tap

Event List

.

Event List Overview

1.

Events

: Shows the details of each motion detection event. Long press an event to

delete just that event.

2.

Delete All

: Tap to delete all events in the Event List.

3.

View

: Tap to view the video or snapshot for the selected event.

18.3.9

Using Favorites

Favorites allows you to select a group of cameras as a favorite. You can then quickly
bring up the group of cameras in Live View without having to individually select each
camera.

To use Favorites:

1. Tap

to access the Menu, and then tap

Favorites

.

2. Tap a group to configure an existing group.

NOTE

Tap

to create a new group and then enter a name for the new group.

3. To add cameras to the group, tap

.

4. Select the cameras you would like to add to the group. Tap

to save changes.

NOTE

To delete cameras that have been added to the group, select the group in the group list. Then,
press and hold to delete cameras from the group.

To open Favorites in Live View:

#LX400060; r.30328/35049; en-US

131

Содержание LHV16212

Страница 1: ...Instruction Manual LHV2000 Series...

Страница 2: ......

Страница 3: ...Instruction Manual LHV2000 Series LX400060 r 30328 35049 en US iii...

Страница 4: ...EFER SERVICING TO QUALIFIED SERVICE PERSONNEL The lightning flash with arrowhead symbol within an equilateral triangle is intended to alert the user to the presence of uninsulated dangerous voltage wi...

Страница 5: ...g Cameras 13 6 11 1 Camera Compatibility 13 6 11 2 About Lorex MPX Cameras 13 6 11 3 Installing Cameras 13 6 11 4 Connecting Camera Extension Cables 14 6 11 5 Extension Cable Options 15 7 Mouse Contro...

Страница 6: ...5 2 3 Version 50 15 2 4 Alarm Status 50 15 2 5 Online Users 51 15 2 6 Load 51 15 2 7 Test 51 15 2 8 BPS 52 15 2 9 Log 52 15 3 Setting 53 15 3 1 Network 53 15 3 2 Selecting DHCP or Static IP Address TC...

Страница 7: ...3 17 5 Playback Controls 85 17 6 Downloading Video to your Computer Hard Drive 86 17 7 Alarm 86 17 8 Log 87 17 9 E map 88 17 10 Devices 90 17 11 Device Config 90 17 12 Alarm CFG 91 17 13 Tour Task 93...

Страница 8: ...r 134 18 3 12 Adding Devices Using an IP or DDNS Address Advanced 134 19 DDNS Setup Advanced 136 19 1 Accessing your System within a Local Network LAN 136 19 1 1 Step 1 of 3 Connect your System to You...

Страница 9: ...nnecting a Self powered Microphone 157 22 2 Step 2 of 2 Configuring Audio Recording 157 23 Troubleshooting 159 24 LHV2000 Series System Specifications 161 25 Notices 164 25 1 FCC IC Notice 164 25 2 Mo...

Страница 10: ......

Страница 11: ...nnected to this product should bear the UL listing mark or CSA certification mark on the accessory itself and should not be modified so as to defeat the safety features This will help avoid any potent...

Страница 12: ...tor or heat register This product should not be placed in a built in installation such as a bookcase or rack unless proper ventilation is pro vided and the product manufacturer s instructions have bee...

Страница 13: ...product manufacturer can pre vent fire electric shock or other hazards 4 Safety Check Upon completion of any service or repairs to this product ask the service technician to perform safety checks reco...

Страница 14: ...TE 1 Compatible with Lorex 1080p MPX 720p HD cameras or analog security cameras For a list of compatible cameras please visit www lorextechnology com support 2 Recording time may vary based on recordi...

Страница 15: ...ot be exactly as shown USB mouse Ethernet cable HDMI cable Quick start guides Hard drive size number of channels and camera configuration may vary by model Please refer to your package for specific de...

Страница 16: ...confirm menu options Directional buttons Press to move cursor in menus In live view press up to change split screen layout press left right to select channels when single chan nel mode is selected 5 U...

Страница 17: ...forms special functions in some menus 6 ESC In menus press to go back exit menus In playback press to return to live view 7 Directional buttons From live view press once to open the System Information...

Страница 18: ...ils NOTE Lorex 1080p MPX and 720p wired HD PTZ cameras can accept commands directly via the video cable 6 HDMI Connect to an HDMI monitor or TV not included to view the system interface 7 LAN Connect...

Страница 19: ...5 USB port s Connect a USB mouse included or USB flash drive not included for data backup or firmware updates 6 VGA Connect a VGA monitor not included to view the system interface 7 HDMI Connect to an...

Страница 20: ...nd twist the BNC connector clockwise to secure it to the BNC port 6 2 Step 2 Connect the Mouse Connect a USB mouse included to one of the USB ports 6 3 Step 3 Connect the Ethernet Cable Connect an Eth...

Страница 21: ...you will be asked to install it once the system starts up It is required to upgrade your system firmware and client software or mobile apps to the latest version to enable remote connection to the sy...

Страница 22: ...ssword Username admin Password 000000 Default ports for DDNS remote access Port 80 HTTP port Port 35000 Client port 6 9 1 FLIR Cloud This system features the exclusive FLIR Cloud This is a cloud servi...

Страница 23: ...efore permanent installation Plan where you will route the wiring for the camera and where you will aim the camera Mount the camera where the lens is away from direct and intense sunlight Plan your ca...

Страница 24: ...ten sion Cable Options page 15 1 Connect the male power connector on the BNC extension cable to the female power connector on the camera Connect the BNC connector to the camera 2 Connect the female po...

Страница 25: ...Lorex model MCBL 60BNCU BNC Cable 60ft 18m 2 RG59 or Coax or Coaxial BNC Siamese Video and Power 300ft 92m 3 RG59 or Coax or Coaxial BNC Video Only 800ft 242m CAUTION The extension cable must be a sin...

Страница 26: ...In live view while in a split screen display mode double click an individual chan nel to view it in full screen Double click again to return to the split screen display mode While navigating menus cli...

Страница 27: ...the System Information screen press twice to open the Navigation Bar Press to confirm menu selections Press to move the menu cursor Press to change menu options 5 Mult Press to switch between full scr...

Страница 28: ...like to assign to the remote control 4 Click OK 5 Using the remote control press Add Then enter the address number and press Enter NOTE When entering the address number using the remote make sure tha...

Страница 29: ...n Right click to open the Quick Menu Left click to open the Navigation Bar Move the mouse to the top of a channel to view the Camera Toolbar Click and drag cameras to rearrange the channel display Thi...

Страница 30: ...ence mode is on Click the icon to pause sequence mode on the channel that is currently shown icon changes to Click again to resume sequence mode Right click and select Sequence to return to normal vie...

Страница 31: ...See 17 4 Playback page 83 8 Alarm Status View alarms in progress See 15 2 4 Alarm Status page 50 9 Channel Info Click to access status information about connected cameras 10 Network Configure network...

Страница 32: ...ayback 9 5 2 Using Digital Zoom in Live Display 1 Move your mouse to the top of the channel display and click to activate digital zoom A check mark will appear in the icon to indicate digital zoom is...

Страница 33: ...f the system prompts you to log in you will need to click again to start Real time Backup after logging in 9 6 Using the Virtual Keyboard The Virtual Keyboard is used to input text or numeric values i...

Страница 34: ...Daylight Savings Time updates NOTE You can adjust the Start Time and End Time for Daylights Savings Time if the default settings do not match your region Under DST Type select Day of Week to set the s...

Страница 35: ...ub Stream recording must be enabled to view video recordings on a com puter or mobile device You can configure the video quality parameters for the Main Stream or Sub Stream For details see 15 1 2 Con...

Страница 36: ...hanges 11 4 Configuring Hard Drive Overwrite When the hard drive is full the system will overwrite the oldest recordings by default This is recommended as it makes sure that your system will continue...

Страница 37: ...efault admin and password default 000000 3 Configure the following 3 1 Use the calendar on the right to select the day to playback 3 2 Use the drop down menus to select the channels you would like to...

Страница 38: ...hide recording types 9 Speed up 10 Slow 11 Previous next frame 12 Play backward 13 Stop 14 Play 12 3 Playing Back from a USB Drive If you have video files saved to a USB thumb drive not included or e...

Страница 39: ...zones of your video stream Select the areas that interest you and Smart Search plays your recording from the time when your camera detects motion in those areas To set up smart search 1 In the multipl...

Страница 40: ...Search Playback 12 4 Click to start the Smart Search playback To stop the Smart Search playback click again LX400060 r 30328 35049 en US 30...

Страница 41: ...ive It is recommended to format your USB thumb drive not included before using it with the system CAUTION Formatting the USB device will permanently erase all data To format a USB device 1 Insert a US...

Страница 42: ...hannels File Format Select DAV to save files to dav format You can playback dav files using the Lorex video player software To find the video player visit www lorextechnology com search for the model...

Страница 43: ...ce not included To use Video Clip Backup 1 Insert a USB flash drive not included or USB external hard drive not included into one of the USB ports 2 Start playing back video using the steps in 12 1 Pl...

Страница 44: ...product click on your product in the search results and click on the Downloads tab To view backup video files using the Player on PC 1 Download and install the Video Player for PC from www lorextechno...

Страница 45: ...frame Playback speed Volume control 5 Zoom Timeline 6 Add Files Click to open back up video files 7 Digital Zoom Click to activate digital zoom mode Click and drag in the video to zoom in Right click...

Страница 46: ...ds tab To view backup video files using the Player on Mac 1 Download Video Player for Mac from www lorextechnology com 2 Double click the downloaded file in Safari to extract the Smart Player app file...

Страница 47: ...m the video file Close the video file 3 Hide show file list 4 Playback controls When a video file ends this button lets you select if you want the video player to repeat the same file or play the next...

Страница 48: ...iguration menu for the player From here you can con trol the default file formats and save locations for snapshots and control the aspect ratio 9 About Click to see version information for the Player...

Страница 49: ...nt is a limited user account that may only view live video from the cameras For security reasons it is essential that you change the password on your system By default the system password is enabled 1...

Страница 50: ...assword Enter a 6 character password for the user account Enter the pass word again under Confirm Password Memo optional Enter a description of the user account Group Select the group you would like t...

Страница 51: ...d from the system 14 5 Account Groups Account groups can be used to easily manage permissions for multiple user accounts User accounts can be given all the permissions of a group but cannot be given p...

Страница 52: ...oup will have User accounts assigned to this group can not be given any permissions the group does not have 7 Click OK to save changes 14 7 Modifying Groups 1 In the Group tab click next to the group...

Страница 53: ...Managing Passwords and User Accounts 14 2 Click OK to confirm NOTE The admin and user groups cannot be deleted from the system LX400060 r 30328 35049 en US 43...

Страница 54: ...ystem schedule network recording display and mo tion settings Restore system to factory defaults 6 SHUTDOWN Logout restart or shutdown the system 15 1 Camera The Camera menu allows you to configure im...

Страница 55: ...devices over the Internet You can customize the video quality settings for these streams according to your needs To configure recording quality 1 From the Main Menu click and select Recording Recordin...

Страница 56: ...352x576 PAL 2CIF 704x240 NTSC 704x288 PAL and CIF 352x240 NTSC 352x288 PAL Available resolutions for the Sub Stream are D1 704x480 NTSC 704x576 PAL CIF 352x240 NTSC 352x288 PAL and QCIF 176x120 NTSC...

Страница 57: ...will take when the snapshot button is pressed 3 Configure the following settings for snapshots saved automatically from motion de tection or the snapshot schedule Channel Select the channel you would...

Страница 58: ...uld work well for almost all types of installations This menus should only be used to troubleshoot issues with picture quality caused by ca bling with a resistance higher than 10 per 100m 330ft Select...

Страница 59: ...nu shows information related to the hard drives installed in the sys tem including capacity status and type To access the HDD Info menu From the Main Menu click and then click Info 15 2 2 Record Info...

Страница 60: ...info is shown such as channels that are currently detect ing motion The following alarms are shown in the Alarm Status menu No HDD No hard drive is detected Disk Error Hard drive error detected Disk...

Страница 61: ...ork 15 2 6 Load The Load menu shows you the network traffic your system is sending and receiving To access Load From the Main Menu click and then select Network Load 15 2 7 Test The Test menu allows y...

Страница 62: ...PS From the Main Menu click and then select BPS 15 2 9 Log The Log sub menu allows you to search for system logs To search for system logs 1 From the Main Menu click and then select Log 2 Under Type s...

Страница 63: ...y obtain an IP address from the router or Static to assign a static IP address If you select Static configure the following IP Address Enter the IP address you would like to assign to the system Make...

Страница 64: ...DDNS Setup Advanced page 136 for details The primary connectivity option uses FLIR Cloud to connect to your system over the Internet without requiring port forwarding or DDNS registration For details...

Страница 65: ...motion detection alerts you must enable the Send Email option for motion detection on each camera you would to receive alerts from For details see 15 3 7 Configuring Motion Detection page 56 To config...

Страница 66: ...he email address that will receive alerts Sender Enter the sender s email address Subject Enter the subject line for the email alert Attachment Check to include a jpg image attachment of the camera NO...

Страница 67: ...rom the Main Menu click and then click Event Motion Motion Detect 2 Under Channel select the channel you would like to configure 3 Check Enable to enable motion detection on the selected channel LX400...

Страница 68: ...ger an event If the amount of motion exceeds the threshold an event occurs It is recommended to select a Threshold between 10 50 Right click when finished 5 Under Anti dither enter the anti dither tim...

Страница 69: ...nd specify the preset point each one will move to Record Channel Select the channels that will record when motion is detected on the selected channel Buzzer Check to enable the system buzzer Snapshot...

Страница 70: ...ccurs You can then select which channels will save snapshots when video loss occurs on the currently selected channel Buzzer Check to enable the system buzzer when video loss occurs on the cur rently...

Страница 71: ...ing Email Alerts page 55 Buzzer Check to activate the system buzzer Record Channel If Net Disconnect is selected you can set the system to trigger recording after it loses connection to the network Ch...

Страница 72: ...ll days The icon for a day changes to when days are linked You can also click the boxes next to individual days to link them to each other If the recording schedule is linked changes made to one of th...

Страница 73: ...select All 3 Configure the schedule as needed Check Continuous or MD motion detection to select the recording type you would like to configure Click and drag on each day to customize the recording sch...

Страница 74: ...r the holiday to be repeated each year Holiday Range Select Date to select a specific date or select Week to select holidays based on which week they fall on 4 Click Add Now that you have added a holi...

Страница 75: ...om this hard drive but it will not re cord to it To set the hard drive type 1 From the Main Menu click and then click Storage HDD Manager 2 Click the hard drive you would like to configure 3 Under Typ...

Страница 76: ...etails on installing hard drives see 20 LHV2000 Series Hard Drive Installation page 146 To set up hard drive mirroring 1 From the Main Menu click and then click Storage HDD Manager 2 Click the Type dr...

Страница 77: ...NTSC North America or PAL Europe HDD Full Select Overwrite for the system to overwrite the oldest recordings when the hard drive is full or select Stop Record for the system to stop recording when the...

Страница 78: ...configure other display settings 1 From the Main Menu click and then click Setting Display Display 2 Configure the following Transparency Select the menu transparency Time Display Check to show the ti...

Страница 79: ...tion 1 Insert a USB flash drive not included with a saved system configuration into one of the USB ports 2 From the Main Menu click and then click Setting Config Backup 3 Under Device Name select the...

Страница 80: ...d on a model s product page or provided by customer support via email To upgrade firmware from a USB drive 1 Download the firmware upgrade from www lorextechnology com if available or re quest it from...

Страница 81: ...access the Shutdown menu 1 From live view right click and select Main Menu 2 Enter the system User Name default admin and Password default 000000 and click OK 3 Click Shutdown 4 Select one of the foll...

Страница 82: ...ww lorextechnology com support 16 1 System Requirements Your system must meet the system requirements below Description Requirement CPU Core 2 Duo 3 0GHz Operating System Windows 8 7 Vista Mac OSX 10...

Страница 83: ...to upgrade your system to the latest firmware version You must have the latest firm ware and client software to connect to the system over the Internet To connect to the system over the Internet 1 Dow...

Страница 84: ...Log into the Client Software using the Client Software user name default admin and password default admin and then click Login 4 Click Add Device 5 Enter the following 5 1 Device Name Choose a name f...

Страница 85: ...5 4 User Name Enter the system User Name default admin 5 5 Password Enter the system Password default 000000 6 Click Add If this is the first time you are connecting you will be prompted to change the...

Страница 86: ...ernet on PC or Mac 16 9 Click and drag Default Group to the display window to open your cameras in live view Congratulations You can now connect over the Internet to view and playback video on your co...

Страница 87: ...a tab from the Home Page to open it or click the button at the top of the screen from within any tab to open a new tab 17 2 Live View The Live View tab is where you can view live video from connected...

Страница 88: ...ecently recorded video from the camera By default it will play back the last 5 minutes of recorded video from the camera 1 7 Digital zoom Click to enable digital zoom mode Click and drag over the dis...

Страница 89: ...ras and systems connected to the client Drag items to the display area to open live video Right click to view additional options 17 2 2 Opening Live View in Multiple Monitors If your computer has mult...

Страница 90: ...g PTZ Cameras If you have PTZ cameras not included you can control them using the client NOTE You must ensure the PTZ camera is properly connected to your system and your system is configured to detec...

Страница 91: ...iris 6 Advanced Click to access advanced PTZ controls 17 3 1 PTZ Presets Presets will save a camera position for quick retrieval To add presets 1 Click to open the Advanced controls Select Preset 2 Cl...

Страница 92: ...r the time in seconds the camera will remain on the selected preset Operation Click to add a preset to the tour Click to delete a preset from the tour 6 Click OK to save changes To run a PTZ tour 1 Se...

Страница 93: ...lick to open the Advanced controls Select Scan 2 Move the camera to the desired left position and click 3 Move the camera to the desired right position and click To run scan mode 1 Click 17 3 5 PTZ Pa...

Страница 94: ...r system must support alarm devices not included to use this feature 3 Under Stream select Main Stream to search for Main Stream recordings high qual ity or Sub Stream to search for Sub Stream recordi...

Страница 95: ...the slider to adjust the playback speed 9 Mute 10 Volume 11 Split screen Select split screen configuration 12 Full screen Click to open playback in full screen Press ESC to exit full screen 13 Timeli...

Страница 96: ...nt folder File Format Select Original Format to save to dav format requires the video player Select AVI to save files to avi format can be played in VLC Media Player NOTE The Mac version only supports...

Страница 97: ...ck to enable the following Display Link Video Open live video to monitor alarms on a continuous basis Display Overlay Window Show the overlay controls They allow you to enable disable sound alerts and...

Страница 98: ...Configure the following Start Time End Time Select the start and end times to search for logs Log Type Select the type of logs to search for Device Name Select the system you would like to view logs...

Страница 99: ...File and then select a png bmp or jpg image on your computer to use as the e map Describe optional Enter a text description of the e map 4 Click Save 5 Click Edit to edit the e map 6 Click and drag c...

Страница 100: ...re 4 Device list Shows a list of systems connected to the client software and shows which systems are online 5 Add Device Add a remote system using a Device ID or IP DDNS address 6 Delete Delete the s...

Страница 101: ...available depend on the model of system you have 17 12 Alarm CFG The Alarm CFG menu allows you to configure alarms for the client software The client software will alert you by popping up live video a...

Страница 102: ...you set up the responses to alarms Select the channels that will pop up or alarm out devices not included not all systems support alarm out devi ces that will be triggered by an alarm For each channel...

Страница 103: ...On off Click to enable disable alarm 7 Delete Click to delete alarm 8 Edit Click to edit alarm settings 17 13 Tour Task The Tour Task menu is where you can set up custom views for the system You can a...

Страница 104: ...7 14 Account The Account menu is where you can set up user accounts and passwords for the client software To simplify management you can group user accounts according to role A role determines the per...

Страница 105: ...account User Rights Check the permissions that will apply to the user account If you click on LiveView Playback and PTZ you can select which channels the user ac count can access in the Channel List s...

Страница 106: ...a text description of the role Role Rights Check the permissions that will apply to user accounts assigned this role If you click on LiveView Playback and PTZ you can select which channels may be acce...

Страница 107: ...to the last view that you had open Auto login application Check for the client to automatically login when it starts up without entering a user name or password Auto Login Windows Not supported Langu...

Страница 108: ...s Open Audio Check to enable audio alerts Loop Check to repeat audio alerts until acknowledged Camera Masking Select or preview the sound that will play for camera masking alarms Motion Detect Select...

Страница 109: ...nt for PC or Mac 17 the client software visit www lorextechnology com search for the model number of your product click on your product in the search results and click on the Downloads tab LX400060 r...

Страница 110: ...have the latest firmware and mobile apps to connect to the system over the Internet NOTE For the latest list of supported apps and devices visit www lorextechnology com support NOTE The app will ask...

Страница 111: ...new 6 character password and tap OK This password will be used to log on to your system from now on 8 The app opens in Live View and streams video from your cameras 18 1 3 Live View Interface You can...

Страница 112: ...Tap to start stop manual recording 8 Access Favorites 9 Connect disconnect all Connect to disconnect from all previously added cameras 10 Device List Tap to open a list of devices You can use the Dev...

Страница 113: ...cal Files Tap to access the Menu and then tap Local Files Local Files Overview 1 Menu Return to Menu 2 Files Tap to open files 3 File Type Tap the options to select video files or snapshots 4 Options...

Страница 114: ...file 4 5 Next Select next video file 4 6 Snapshot Tap to take a snapshot from the selected camera 4 7 Stop All Stop playback on all channels 4 8 Not supported 4 9 Manual Record Tap to start stop recor...

Страница 115: ...a snapshot attachment from the camera that de tected motion NOTE Your cameras must have motion detection activated to receive push notifications To enable Push Notifications 1 Tap to access the Menu a...

Страница 116: ...will now receive a notification when one of the selected cameras detect motion 18 1 8 Using the Event List The Event List menu shows a list of events that were sent to your device via push notificati...

Страница 117: ...View Tap to view the video or snapshot for the selected event 18 1 9 Using Favorites Favorites allows you to select a group of cameras as a favorite You can then quickly bring up the group of cameras...

Страница 118: ...en swipe left and tap Delete To open Favorites in Live View 1 Tap to access the Menu and then tap Live View 2 Tap and then tap to open the group 18 1 10 Using the E Map E Map allows you to place camer...

Страница 119: ...pg image on your mobile device 4 Press and select a camera Drag the camera on the screen to place it on the map Repeat to add additional cameras 5 Click Choose a name for your E Map and then tap OK To...

Страница 120: ...e Manager You can use Device List to add delete or edit your systems To access Device Manager Tap to access the Menu and then tap Device Manager To edit a system 1 Tap the system in Device Manager Tap...

Страница 121: ...to use with your system For more information on port forwarding and DDNS visit www lorextechnology com support To add a device using an IP or DDNS address 1 Tap then 2 Configure the following 2 1 Tap...

Страница 122: ...list of supported apps and devices visit www lorextechnology com support NOTE The app will ask for permission to send push notifications and to access Photos It will only send no tifications if you en...

Страница 123: ...User Name Enter the system s User Name default admin 6 5 Password Enter the system s Password default 000000 6 6 Channel Amount Enter the number of channels your system has 7 Tap Start Live View You...

Страница 124: ...y selected channel NOTE You can view or share snapshots using the Photos app 6 Change display view 7 Not supported 8 Manual record Tap to start stop manual recording from this channel 9 Not supported...

Страница 125: ...and EPTZ mode Use PTZ mode to control PTZ cameras Use EPTZ mode to activate digital zoom mode on non PTZ cameras 7 Goto preset Tap to goto a camera preset NOTE You must set presets for the camera usin...

Страница 126: ...se the playback controls Playback Controls 1 Display area Double tap to open camera in full screen 2 Play pause 3 Previous file 4 Disconnect Disconnect from the currently selected camera 5 Not support...

Страница 127: ...2 Tap Local Files 3 Tap a video file to open it To delete videos 1 Tap Edit 2 Select the videos you would like to delete and tap 18 2 7 Enabling Push Notifications You can have the app send push noti...

Страница 128: ...s 18 NOTE Your cameras must have motion detection activated to receive push notifications To enable Push Notifications 1 From live view tap then 2 Tap Push Config 3 Tap the slider for the system you w...

Страница 129: ...selected cameras detect motion you will re ceive a notification 18 2 8 Using the Event List The Event List menu shows a list of events that were sent to your device via push notifications NOTE You mu...

Страница 130: ...h favorites To edit favorites 1 From live view tap then 2 Tap Favorites 3 Tap the favorite you would like to edit 4 Tap Edit 5 Select the cameras you would like to include in the favorite and then tap...

Страница 131: ...ect Image Select a different image file to use for your E Map 4 2 Add Camera Tap to select cameras to add to your E Map Then drag the camera to place it on the E Map 4 3 Delete E Map 5 When you are fi...

Страница 132: ...lect the E Map 2 Tap a camera from the E map to open 18 2 11 Using the Device Manager Device Manager allows you to manage your systems To access Device Manager 1 From live view tap then 2 Tap Device M...

Страница 133: ...loud Prerequisites The device you are connecting to must be connected to the Internet You must port forward the HTTP Port default 80 and Client port default 35000 on your router to the device s local...

Страница 134: ...rt Enter the Client Port default 35000 6 5 User Name Enter the system s User Name default admin 6 6 Password Enter the system s Password default 000000 6 7 Channel Amount Enter the number of channels...

Страница 135: ...Connecting to your System on Android 1 Download FLIR Cloud for free from the Google Play Store 2 Tap on the FLIR Cloud icon to start the app 3 Tap Sign up and enter your email address and password to...

Страница 136: ...rea Double tap to open a channel in full screen Swipe left or right to se lect a different page of channels 3 Pages Shows the number of pages available and highlights the currently selected page 4 Spl...

Страница 137: ...PTZ cameras not included you can control them from the app To control PTZ cameras 1 Tap the display area the PTZ camera is connected to 2 Tap to open PTZ controls PTZ Controls 1 Live Display Swipe to...

Страница 138: ...apshot mp4 which you can ac cess by connecting your Android device to a computer using a USB cable 18 3 6 Using Playback Mode on Android You can access recorded video on your system using your Android...

Страница 139: ...7 Stop All Stop playback on all channels 4 8 Not supported 4 9 Manual Record Tap to start stop recording to your mobile device s local storage 4 10 Fast 4 11 Slow 4 12 Time Range Tap to change the ra...

Страница 140: ...ld like to receive push noti fications from 4 Under Push type select Video to attach a video clip to each push notification Or select Image to attach an image to each push notification 5 Tap to save c...

Страница 141: ...of cameras as a favorite You can then quickly bring up the group of cameras in Live View without having to individually select each camera To use Favorites 1 Tap to access the Menu and then tap Favori...

Страница 142: ...roup 18 3 10 Using the E Map E Map allows you to place cameras over a still image For example you can use the E Map to create a virtual map of your cameras over a floor plan of your home or business T...

Страница 143: ...creen to place it on the map Repeat to add additional cameras 5 Click Choose a name for your E Map and then tap OK To open cameras from an E Map 1 Tap in Live View 2 Select the E Map in the Device Lis...

Страница 144: ...Address Advanced The app can connect directly to a device via the IP address or DDNS address as an op tional advanced connectivity method or for systems that do not support FLIR Cloud Prerequisites T...

Страница 145: ...ent Port Enter the Client Port default 35000 2 5 Username Enter the system s User Name default admin 2 6 Password Enter the system s Password default 000000 3 Tap Connect You will be prompted to chang...

Страница 146: ...can connect to your system through using the Client Software through the local area network LAN It is recommended to confirm connectivity over a local network before setting up your system for DDNS c...

Страница 147: ...ss 1 Download and install the client software To find the client software visit www lorextechnology com search for the model number of your product click on your product in the search results and clic...

Страница 148: ...the password for your system default 000000 and click OK 6 If this is the first time you are connecting you will be prompted to change the system password 7 Enter a new 6 character password and click...

Страница 149: ...1 of 4 Port Forwarding You must port forward the HTTP port default 80 and Client port default 35000 on your router to your system s IP address before you can remotely connect to your system There are...

Страница 150: ...Lorex DDNS account 1 In your browser go to http www lorexddns net and click Step 1 2 The My Lorex account login screen opens if you are already logged in skip to step 4 Create a new account or log in...

Страница 151: ...warranty registration form with your product and purchase details Check the sticker underneath your system for the Product Model Number and Serial Num ber You can also upload a scan photo or electroni...

Страница 152: ...name default admin and password default 000000 8 4 URL Request Enter the web site address that will be used to connect to your Lorex product For example if you enter tomsmith the address to access you...

Страница 153: ...S address before at tempting to connect To connect using the system s DDNS address 1 Download and install the client software on a remote computer To find the client soft ware visit www lorextechnolog...

Страница 154: ...ess Enter the Domain Name URL Request you received in the email when you registered for DDNS followed by lorexddns net NOTE For example if your Domain Name URL Request is tomsmith enter tomsmith lorex...

Страница 155: ...a new 6 character password and click OK This password will be used to con nect to your system from now on 8 Click then 9 Click and drag Default Group to the display window to open your cameras in liv...

Страница 156: ...t the system is OFF and the power adapter is disconnected before removing installing the hard drive To install the hard drive 1 Insert hard drive screws 4x on the hard drive and tighten them half way...

Страница 157: ...ce the cover and cover screws 6x NOTE After installation you must format the hard drive in order to use it with the system See 20 3 Format ting Hard Drives page 151 20 1 2 LHV2216 CAUTION Make sure th...

Страница 158: ...n slide the hard drive into place The SATA connectors on the hard drive should face the center of the unit 5 Turn the system over carefully Tighten the hard drive screws 4x to secure the hard drive CA...

Страница 159: ...OFF and ALL power adapters have been disconnected before removing installing the hard drive 1 Power off the system and unplug all cabling from the system 2 Remove the rear panel screws 4x and side pan...

Страница 160: ...2216 CAUTION Make sure that the system is OFF and ALL power adapters have been disconnected before removing installing the hard drive 1 Power off the system and unplug all cabling from the system 2 Re...

Страница 161: ...Formatting Hard Drives You must format hard drives before you may use them with the system CAUTION Formatting the HDD erases all data on the hard disk This step cannot be undone System settings will n...

Страница 162: ...have an 1080p MPX or 720p HD PTZ camera it will automatically be detected and can be controlled by the DVR If have an analog PTZ camera connect the RS485 wires for analog PTZ cameras to the AB ports...

Страница 163: ...camera s address Baud Rate Enter the baud rate for your PTZ camera Data Bits Enter your PTZ camera s data bit setting Stop Bit Enter your PTZ camera s stop bit setting Parity Enter your PTZ camera s...

Страница 164: ...used to save camera positions and cycle through various positions and automate camera actions To open advanced PTZ controls Click the arrow in the PTZ control window to open advanced controls Advanced...

Страница 165: ...position and click Set To go to a preset Under No select the number of the preset you would like to go to and click 21 2 2 Tours Tours will cycle through a set of presets To create a tour 1 Click to...

Страница 166: ...k Begin 5 Move the camera into the desired end position and click End To run a pattern Under No select the number of the pattern you would like to go to and click 21 2 4 Auto Scan An auto scan automat...

Страница 167: ...e camera that will be near the microphone to channel 1 2 Connect the microphone to the Audio IN RCA port on the system 3 Connect a speaker to the Audio OUT RCA port on the system If you are using an H...

Страница 168: ...the channel where the audio capable camera is connected 4 Under Audio Video check the box on the left to enable audio recording 5 Under Audio Format select the format that will be used to record audio...

Страница 169: ...power at the outlet Connect the power cable to another outlet Test the outlet with anoth er device such as a lamp or phone charger Hard drive is not detected by the system Hard drive cables are loose...

Страница 170: ...video ca ble and connections Disconnect and reconnect the cable at the system and at the camera Try moving the camera to an other channel or use another cable The system beeps at startup The beep at s...

Страница 171: ...ch 120 NTSC 100 PAL 8 ch 240 NTSC 200 PAL 16 ch 480 NTSC 400 PAL OSD ON OFF System Navigation USB mouse IR remote controller front panel Motion Area Setting Adjustable grid 22x18 Sensitivity Levels 1...

Страница 172: ...udio Play Yes Storage Archive Storage LHV2104 LHV2108 LHV2116 Up to 1 HDD s SATA LHV2216 Up to 2 HDD s SATA Maximum Capacity LHV2104 LHV2108 LHV2116 Up to 1x4TB LHV2216 Up to 2x4TB Backup Media USB fl...

Страница 173: ...1 5kg LHV2216 3 9lbs 1 8kg Operating Temperature 32 104 F 0 40 C Humidity 10 90 RH Recording Resolution Pixels Speed FPS Frames per second Model FPS NTSC PAL 720p 1280x720 1080p 1920x1080 LHV2104 Tot...

Страница 174: ...rference to radio or television reception which can be determined by turning the equipment on and off the user is encouraged to try to correct the interference by one or more of the following measures...

Страница 175: ......

Страница 176: ...istered trademarks or trademarks of Lorex Corporation and or its subsidiaries All other trademarks trade names or company names referenced herein are used for identification only and are the property...

Отзывы: