background image


Finalizing the Installation


(for qualified installers only)


23 

© Travis Industries 

6/27/2019 - 1500 

864 31K CF Aust


Vent Requirements 

  The gas appliance and vent system must be vented directly to the outside of the building, and never 

be attached to a chimney serving a separate solid fuel or gas-burning appliance.  Each direct vent 
gas appliance must use its own separate vent system.   

  In addition to the requirements listed here, follow the requirements provided with the vent. 

  The flow of combustion and ventilation air must not be obstructed. 

  A firestop is required whenever the vent penetrates a wall, floor, or ceiling (passes through framing 

members).  Horizontal vent less than 48" (1219mm) above the fireplace must use the Travis Firestop 
(sku 93006094 - it incorporates a 3" (76mm) clearance above, 1" (25mm) clearance below and to the 
sides of the vent).  Other penetrations only require a 1" (25mm) clearance and may use a standard 
firestop (make sure the required 1" (25mm) clearance is met). 

Drafting Performance 

This direct vent appliance requires natural draft to operate (similar to a wood stove or other heating appliance).  Draft 
can be adjusted using the included restrictor.  The restrictor settings detailed in the manual should be followed 
(variations may occur depending upon installation parameters). 


Many factors may negatively influence the draft of the appliance.  Travis Industries will not be responsible for improper 
draft due to factors such as trees, hills, buildings, obstructions, excessive wind, extreme hot or cold outdoor 
temperatures, restrictive vent terminations, or influence from mechanical systems. 

Vent Clearances  

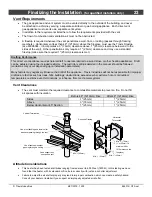
  The vent must maintain the required clearance to combustible materials to prevent a fire.  Do not fill 

air spaces with insulation. 


Before 48" (1219mm) Rise 

After 48" (1219mm) Rise 

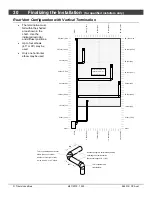
Sides 

1" (25mm) 

1" (25mm) 

Above 

3" (76mm) 

1" (25mm) 

Below Horizontal or 45° Section 

1" (25mm) 

1" (25mm) 


Altitude Considerations  


This heater has been tested at altitudes ranging from sea level to 6,000 feet (1800 M). In this testing we have 
found that the heater, with its standard orifice, burns correctly with just an air shutter adjustment. 


Failure to adjust the air shutter properly may lead to improper combustion which can create a safety hazard. 
Consult your dealer or installer if you suspect an improperly adjusted air shutter. 

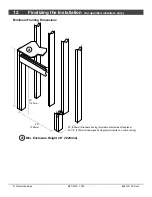
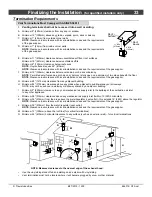
Horizontal 

Termination

Required Firestop

Min. 3" (76mm)

(1" or 25mm if a 

minimum 48"or 

1219mm above the 

fireplace)

Min. 1" (25mm)

Min. 1" (25mm)

Use a firestop whenever 

passing through a ceiling

Vertical Termination 

Use a roof flashing and storm collar 

whenever passing through the roof

Min. 1"(25mm)

Use a support box 

on exposed vent

Содержание 864 TRV 31K CleanFace

Страница 1: ...U SMELL GAS Do not try to light any appliance Do not touch any electrical switch do not use any phone in your building Immediately call gas supplier from a neighbor s phone Follow the gas supplier s instructions If you cannot reach your gas supplier call the fire department Installation and service must be performed by a qualified installer service agency or the gas supplier This appliance may be ...

Страница 2: ...is Industries 6 27 2019 1500 864 31K CF Aust Overview This manual details the installation requirements for the 864 TRV 31K GSR2 fireplace For operating and maintenance instructions refer to the 864 TRV 31K Owner s Manual ...

Страница 3: ...ictor Adjustment 25 Intake Restrictor Adjustment 26 Diffuser Plate Adjustment 27 Rear Vent Configuration with Horizontal Termination no vertical rise 28 Rear Vent Configuration with Horizontal Termination with vertical rise 29 Rear Vent Configuration with Vertical Termination 30 Top Vent Configuration with Horizontal Termination 31 Top Vent Configuration with Vertical Termination 32 Termination Re...

Страница 4: ...ay be installed in Manufactured Housing only after the home is site located All exhaust gases must be vented outside the structure of the living area Combustion air is drawn from outside the living area structure The venting must not be connected to a chimney flue serving a separate solid fuel burning appliance Notify your insurance company before hooking up this fireplace The instructions in this...

Страница 5: ...nce and shall be installed for the protection of children and other at risk individuals If the barrier becomes damaged the barrier shall be replaced with the manufacturer s barrier for this appliance Clothing or other flammable material should not be placed on or near the appliance Any safety screen guard or barrier removed for servicing an appliance must be replaced prior to operating the applian...

Страница 6: ...floor plan insulation and outside temperature Efficiency rating is a product thermal efficiency rating determined under continuous operation independent of installed system Dimensions 38 1 4 972mm 42 3 4 1086mm 28 3 4 731mm 7 1 4 184mm Optional CoolSmart TV or Power Heat Duct Connection 22 559mm Left a gauche Front avant Right droit Rear arrie re Baseplate The bottom of the face is 1 8 4mm above t...

Страница 7: ...ng Brackets on page 16 for details Secure the fireplace to the framing Install the vent gas line and electrical hook up Install the drywall Install the hearth if applicable Install the facing if applicable Install the mantel if applicable Finalize the installation see page 38 See the section Approved Vent Configurations See the section Electrical Connection See the section Mantel Requirements Insu...

Страница 8: ... correct prior to installation You may wish to configure the diffuser when changing the vent configuration Remove the 12 screws securing the flue assembly NOTE Use a magnetic tipped nutdriver on these screws take care to prevent the screws from falling into the fireplace Rotate the flue assembly so the flue points to the rear Secure using the twelve screws removed earlier DO NOT OVER TIGHTEN THE S...

Страница 9: ...ve the exhaust manifold The insulation must be placed so it covers the entire area over the flue assembly Attach the intake cover plate to the top of the fireplace using the screws removed earlier Bend the heat shield legs downward as shown Remove the screws from the top of the fireplace Attach the heat shield to the top of the fireplace using these screws Attach the vent cover plate to the back o...

Страница 10: ...position Make sure to bend and secure the standoffs and drywall supports as shown below The two standoffs are shipped flat Bend both standoffs as shown below Remove the screw from the top of the fireplace and secure the standoff as shown When in place the standoffs and drywall supports should look as shown to the right Bend the three drywall supports up 90 degress the outer two are concealed when ...

Страница 11: ...eplace requires a 1 2 13mm clearance from the angled sides and back of the fireplace to the framing members No material insulation framing etc may be placed into this area When installed walls in front of the fireplace must be a minimum 1 25mm to the side of the fireplace Due to the high temperature the heater should be located out of traffic and away from furniture and draperies Fireplace must be...

Страница 12: ... only Travis Industries 6 27 2019 1500 864 31K CF Aust Minimum Framing Dimensions Min Enclosure Height 48 1220mm 43 1093mm 45 1143mm 22 559mm Standard Facing drywall contacts side of fireplace 22 1 2 572mm Submerged Facing drywall butts non comb facing a a ...

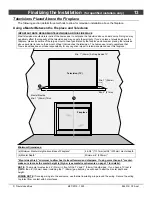
Страница 13: ...elevision The homeowner must understand that Travis Industries does not take responsibility for any negative impact to televisions placed near this fireplace Minimum Dimensions a Minimum Mantel Height above Base of Fireplace 44 3 4 1137mm with 8 203mm mantel depth b Mantel Depth Minimum 8 203mm Mantel depth is 8 minimum to allow heat to travel forward and dissipate If using more than an 8 mantel m...

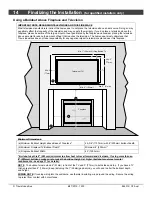
Страница 14: ...isions placed near this fireplace Minimum Dimensions a Minimum Buildout Height above Base of Fireplace 44 3 4 1137mm with 8 203mm buildout depth b Minimum Fireplace TV Buildout Depth Minimum 8 203mm c Fireplace Buildout Width 43 1093mm Buildout depth is 8 203mm minimum to allow heat to travel forward and dissipate If using more than an 8 203mm buildout make sure to make the buildout height a highe...

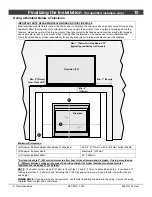
Страница 15: ...fireplace Minimum Dimensions a Minimum Buildout Height above Base of Fireplace 44 3 4 1137mm with 8 203mm buildout depth b Minimum Buildout Depth Minimum 8 203mm c Fireplace Buildout Width 43 1093mm Buildout depth is 8 203mm minimum to allow heat to travel forward and dissipate If using more than an 8 203mm buildout make sure to make the buildout height a higher buildout must meet mantel requireme...

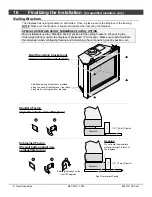
Страница 16: ... the fireplace is positioned to the rear Make sure to accommodate this dimension when configuring framing and determining the vent position gas line position etc Standard Facing drywall contacts side of fireplace Submerged Facing Drywall butts against non combustible facing Additional nailing brackets are provided along the base of the fireplace Use these brackets if not using the front brackets 1...

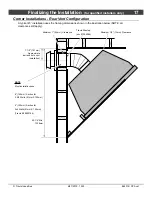
Страница 17: ...n uses the framing dimensions shown in the illustration below NOTE all clearances still apply 7 1 2 191mm Approximate varies due to vent installation Minimum 1 2 13mm Clearance NOTE Most installations use 6 152mm Section for 2 X 6 Walls 51mm X 152mm 4 102mm Section for 2x4 Walls 51mm X 102mm Travis 98900166 Minimum 1 25mm Clearance Travis Firestop sku 93006094 52 1 4 Min 1328mm ...

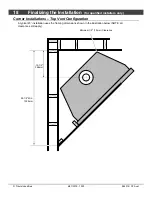
Страница 18: ...vis Industries 6 27 2019 1500 864 31K CF Aust Corner Installations Top Vent Configuration A typical 45 installation uses the framing dimensions shown in the illustration below NOTE all clearances still apply 15 1 2 394mm 52 1 4 Min 1328mm Minimum 1 2 13mm Clearance ...

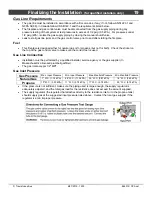
Страница 19: ...he sticker on the top of the gas control valve to make sure the correct fuel is used Gas Line Connection Installation must be performed by a qualified installer service agency or the gas supplier In Massachusetts a licensed plumber gasfitter The gas inlet accepts 1 2 MPT Gas Inlet Pressure Gas Pressure Max Input Pressure Min Input Pressure Max Manifold Pressure Min Manifold Pressure Natural Gas 7 ...

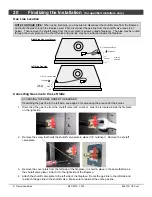
Страница 20: ...ing the gas line to the left side see page 22 for accessing the area under the burner 1 Disconnect the gas line from the shutoff valve 3 4 wrench Gas line is located inside the fireplace on the right side 2 Remove the screw that holds the shutoff valve plate in place 1 4 nutdriver Remove the shutoff valve plate 3 Remove the cover plate from the left side of the fireplace it is held in place in the...

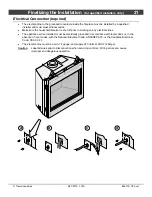
Страница 21: ...household breaker is shut off prior to working on any electrical lines The appliance when installed must be electrically grounded in accordance with local codes or in the absence of local codes with the National Electrical Code ANSI NFPA 70 or the Canadian Electrical Code CSA C22 1 The electrical line must be a min 14 gauge and supply 240 Volts at 60 Hz 2 Amps Caution Label all wires prior to disc...

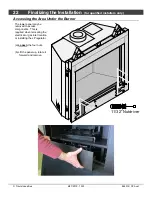
Страница 22: ...0 864 31K CF Aust Accessing the Area Under the Burner The lower panel may be removed to access components This is required when relocating the electrical or gas inlet location or installing the LP regulator a Loosen the four nuts b Lift the panel up rotate it forward and remove 11 32 Nutdriver ...

Страница 23: ...ould be followed variations may occur depending upon installation parameters Many factors may negatively influence the draft of the appliance Travis Industries will not be responsible for improper draft due to factors such as trees hills buildings obstructions excessive wind extreme hot or cold outdoor temperatures restrictive vent terminations or influence from mechanical systems Vent Clearances ...

Страница 24: ...ion instructions for Simpson Dura Vent may be found at www duravent com Vent Installation Slide the vent sections together and turn 1 4 turn until the sections lock in place Screws are not required to secure the vent However three screws may be used to secure vent sections together if desired High temperature sealant is recommended at the appliance starter section connection use high temperature s...

Страница 25: ...or acceptable vent configurations detail the correct vent restrictor positions Exhaust Restrictor Adjustment If the diffuser is required to be in position 2 you may wish to adjust the diffuser while the exhaust restrictor is removed Loosen these 4 screws on the exhaust restrictor Slide the restrictor to the correct position see illustration above The rear screw location indicates restrictor positi...

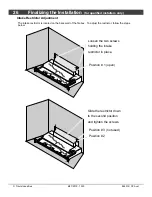
Страница 26: ...e Restrictor Adjustment The intake restrictor is located on the back wall of the firebox To adjust the restrictor follow the steps below Slide the restrictor down to the second position and tighten the screws Position 1 open Loosen the two screws holding the intake restrictor in place Position 2 Position 3 not used ...

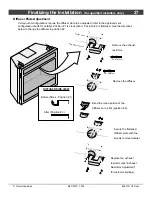
Страница 27: ...k bent Position 2 is flattened See the directions below to change the diffuser to position 2 Back Wall of Firebox Firebox Roof Remove the exhaust restrictor 1 4 Nutdriver Remove the diffuser 1 4 Nutdriver Secure the flattened diffuser plate with the screws removed earlier Replace the exhaust restrictor see Exhaust Restrictor Adjustment for restrictor settings Bend the round portion of the diffuser...

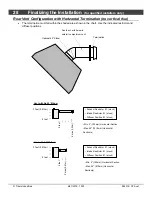
Страница 28: ...tions Optional 45 Elbow Termination See the charts below to determine maximum vent 3 feet 0 915m 0 feet 0 feet 4 max 1 22m Exhaust Restrictor 1 stock Intake Restrictor 1 stock Diffuser Position 1 stock Vent with No 45 Elbow 3 feet 0 915m 0 feet 0 feet 2 max 0 61m Vent with 1 45 Elbow Min 4 102mm Horizontal Section Max 24 610mm Horizontal Section s Min 4 102mm Horizontal Section Max 48 1219mm Horiz...

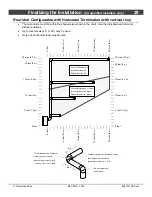
Страница 29: ... 5 m 0 feet 20 feet 6 m 20 feet 6 m 5 feet 1 5 m 10 feet 3 m 5 feet 1 5 m 10 feet 3 m 0 feet 15 feet 4 5 m 20 max 6 m 10 feet 3 m 15 feet 4 5 m 15 feet 4 5 m 20 max 6 m 10 feet 3 m 15 feet 4 5 m 22 max 6 7 m 22 max 6 7 m Exhaust Restrictor 4 Intake Restrictor 2 Diffuser Position 2 Exhaust Restrictor 1 stock Intake Restrictor 1 stock Diffuser Position 1 stock This is considered a horizontal elbow i...

Страница 30: ... 5m 0 feet 20 feet 6m 20 feet 6m 5 feet 1 5m 10 feet 3m 5 feet 1 5m 10 feet 3m 0 feet 15 feet 4 5m 20 6m max 10 feet 3m 15 feet 4 5m 15 feet 4 5m 20 6m max 10 feet 3m 15 feet 4 5m 40 12m max Exhaust Restrictor 4 Intake Restrictor 2 Diffuser Position 2 25 feet 7 5m 30 feet 9m 35 feet 10 5m 40 12m max 25 feet 7 5m 30 feet 9m 35 feet 10 5m This is considered a horizontal elbow it does not matter whet...

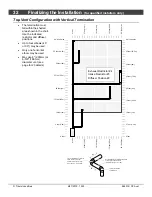
Страница 31: ... feet 1 5m 0 feet 0 feet 5 feet 1 5m 0 feet 20 feet 6m 20 feet 6m 5 feet 1 5m 10 feet 3m 5 feet 1 5m 10 feet 3m 0 feet 15 feet 4 5m 20 6m max 10 feet 3m 15 feet 4 5m 15 feet 4 5m 20 6m max 10 feet 3m 15 feet 4 5m 21 6 4m max 21 6 4m max Exhaust Restrictor 4 Intake Restrictor 2 Diffuser Position 2 Exhaust Restrictor 1 stock Intake Restrictor 1 stock Diffuser Position 1 stock This is considered a ho...

Страница 32: ...strictor 2 Diffuser Position 2 This is considered a horizontal elbow it does not matter whether it turns right or left It may be a 90 or 45 elbow This is considered a vertical elbow Horizontal length is calculated by adding both lengths of horizontal run Horizontal Length H1 H2 H1 H2 5 feet 1 5m 0 feet 0 feet 5 feet 1 5m 0 feet 20 feet 6m 20 feet 6m 5 feet 1 5m 10 feet 3m 5 feet 1 5m 10 feet 3m 0 ...

Страница 33: ...nstallation codes and the requirements of the gas supplier G Minimum 48 1219mm clearance from any adjacent building H Minimum 84 2134mm clearance above any grade when adjacent to public walkways or driveways NOTE may not be used over a walkway or driveway shared by an adjacent building I Minimum 9 229mm clearance to any non mechanical air supply inlet to the building or the combustion air inlet to...

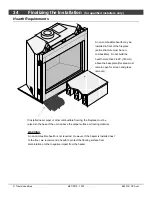
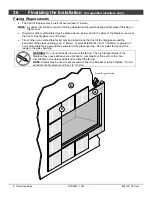
Страница 34: ...e than 5 625 143mm above the baseplate this area must remain open for screen and glass removal If installed near carpet or other combustible flooring the fireplace must be raised so the base of the unit is above the carpet surface or flooring material WARNING A non combustible hearth is not required However if the heater is installed next to the floor we recommend a hearth to protect the flooring ...

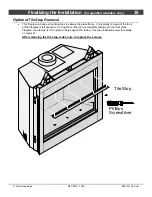
Страница 35: ...le stop above the glass frame It is typically removed if the front of the fireplace is left exposed If using tile or other non combustible facing over the front of the fireplace the tile stop is left in place to help support the facing See the illustration below for details on removal After removing the tile stop make sure to replace the screws Tile Stop Phillips Screwdriver ...

Страница 36: ...ustible facing may be placed along the front of the fireplace around the perimeter of the glass opening see c below Typical installations use 12 305mm or greater of non combustible facing around the perimeter of the glass opening Do not install facing over the ledge to the glass opening WARNING Do not use adhesive to secure the facing The high temperatures of the fireplace may cause adhesives to e...

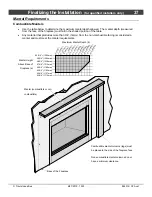
Страница 37: ...g is considered a mantel and must meet the mantel requirements Combustible mantel columns legs must be placed to the side of the fireplace face Non combustible mantel columns do not have a minimum clearance Mantel combustible or non combustible Base of the Fireplace Maximum Mantel Depth b Mantel Height Above Base of Fireplace a 44 3 4 1137mm 45 3 4 1163mm 0 0 m m 1 2 5 m m 2 5 1 m m 8 2 0 3 m m 7 ...

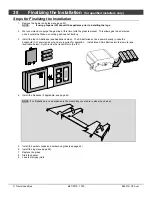
Страница 38: ...A batteries see illustration below The AA batteries act as a power backup in case the household AC power goes out and are required for operation Install three AAA batteries into the remote see illustration below Synchronize the transmitter to the IFC 4 Install the firebacks if applicable see page 43 NOTE If no firebacks are used make sure the media tray covers are in place see below 5 Install the ...

Страница 39: ... low position The flames should burn off of each burner hole If the heater does not work correctly contact your Travis dealer for a remedy 12 Give this manual to the home owner for future reference and fully explain operation of this heater For comprehensive operating and maintenance instructions refer to the Owner s Manual ACID WASH WARNING Before installing the faceplate make sure any masonry th...

Страница 40: ...aced with the manufacturer s barrier for this appliance If using a face or grill that requires use of a cove cover use the cove cover included with the fireplace see below Do not use the cover included with face or grill if applicable c b Remove the concealment cover Lift the screen up pivot the top forward and remove from the fireplace 11 32 Wrench a Remove and discard the two nuts used to secure...

Страница 41: ... the face being used either a swing the access door down and remove the top grill b remove the face unscrew or lift off see the instructions included with the face for details Open the six latches holding the glass frame in place start with the bottom three follow the directions shown to the right a Lift the glass frame up and pull it forward to remove b Re Attaching the Glass Frame a Hang the gla...

Страница 42: ...s turned 1 4 turn when it is disengaged Follow the directions below to re install the latch if it becomes loose Top of Firebox Hold the latch at an angle and insert it into the slot on the glass frame anchor NOTE this slot may be at a different angle than illustrated Note how the washer on the latch fits behind the flange on the glass frame anchor Glass Frame Anchor Once fully inserted turn the la...

Страница 43: ...ure the rear burner to the fireplace for shipping purposes Remove and discard the nuts see below NOTE Do not reinstall the shipping nuts The burner brackets sit over the threaded pins and the burner needs to be able to move freely as it expands and contracts with heat Remove and discard nuts Left Rear Corner of Rear Burner Right Rear Corner of Rear Burner ...

Страница 44: ...e instructions included with the firebacks may not include the following caveats Remove the Media Tray Skirt and Air Deflector replace once firebacks in place Remove the Exhaust Restrictor replace once firebacks in place a b 1 4 Nutdriver Back Wall of Firebox Firebox Roof NOTE These obround holes allow for the restrictor to be removed with the screws still in place Loosen these 4 screws on the exh...

Страница 45: ...ear on the media tray must be bent out see below You will need to remove the media tray 2 screws hold it in place to bend the tabs out Glass Firebacks Bend the tabs on the media tray out Bend the secondary tab straight up Glass Firebacks The 4 side tabs on the media tray must be bent out do not bend out the rear tabs see below You will need to remove the media tray 2 screws hold it in place to ben...

Страница 46: ...orations in front of the log grate Place a thick layer of the ember glass over the perforations making sure to cover all of the holes completely Lightly dress the ember glass with the black touch up paint provided Check the appearance with the lights on and add additional paint as needed for a realistic glowing ember appearance NOTE If power is supplied to the fireplace it can helpful to turn the ...

Страница 47: ... glass installation is complete place a generous amount of ember material on the firebox floor on either side of the firebox Completely cover any visible metal on the firebox floor NOTE Make sure no ember material is placed directly on the burner HINT Add a few randomly placed ember chunks over the ember bed glass to produce a more realistic appearance ...

Страница 48: ...ol prior to conducting service Failure to position the parts in accordance with these diagrams or failure to use only parts specifically approved with this appliance may result in property damage or personal injury The burner must be correctly positioned before installing the log set Make sure the burner is fully seated and the pilot is properly aligned See owner s manual for details on burner rem...

Страница 49: ...ck Log The back log has two pockets that insert over two tabs on the back burner see photos below Place the log in place and push it back The log straddles the burner and does not cover any burner holes Right Log The right log has a channel on the bottom that fits over the grate Place the log in place and slide it to the rear ...

Страница 50: ...ont Left Log The front left log has a channel that fits over the grate When in place the knob on the front of the log fits over the grate as well Left Log The left log has a channel on the bottom Place this channel over the grate When in place make sure the log is positioned so it does not block any burner holes ...

Страница 51: ...Twig The center twig is shown below It has a pin on the bottom side When in place the fork on the front straddles the grate and the pin rests on the rear burner make sure it is not over any burner holes Front Ember Chunk The front ember chunk has a groove on the bottom that fits over the grate Place it as shown below ...

Страница 52: ... pin on the front left log Place the twig as shown below The front left log has a groove that will point the twig upwards and to the right Center Left Twig The left center twig is flat on the bottom and has a fork at one end Place the twig as shown below Note how the twig rests in the groove in the front left log and the right end hangs over the burner but does not rest on it ...

Страница 53: ... has a hole on the back and a fork on the front Position the log so this fits over the pin on the back log Make sure the fork on the front of the log fits over the grate as shown below Right Twig The right twig has a hole on the bottom that fits over the pin on the right log Position the twig so it rests on the back log as shown below ...

Страница 54: ...ls Rock Wool Placement NOTE The rock wool is included with the fireplace Consult the installation manual for details on installing the rock wool The included rock wool is placed on top of the burner to enhance the glow from the burner The rock wool works best when it is applied in a very thin porous layer The best method for applying the rock wool is to brush it on to the burner Compress a clump o...

Страница 55: ...d as specified in the manufacturer s instructions supplied with the kit Caution The gas supply shall be shut off prior to disconnecting the electrical power before proceeding with the conversion Note Convert the appliance prior to installing the gas line to ensure proper gas use The GSR Stepper Motor Kit 4 pack 94400999 single 250 01463 is required for converting this appliance to LP The kit conta...

Страница 56: ...rew each LP orifice until orifice protrudes 15 16 23 8mm indicating full insertion use wrench to secure manifold when re attaching orifice d Look here for the orifice identification Apply thread sealant to the LP orifices prior to installation Use the chart below to identify the correct orifices Front Rear NG 49 49 LP 56 57 c Front Burner Orifice Manifold Slide the air shutters to provide access t...

Страница 57: ...e firebox components Install the logs and embers Replace the glass 6 Remove the control panel to access the gas control valve The stepper motor adjustable regulator has an installation sheet included with it make sure to follow all of the directions Place the stepper motor on the gas control valve see Figure 1 MAKE SURE IT IS CORRECTLY ORIENTED Secure using the screws included with the motor see F...

Страница 58: ...ed earlier Use snips to cut the tab on the knockout located on the top cover plate Press on the far side of the tab to pop the edge of the knockout up Grab on to the knockout with pliers and bend it back and forth until the remaining tabs break free Discard the knockout The flexible duct will attach to this location see picture below and instructions included with the power heat duct CoolSmart TV ...

Страница 59: ...Accent Light s Blower s 3 Amp Fuse Appliance Ground Appliance Ground Green Orange Yellow Green White Blue IPI CPI JUMPER WIRE Blue Pink Power In TOP 4 AA Batteries Black Red Yellow Orange Yellow Flame Detect Black Red Purple Grey Black White Green 3 15A FUSE White Black White Black Black Black White White 3 Amp Fuse EmberBed Lights Rheostat 3 Amp Fuse Integrated Fireplace Control IFC These AC comp...

Страница 60: ...rth Requirements 34 Heating Specifications 6 Installation Options 6 Installation Overview 7 LP Conversion Instructions 55 Mantel Requirements 37 Rear Vent Configuration with Horizontal Termination no vertical rise 28 Rear Vent Configuration with Horizontal Termination with vertical rise 29 Rear Vent Configuration with Vertical Termination 30 Recommended Installation Procedure 7 Safety Warnings 4 S...

Отзывы: