background image

BEFORE

YOU 
BEGIN

34

INTRODUCTION

IMPORT

ANT

PRECAUTIONS

ASSEMBL

Y

BEFORE

YOU 
BEGIN

TREADMILL

OPERA

TION

LIMITED

W

ARRANTY

TROUBLESHOOTING

MAINTENANCE

CONDITIONING

GUIDELINES

ASSEMBL

Y

CONDITIONING

GUIDELINES

BEFORE YOU 

BEGIN

ASSEMBL

Y

ASSEMBL

Y

35

INTRODUCTION

IMPORT

ANT

PRECAUTIONS

TREADMILL OPERA

TION

CONDITIONING GUIDELINES

TROUBLESHOOTING & 

MAINTENANCE

LIMITED WARRANTY

TROUBLESHOOTING & 

MAINTENANCE

COMMON PRODUCT QUESTIONS

ARE THE SOUNDS MY TREADMILL MAKES NORMAL?

All treadmills make a certain type of thumping noise due to the belt riding over the rollers, especially new 

treadmills. This noise will diminish over time, although may not totally go away. Over time, the belt will 

stretch, causing the belt to ride smoother over the rollers. 

WHY IS THE TREADMILL I PURCHASED LOUDER THAN THE ONE AT THE STORE?

All fitness products seem quieter in a large store showroom because there is generally more background noise 

than in your home. Also, there will be less reverberation on a carpeted concrete floor than on a wood overlay 

floor. Sometimes a heavy rubber mat will help reduce reverberation through the floor. If a fitness product is 

placed close to a wall, there will be more reflected noise.

WHEN SHOULD I BE WORRIED ABOUT A NOISE?

As long as the sounds your treadmill makes are no louder than a normal conversational tone of voice, it is 

considered normal noise.

PROBLEM:


The console does not light up and/or the belt does not move.

SOLUTION:


Verify the following:

DOES THE RED LIGHT ON THE ON/OFF SWITCH LIGHT UP? 

IF YES:

• Double check that all connections are secure, especially the console cable.  Unplug and reconnect the console 

cable to verify.

• Make sure the console cable is not pinched or damaged in any way.

• Turn the power off, unplug the power cable and wait 60 seconds. Remove motor cover. Wait until all red LED 

lights have gone off on the motor control board before proceeding. Next, verify that none of the wires connected 

to the lower board are loose or disconnected.

IF NO:

• Verify that the outlet the machine is plugged into is functional. Double check that the breaker has not tripped, 

it is on a dedicated 20-amp circuit, it is not on a GFCI equipped outlet, and it is not plugged into a power 

strip/surge protector or extension cord.

• The power cord is not pinched or damaged and is properly plugged into the outlet AND the machine.

• The power switch is turned to the ON position.

PROBLEM:

 The treadmill circuit breaker trips during a workout.

SOLUTION:


Verify the following:

• Make sure the treadmill is plugged into a dedicated 20-amp circuit.

• Verify that you do not have the machine on an extension cord or surge protector.

• Confirm that the machine is not plugged into a GFCI-equipped outlet or on a circuit that has a 

GFCI-equipped outlet on it.

• Lubricate treadmill deck if necessary.

PROBLEM:

 The running belt does not stay centered during a workout.

SOLUTION:


Verify the following:

• Make sure the treadmill is on a level surface.

• Verify  that  the  belt  is  properly  tightened  and  centered  (Refer  to  the  Adjustment  section  for  detailed 

directions).

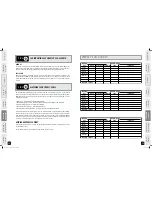
TROUBLESHOOTING

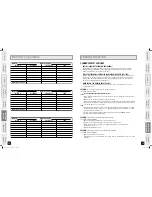
MONTHLY LOG SHEETS

MONTH

MONTHLY GOAL

MONTHLY TOTALS :

WEEK #

DISTANCE

CALORIES

TIME

MONTH

MONTHLY GOAL

MONTHLY TOTALS :

WEEK #

DISTANCE

CALORIES

TIME

MONTH

MONTHLY GOAL

MONTHLY TOTALS :

WEEK #

DISTANCE

CALORIES

TIME

LS16.9T_owners_manual_Rev.1.1.indd   34-35

9/9/09   10:57 AM

Содержание LS16.9T

Страница 1: ...TREADMILL USER S GUIDE FOR MODEL LS16 9T LS16 9T_owners_manual_Rev 1 1 indd 1 9 9 09 10 56 AM...

Страница 2: ...at offers the most comfort the best reliability and the highest quality in its class LIVESTRONG Treadmills deliver INTRODUCTION Important Precautions Assembly Before You Begin Treadmill Operation Cond...

Страница 3: ...recommended that the treadmill is warmed up to room temperature before first time use Failure to do so may cause premature electronic failure SAVE THESE INSTRUCTIONS Read all instructions before using...

Страница 4: ...ll FAILURE TO FOLLOW THESE INSTRUCTIONS COULD RESULT IN INJURY Before proceeding find your treadmill s serial number and model name located to the left of the on off power switch and power cord and en...

Страница 5: ...NE bolt A light application of grease may aid in the installation of hardware Any grease such as lithium bike grease is recommended PRE ASSEMBLY MAIN FRAME BRACKET SCREW A CONSOLE MAST BOOT SCREW B EN...

Страница 6: ...8 2 mm Qty 4 HARDWARE BAG 3 CONTENTS ASSEMBLY STEP 4 HARDWARE BAG 4 CONTENTS CONSOLE MAST BOLTS B SPRING WASHER C ARC WASHER D MAST RING CONSOLE CONSOLE WIRES BOLT B 15 mm Qty 4 SPRING WASHER C 8 2 mm...

Страница 7: ...HANDLEBAR A Open HARDWARE BAG 5 B Align LEFT HANDLEBAR with CONSOLE as shown C To attach the top of the LEFT HANDLEBAR to the CONSOLE slide HANDLEBAR CAP through HANDLEBAR and place 2 SCREWS F into t...

Страница 8: ...t walking on the belt only after the belt has begun to move Never start the treadmill at a fast running speed and attempt to jump on WARNING NEVER USE THE TREADMILL WITHOUT SECURING THE SAFETY KEY CLI...

Страница 9: ...attached iPOD audio settings P AUDIO IN NOT SHOWN Plug your CD MP3 player into the console using the included audio adaptor cable Q AUDIO OUT HEADPHONE JACK NOT SHOWN Plug your headphones into this j...

Страница 10: ...a time has been chosen press ENTER 4 SELECT A LEVEL Select a Level using the KEYPAD arrow keys PROGRAMMING BUTTON or use the default time Once a LEVEL has been chosen press ENTER Finishing YOUR PROGRA...

Страница 11: ...0 1 0 2 0 1 0 2 5 1 0 2 5 1 5 1 0 Speed 1 0 1 5 2 0 4 0 2 0 4 0 2 0 4 5 2 0 4 5 1 5 1 0 Level 2 Elevation 1 0 1 5 1 0 2 5 1 0 2 5 1 5 3 0 1 5 3 0 1 5 1 0 Speed 1 0 1 5 2 0 4 5 2 0 4 5 2 5 5 0 2 5 5 0...

Страница 12: ...sing the arrow keys and press enter 3 Choose a target heart rate using the arrow keys on the programming button and press enter Note Use the chart provided in this guide to determine your target heart...

Страница 13: ...re deleting While using your saved program you are able to adjust the speed or incline but any changes will not be saved PROGRAM INTERVALS HR P9 Automatically adjusts peak and valley incline levels wi...

Страница 14: ...ifically relates to the user that is chosen Note If no user is selected and clock and date are not set no data will be tracked RESET Reset all recorded information for User 1 or User 2 by selecting th...

Страница 15: ...intensity The first is by monitoring your heart rate using the grip pulse handlebars and the second is by evaluating your perceived exertion level this is simpler than it sounds PERCEIVED EXERTION LEV...

Страница 16: ...hand 3 SITTING HAMSTRING LOWER BACK MUSCLE STRETCH Sit on the floor with your legs together and straight out in front of you Do not lock your knees Extend your fingers towards your toes and hold for...

Страница 17: ...hing exercises listed above to loosen and relax your muscles An important step in developing a long term fitness program is to determine your goals Is your primary goal for exercising to lose weight I...

Страница 18: ...ure especially the console cable Unplug and reconnect the console cable to verify Make sure the console cable is not pinched or damaged in any way Turn the power off unplug the power cable and wait 60...

Страница 19: ...everal minutes until calibration is complete MAINTENANCE Cleanliness of your treadmill and its operation environment will keep maintenance problems and service calls to a minimum For this reason we re...

Страница 20: ...anufacturer is not responsible or liable for indirect special or consequential damages economic loss loss of property or profits loss of enjoyment or use or other consequential damages of whatsoever n...

Страница 21: ...a problem and we want to have an opportunity to correct it for you Note Please read the troubleshooting section before contacting Customer Tech Support To receive additional product information visit...

Отзывы: