background image

5

Chapter 2: Getting to Know Your Phone
Understanding the Phone Screen Interface

Linksys One Communications Solution

Chapter

2

Understanding the Phone Screen Interface

PHM1200 IP Phone

Your phone screen provides access to all calling functions and phone settings. The top of the 
phone screen displays the current date, time and call state; the bottom of the screen displays 
the 

Calls

 tab and 

Tasks 

tab. Select the 

Calls

 tab to place and handle calls and select the 

Tasks 

Tab to view call history, view the button template and access voice mail settings.

Navigating the Menus

If you want to...

Then...

Select an item on the screen

1. Use the arrows on the navigation dial to scroll 

through menus and tabs.

2. Press the center button on the navigation dial to 

select a highlighted item.

Go back to the previous screen or exit a 
screen

Press the 

Cancel

 button.

On the Voice Mail and the Auto Attendant screens, 
you can also press the left navigation button to go 
back to the previous screen.

Erase text on a screen

Press the left arrow on the navigation dial to erase 
digits you enter on the screen.

Select a softkey tab

Press the button directly below the softkey tab.
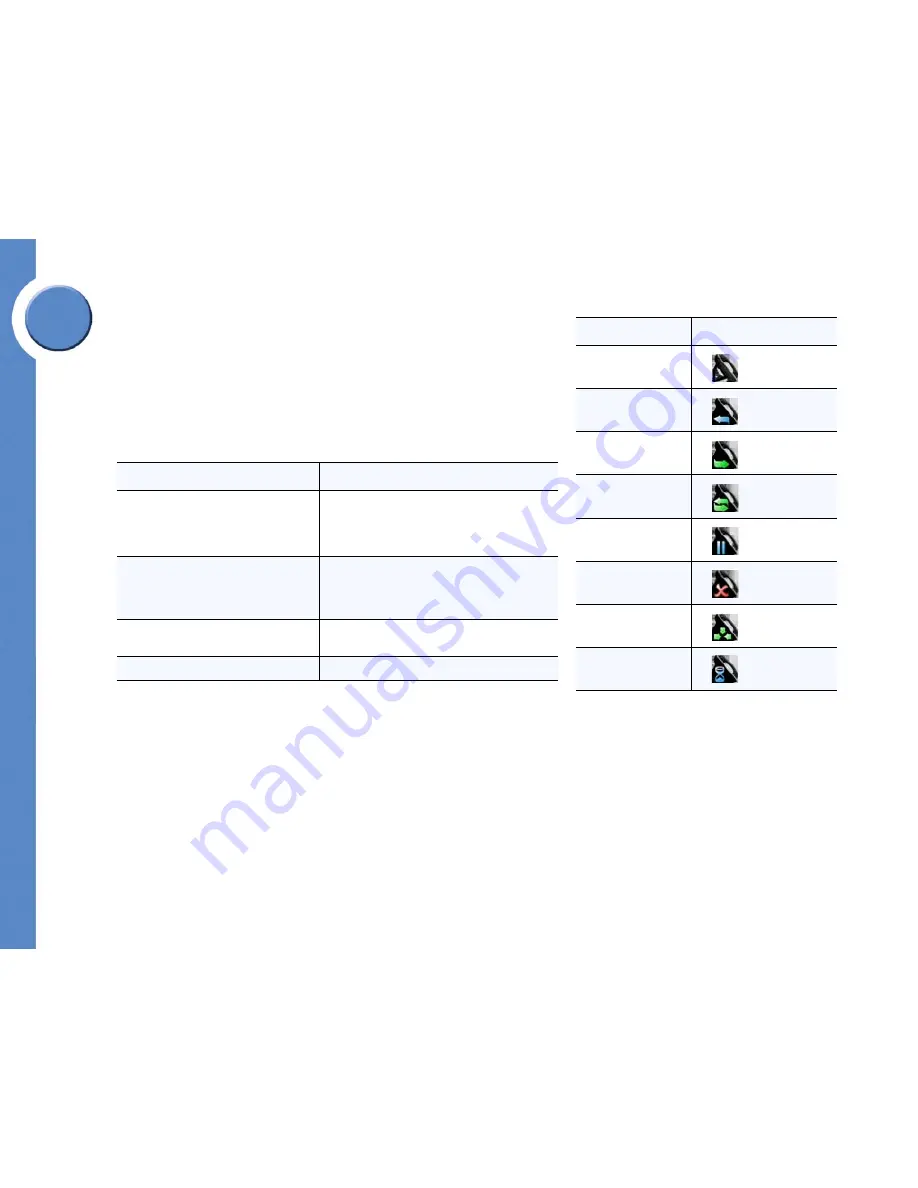
Call State

 Lines

Idle

Outgoing call

Incoming call 

Call connected

Call on hold

Error

Conference call

Call proceeding

Содержание PHB1100 - One Business Phone VoIP

Страница 1: ...LINKSYS ONE IP PHONE USER GUIDE PHM1200 and PHB1100 IP Phone User Guide Release 1 2...

Страница 2: ...apter 4 Using Voice Mail 23 Accessing Personal Voice Mail Using Voice Prompts 23 Accessing Voice Mail Using the Phone Screen 24 Managing Your Personal Voice Mailbox 25 Recording Voice Mail Greetings 2...

Страница 3: ...mplate 33 Installing the Button Template on Your Phone 34 Chapter 6 Using the Auto Attendant 35 Accessing the Auto Attendant 35 Managing the Auto Attendant 35 Recording the Auto Attendant Greeting 36...

Страница 4: ...ng Your Phone describes the feature and control buttons on your phone Chapter 4 Using Voice Mail provides procedures for accessing personal and system voice mail Chapter 5 Using Your User Page provide...

Страница 5: ...Chapter 1 2 Chapter 1 Introduction Linksys One Communications Solution...

Страница 6: ...mple automated installation with your Services Router Call processing features with integrated Voice Mail and Auto Attendant Online control of custom phone features and settings via a User web page Th...

Страница 7: ...ure buttons provide quick access to assigned phone features 8 Hold button puts a call on hold 9 Display shows button layout PHM1200 OR the phone s IP and MAC address PHB1100 10 Cancel button cancels t...

Страница 8: ...ce mail settings Navigating the Menus If you want to Then Select an item on the screen 1 Use the arrows on the navigation dial to scroll through menus and tabs 2 Press the center button on the navigat...

Страница 9: ...ur phone administrator External Lines External lines are used for making outise calls These lines are accessible from the top right feature buttons The number of lines which lines and if the line is s...

Страница 10: ...rsonal Voice Mailbox on page 25 User extension 100 This is the same password used to access your User page Note that if you change this password you are also changing the password for your User page M...

Страница 11: ...on page 29 User extension 100 Your User page password is also used to access your Personal Voice Mailbox Therefore if you change this password you are also changing the password for your Personal Voic...

Страница 12: ...ic phone tasks such as placing answering and transferring calls Your phone also supports advanced call handling features that may not be available to you and must be enabled by your phone administrato...

Страница 13: ...ll While on Another Line 1 Press the flashing line button for the incoming call This puts the previous call on hold 2 Greet the new caller 3 To return to the previous call press the flashing line butt...

Страница 14: ...e first call The partcipants are now connected in a conference call A total of three participants can be connected in a call Once the call is in progress the buttons for the intercoms or lines involve...

Страница 15: ...When the phone is muted the microphone button LED lights red To unmute the phone press the microphone button again If you want to Then Place and receive calls using the speakerphone Press the speakerp...

Страница 16: ...Display button Press the Display button to view the button layout screen on your PHM1200 IP Phone If you want to Then Use the Cancel button Press the Cancel button to cancel the current phone task and...

Страница 17: ...ll park number using an intercom from any phone on the network If a parked call is not retrieved within 30 seconds the park lamp display glows red as a reminder for a limited time Once the call is ret...

Страница 18: ...ing Voice Mail on page 23 If you want to Then Access System Voice Mail The System Voice Mail feature button allows you to access the system wide mailbox See Accessing Your System Voice Mailbox on page...

Страница 19: ...his feature may not be available to you See Enabling the After Hours greeting on page 38 If you want to Then Answer Operator Calls The Operator feature button is enabled by your phone administrator Th...

Страница 20: ...disable the phone ringer and call waiting features Calls get forwarded on no answer to their related destination If you want to Then Place an Internal or Outside Call Press the calls softkey and selec...

Страница 21: ...l on Hold While in a call press the Hold button on the phone screen To resume the call press the line button for the call If you want to Then Transfer a Call 1 While on an internal call select the Tra...

Страница 22: ...t up green 4 Select Join under the Calls tab for your first call The participants are now connected in a conference call A total of three participants can be connected in a call When a conference call...

Страница 23: ...glows red as a reminder for a limited time Once the call is retrieved the Park lamp turns off If you want to Then Use Call Forward 1 Press the Tasks softkey tab on your phone and choose Set Call Forw...

Страница 24: ...sing Support If you want to Then Access System Voice Mail Press the Tasks softkey tab on your phone and choose System Voicemail See Accessing Your System Voice Mailbox on page 28 If you want to Then D...

Страница 25: ...Chapter 3 22 Chapter 3 Using Your Phone Using Your Phone Screen Linksys One Communications Solution...

Страница 26: ...ing and managing your personal and system voice mailbox The following topics are covered Accessing Personal Voice Mail Using Voice Prompts on page 23 Accessing Voice Mail Using the Phone Screen on pag...

Страница 27: ...tion See table below for options that are available to you on the Voice Mail menu you can click the back arrow on the navigation dial to return to the previous menu NOTE If you have a private line you...

Страница 28: ...ength of the message Click the Play tab to listen to the message or click the Trash tab to send the message to the Trash You can still access this message from the Trash menu option Press the forward...

Страница 29: ...rd it press the Record softkey again and follow the instructions on the screen 8 When you are satisfied with your greeting highlight and select Primary Greeting to set this as the message that callers...

Страница 30: ...sword and press Enter again Changing Voice Mail Notification Settings When you have a new voice mail message in your voice mailbox the message waiting indicator on the phone handset lights up red and...

Страница 31: ...ou can access your system voicemail as follows Using an Intercom Button 1 Select an intercom on your phone and dial the default extension 301 or the extension number for your system wide mailbox as ap...

Страница 32: ...related screens The following topics are covered Login To Your User Page on page 29 Changing Your User Account Password on page 30 Changing Your Call Forward Settings on page 31 Setting Auto Dial Num...

Страница 33: ...phone screen See Changing Your Voice Mail Password on page 27 1 Login to your User web page 2 Click on Accounts 3 In the Password Change section type your old and new password For password verificati...

Страница 34: ...vailable on the User Settings screen NOTE You can also personalize your Call Forward Always setting from the phone screen See Using Your Phone Screen section for more information Call Forward Option D...

Страница 35: ...dit mode and then type a new first name and last name Click commit to save your changes Accessing Your User Template Use your web based User Template screen to customize Auto Dial features that are av...

Страница 36: ...splay button followed by any button on the phone The feature assigned to that button is displayed at the top of your phone screen You can also see which features are assigned to your phone buttons on...

Страница 37: ...u bar Select the desired printer options and print the template To print the template using the Firefox browser On your browser menu choose File Page Setup Choose Format and Options tab click on the P...

Страница 38: ...to reach their intended party using dial by name or extension number functionality The Auto Attendant also features the ability for callers to talk Live to an Operator by pressing 0 in response to an...

Страница 39: ...screen 2 Type the password for the Auto Attendant The first time you access the Auto Attendant the default password is set to 209 See Changing the Auto Attendant password on page 39 3 To record the M...

Страница 40: ...dant administration extension 209 2 Type the password for the Auto Attendant The first time you access the Auto Attendant the default password is set to 209 See Changing the Auto Attendant password on...

Страница 41: ...button or by choosing a greeting from the Auto Attendant phone menu on your PHM1200 phone as follows 1 Open the Auto Attendant menu on your phone screen and select the greeting you want to play Main...

Страница 42: ...n add you as a Live Operator this enables the Operator Operator DND and System Voice Mail feature buttons on your phone When a caller presses zero in response to an Auto Attendant prompt or gets trans...

Страница 43: ...Chapter 6 40 Chapter 6 Using the Auto Attendant Managing Operator Calls Linksys One Communications Solution...

Страница 44: ...e from 8 am 5 pm Central Time Monday Friday If you experience problems with any Linksys One product you can call us at Don t wish to call You can e mail us at You can reach Linkys One technical suppor...

Страница 45: ...2006 Cisco Systems Inc All rights reserved Linksys is a registered trademark and the Linksys One logo is a trademark of Cisco Systems Inc Software Release Number 1 2...

Отзывы: