background image

27

Advanced Wireless-N Router

Linksys E2100L

Chapter 3: Advanced Configuration

NOTE:

  If  you  used  the  setup  software  for 

installation,  then  the  name  of  your  wireless 
network  (up  to  15  characters)  is  the  server 
name of the Router .

UPnP  Media  Server 

To  use  the  Router’s  media  server 

function, select Enabled . Otherwise, select Disabled .

Database Setup

This section lets you select content to add to the database 
of the Router’s media server . 

Specify  Folder  to  Scan 

To  add  a  media  folder  to  the 

database  of  the  Router’s  media  server,  click  this  option . 
Proceed to Add a Media Folderpage 27 .

Auto-scan  every  __ 

To  automatically  scan  the  media 

folders,  select  this  option .  Then  select  the  appropriate 
interval: 2 Hours (default), 6 Hours12 Hours24 Hours
or 48 Hours .

Scan All 

To scan all media files, click this option .

For  each  media  folder,  the  Name,  Partition,  and  Folder 
location are displayed . 

Scan 

To scan a folder, click Scan .

Delete 

To delete a folder, click Delete .

Click Save Settings to apply your changes, or click Cancel 
Changes
 to clear your changes .

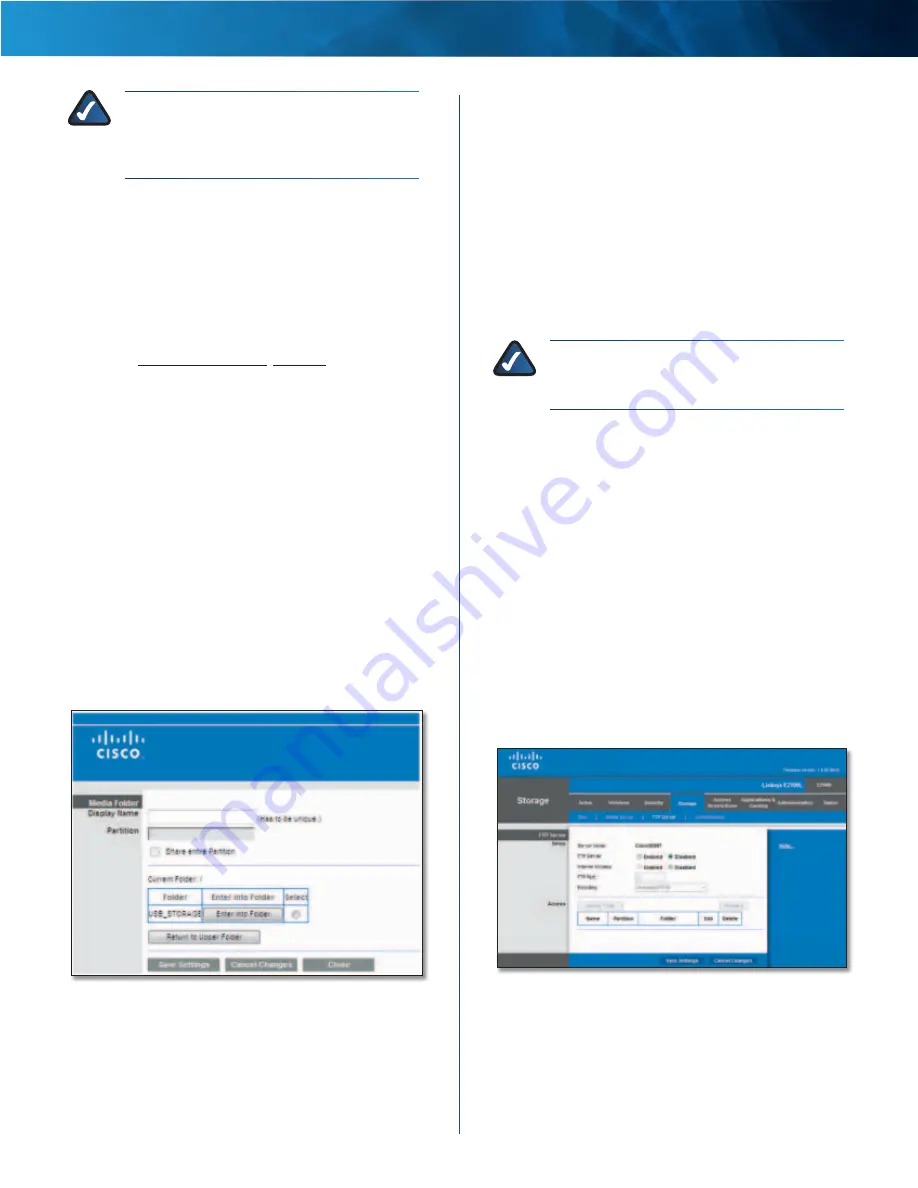
Add a Media Folder

1 .  After  you  clicked  Specify Folder to Scan, the 

Media 

Folder

 screen appears .

Media Folder 

2 .  In the 

Display Name

 field, enter a name for the media 

folder . This  will  appear  in  the  Database  table  on  the 

Media Server 

screen .

3 .  The  Partition  name  is  displayed .  If  the  media  folder 

should include the entire partition, select Share entire 
Partition
 and proceed to step 5 .

If you do not want to share the entire partition, then 
proceed to step 4 and specify the folder you want to 
share .

4 .  The 

Current Folder

 setting displays the selected folder . 

To  specify  a  different  folder,  click  Select .  To  display 
sub-folders,  click  Enter  into  Folder . To  return  to  the 
previous folder, click Return to Upper Folder .
If you want to create a new folder, enter its name in the 

New Folder

 field . Then click Create .

5 .  To allow a group access to the media folder, select it 

from the 

Available Groups

 column, and then click the 

>> button .

NOTE:

  Specify  which  user  groups  have 

read-and-write or read-only access to the media 
folder .

6 .  To  block  a  group  from  accessing  the  media  folder, 

select it from the 

Groups with Access

 column, and then 

click the << button .

7 .  Click  Save  Settings  to  apply  your  changes,  or  click 

Cancel Changes to clear your changes . Click Close to 
exit the screen and return to the 

Media Server 

screen .

Storage > FTP Server

The  storage  options  are  available  when  a  USB  storage 
device is connected to the USB port of the Router . If the 
storage  device  does  not  fit  (for  example,  it  may  block 
port 1), then use the included USB extension cable .

Use the 

FTP Server 

screen to create an FTP server that can 

be accessed from the Internet or your local network . You 
can also create FTP folders, which are folders you create to  
manage FTP client access to the folders on the disk .

Storage> FTP Server 

FTP Server

Setup

Server  Name 

The  default  server  name  of  the  Router  is 

CiscoXXXXX (xxxxx are the last five digits of the Router’s 
serial number) . You can change this name on the 

Storage > 

Содержание E2100L

Страница 1: ...Linksys E2100L Advanced Wireless N Router User Guide ...

Страница 2: ...up 11 Setup MAC Address Clone 16 Setup Advanced Routing 16 Wireless Basic Wireless Settings 17 Manual Setup 17 Wireless Wireless Security 19 Wireless Wireless MAC Filter 21 Wireless Advanced Wireless Settings 21 Security Firewall 23 Security VPN Passthrough 23 Storage Disk 24 Storage Media Server 26 Storage FTP Server 27 Storage Administration 29 Access Restrictions Internet Access 31 Applications...

Страница 3: ...ced Configuration Advanced Users Only 53 Appendix C Specifications 56 Appendix D Warranty Information 57 LIMITED WARRANTY 57 Appendix E Regulatory Information 59 FCC Statement 59 FCC Radiation Exposure Statement 59 Safety Notices 59 Industry Canada Statement 59 Avis d Industrie Canada 59 Wireless Disclaimer 60 Avis de non responsabilité concernant les appareils sans fil 60 User Information for Con...

Страница 4: ...that port It flashes to indicate network activity over that port Wi Fi Protected Setup Button If you have client devices such as wireless adapters that support Wi Fi Protected Setup then you can use the Wi Fi Protected Setup button to automatically configure wireless security for your wireless network To use Wi Fi Protected Setup refer to Wi Fi Protected Setup page 18 Wireless Blue The Wireless LE...

Страница 5: ...en the slots is 152 mm Two screws are needed to mount the Router Suggested Mounting Hardware 2 5 3 0 mm 4 5 mm 1 1 5 mm NOTE Cisco is not responsible for damages incurredbyunsecuredwall mountinghardware Follow these instructions 1 Determine where you want to mount the Router Make sure that the wall you use is smooth flat dry and sturdy Also make sure the location is within reach of an electrical o...

Страница 6: ...iles using Windows Explorer Speed up my system using Windows ReadyBoost DVD CD RW Drive E Linksys Router Setup Always do this for software and games Install or run program General options Set up your Linksys Router Published by Cisco Consumer Products LLC Set AutoPlay defaults in Control Panel Open folder to view files using Windows Explorer Speed up my system using Windows ReadyBoost Set Up Your ...

Страница 7: ... existing Ethernet cable from your computer and plug it into the yellow port labeled Internet on the back of the Router Click Next Internet Ethernet 4 3 2 1 Power 12VDC USB Connect Ethernet Cable NOTE You can view detailed connection steps by clicking in the setup software NOTE If the setup software detects multiple routers then select the serial number of your Router The serial number is located ...

Страница 8: ... more information click Need help Local Access versus Guest Access Cisco Connect offers two types of access local access Computers and devices option and guest access Guest access option With local access computers and devices will have access to the Internet and to other devices on your local network including shared computers and printers which are connected to the Router Local access can be giv...

Страница 9: ...lize the Router s settings Router name is x The name of the Router is displayed Change To change settings click Change and go to Router Settings page 9 Computers and Other Devices The Computers and other devices screen appears Computers and Other Devices Computer Click this option to connect another computer in your home Go to Computer page 6 Wireless Printer Click this option to connect a wireles...

Страница 10: ...sing a USB flash drive If you already have an Easy Setup Key then you can update it with the Router s current settings 1 Insert the Easy Setup Key or a USB flash drive into an available USB port on your computer Update or Create an Easy Setup Key 2 Please wait while settings are copied to the Easy Setup Key Copying Files to the Easy Setup Key 3 Remove the Easy Setup Key You can now use it to conne...

Страница 11: ...inish Name Your Printer Guest Access The Guest access settings screen appears Guest Access Settings Allow guest access By default guest access is enabled To disable guest access select no Guest network name By default the setup software sets up the name of the guest network Password By default the setup software sets up the password for the guest network To change the password click Change If you ...

Страница 12: ...al offers and updates To sign up to receive special offers and updates click this option Router details To view more information about the Router click this option and go to Router Details page 10 Advanced settings To access settings for advanced users click this option and go to Advanced Settings page 10 Click Finish to save your settings Change Router Name or Password NOTE If you change the Rout...

Страница 13: ... to the Router settings screen Advanced Settings If you are an advanced user familiar with router administration you can access the browser based utility to use the advanced configuration settings of the Router Username Enter this username to access the browser based utility Password Enter this password to access the browser based utility Copy password To copy the password to the Clipboard click t...

Страница 14: ...d enter admin Then enter the password created during the setup software If you did not run the setup software then use the default password admin You can set a new password on the Administration Management screen Refer to Administration Management page 36 Click OK to continue Login Screen NOTE You can also access the browser based utility through Cisco Connect For more information refer to Router ...

Страница 15: ... been inactive for a specified period of time Max Idle Time If your Internet connection has been terminated due to inactivity Connect on Demand enables the Router to automatically re establish your connection as soon as you attempt to access the Internet again To use this option select Connect on Demand In the Max Idle Time field enter the number of minutes you want to elapse before your Internet ...

Страница 16: ...iod If you select this option the Router will periodically check your Internet connection If you are disconnected then the Router will automatically re establish your connection To use this option select Keep Alive In the Redial Period field specify how often the Router should check the Internet connection The default is 30 seconds Telstra Cable Telstra Cable is a service that applies to connectio...

Страница 17: ...t to assign a fixed local IP address to a MAC address DHCP Reservation You will see a list of DHCP clients with the following information Client Name Interface IP Address and MAC Address DHCP Reservation Select Clients from DHCP Table Click the Select check box to reserve a client s IP address Then click Add Clients Manually Adding Client To manually assign an IP address enter the client s name in...

Страница 18: ...ransfer Protocol FTP server or other server behind the Router Before you can use this option you need to sign up for DDNS service with a DDNS service provider www dyndns org or www tzo com If you do not want to use this option keep the default Disabled DDNS DDNS Service If your DDNS service is provided by DynDNS org then select DynDNS org from the drop down menu If your DDNS service is provided by...

Страница 19: ... computer you are using Click Save Settings to apply your changes or click Cancel Changes to clear your changes Setup Advanced Routing This screen is used to set up the Router s advanced functions Operating Mode allows you to select the type s of advanced functions you use Dynamic Routing automatically adjusts how packets travel on your network Static Routing sets up a fixed route to another netwo...

Страница 20: ...up Wi Fi Protected Setup is a feature that makes it easy to set up your wireless network If you have client devices such as wireless adapters that support Wi Fi Protected Setup then you can use Wi Fi Protected Setup Wireless Configuration To manually configure your wireless networks select Manual Proceed to the Manual Setup section To use Wi Fi Protected Setup select Wi Fi Protected Setup Proceed ...

Страница 21: ... client device supports Wi Fi Protected Setup Wait until the LED is off and then try again The LED flashes when a Wi Fi Protected Setup session is active The Router supports one session at a time Wait until the LED is continuously lit or off before starting the next Wi Fi Protected Setup session c After the client device has been configured click OK on the Router s Wi Fi Protected Setup screen The...

Страница 22: ... a RADIUS server for authentication Security Mode Select the security method for your wireless network If you do not want to use wireless security keep the default Disabled WPA WPA2 Mixed Mode NOTE If you are using WPA WPA2 Mixed Mode each device in your wireless network MUST use the same WPA shared key or else the network will not function properly Wireless Security WPA WPA2 Mixed Mode Passphrase...

Страница 23: ...sed in coordination with a RADIUS server This should only be used when a RADIUS server is connected to the Router NOTE If you are using WEP encryption each device in your wireless network MUST use the same WEP encryption method and encryption key or else your wireless network will not function properly RADIUS RADIUS Server Enter the IP address of the RADIUS server RADIUS Port Enter the port number...

Страница 24: ...screen shows computers and other devices on the wireless network The list can be sorted by Client Name Interface IP Address MAC Address and Status Select Save to MAC Address Filter List for any device you want to add to the MAC Address Filter List Then click Add To update the on screen information click Refresh To exit this screen and return to the Wireless MAC Filter screen click Close MAC 01 50 ...

Страница 25: ...ally use the fastest possible data rate and enable the Auto Fallback feature Auto Fallback will negotiate the best possible connection speed between the Router and a wireless client CTS Protection Mode The Router automatically uses CTS Clear To Send Protection Mode when your Wireless N andWireless G devices are experiencing severe problems and are not able to transmit to the Router in an environme...

Страница 26: ...lect the option to allow proxy access Java Java is a programming language for websites If you deny Java you run the risk of not having access to Internet sites created using this programming language Select this option to enable Java filtering Deselect the option to allow Java usage ActiveX ActiveX is a programming language for websites If you deny ActiveX you run the risk of not having access to ...

Страница 27: ...hat shares the entire partition Create multiple shared folders which share specific folders with specific user groups Proceed to Create a Shared Folder page 25 Storage Disk Disk Management IfaformatteddiskisconnectedtotheRouter thenitsname is displayed For each partition of the disk the Partition File System Capacity and Free Space information are displayed Safely Remove Disk Before physically dis...

Страница 28: ...n then proceed to step 4 and specify the folder you want to share NOTE If you select Share entire Partition then all of the Groups with Access see step 5 can access any folder in the partition 4 The Current Folder setting displays the selected folder To specify a different folder click Select To display sub folders click Enter into Folder To return to the previous folder click Return to Upper Fold...

Страница 29: ...rom accessing the shared folder select it and then click the button Click Save Settings to apply your changes or click Cancel Changes to clear your changes Click Close to exit the screen and return to the Disk screen Storage Media Server The storage options are available when a USB storage device is connected to the USB port of the Router If the storage device does not fit for example it may block...

Страница 30: ...n and proceed to step 5 If you do not want to share the entire partition then proceed to step 4 and specify the folder you want to share 4 The Current Folder setting displays the selected folder To specify a different folder click Select To display sub folders click Enter into Folder To return to the previous folder click Return to Upper Folder If you want to create a new folder enter its name in ...

Страница 31: ...der click this option Proceed to Edit an FTP Folder page 29 Delete To delete an FTP folder click this option FTP Summary The FTP Summary screen displays the following information Display Name Partition Shared Folder and Groups with Access FTP Summary To exit the FTP Summary screen and return to the FTP Server screen click Close Create an FTP Folder 1 After you clicked Specify Folder the FTP Folder...

Страница 32: ... To create user groups refer to Create or Edit a Group Account page 30 Available Groups To allow a group access to the FTP folder select it and then click the button Groups with Access To block a group from accessing the FTP folder select it and then click the button Click Save Settings to apply your changes or click Cancel Changes to clear your changes Click Close to exit the screen and return to...

Страница 33: ...lick this option Click Save Settings to apply your changes or click Cancel Changes to clear your changes Create or Edit a Group Account Group Account Group Account To create a group account complete the options To edit a group account make the appropriate changes Group Name Enter a name for the group Description Enter keywords to describe the group Access Select the appropriate level of access rea...

Страница 34: ...ck Save Settings to save your changes or click Cancel Changes to clear your changes To return to the Internet Access Policy screen click Close Summary Status Policies are disabled by default To enable a policy select the policy number from the drop down menu and select Enabled To create a policy follow steps 1 11 Repeat these steps to create additional policies one at a time 1 Select a number from...

Страница 35: ...applications When users send these types of requests to your network via the Internet the Router will forward those requests to the appropriate computers also called servers Before using forwarding you should assign static IP addresses to the designated computers use the DHCP Reservation option on the BasicSetup screen refer to DHCPReservation page14 Applications and Gaming Single Port Forwarding ...

Страница 36: ... more information Protocol Select the protocol s used for this application TCP UDP or Both To IP Address Enter the IP address of the computer running the specific application If you assigned a static IP address to the computer then you can look up its static IP address refer to DHCP Reservation page 14 Enabled Select Enabled to enable port forwarding Click Save Settings to apply your changes or cl...

Страница 37: ... Table DMZ DHCP Client Table DHCP Client Table The DHCP Client Table lists computers and other devices that have been assigned IP addresses by the Router The list can be sorted by Client Name Interface IP Address and MAC Address To select a DHCP client click Select To update the on screen information click Refresh To exit this screen and return to the DMZ screen click Close Click Save Settings to ...

Страница 38: ...ns in the Add a New Application section Priority Select the appropriate priority High Medium Recommend Normal or Low Click Add to save your changes Your new entry will appear in the Summary list Add a New Application QoS Add a New Application Enter a Name Enter a name for this application Port Range Enter the port range that the application will be using For example if you want to allocate bandwid...

Страница 39: ...lected there will be no valid entry shown in this section Remove Click this option to remove an entry Edit Click this option to make changes Click Save Settings to apply your changes or click Cancel Changes to clear your changes Administration Management The Management screen allows the network s administrator to manage specific Router functions for access and security Administration Management Ma...

Страница 40: ...Remote Management Port number in place of yyyy UPnP Universal Plug and Play UPnP allows the appropriate Windows operating system to automatically configure the Router for various Internet applications such as gaming and videoconferencing UPnP If you want to use UPnP keep the default Enabled Otherwise select Disabled Allow Users to Configure Keep the default Enabled if you want to be able to make m...

Страница 41: ...the connections of your network devices including connection to the Internet Administration Diagnostics Diagnostics Ping Test Ping checks the status of a connection IP or URL Address Enter the address of the computer device or website whose connection you wish to test Packet Size Enter the packet size you want to use The default is 32 bytes Number to Ping Enter the number of times you wish to test...

Страница 42: ... write down all of your custom settings After you upgrade its firmware you will have to re enter all of your configuration settings Firmware Upgrade Before upgrading the firmware download the Router s firmware upgrade file from the website www linksys com support Please select a file to upgrade the firmware Click Browse and select the firmware upgrade file StarttoUpgrade Afteryouhaveselectedtheapp...

Страница 43: ...ed End IP Address For the range of IP addresses that can be used by devices on your local network the ending IP address is displayed DHCP Client Table Click this option to view a list of computers or other devices that are using the Router as a DHCP server DHCP Client Table DHCP Client Table The DHCP Client Table lists computers and other devices that have been assigned IP addresses by the Router ...

Страница 44: ...tion 4 Click OK The Router does not have a coaxial port for the cable connection The Router does not replace your modem You still need your cable modem in order to use the Router Connect your cable connection to the cable modem and then insert the setup CD into your computer Click Set up your Linksys Router and follow the on screen instructions The computer cannot connect wirelessly to the network...

Страница 45: ...er Follow these instructions 1 Access the web based utility of the Router Refer to How to Access the Browser Based Utility page 11 2 Click the Storage tab 3 Click the Administration tab 4 In the Workgroup Name field enter the workgroup name of your computer 5 Click Save Settings In Windows XP you do not see the Router in the My Network Places screen In the Network Tasks section click Show icons fo...

Страница 46: ...not displayed then go to Start All Programs Accessories Windows Explorer 2 In the Address field enter the local IP address of the Router xxx xxx xxx xxx The default is 192 168 1 1 You can change this IP address on the Setup Basic Setup screen refer to Setup Basic Setup page 11 Enter Local IP Address of Router NOTE Another option is to use the server name of the Router In the Address field enter Ci...

Страница 47: ...r to Setup Basic Setup page 11 Enter Local IP Address of Router NOTE Another option is to use the server name of the Router In the Address field enter Ciscoxxxxx xxxxx are the last five digits of the Router s serial number You can change the server name on the Storage Administration screen refer to Storage Administration page 29 If you used the setup software for installation then enter the name o...

Страница 48: ... Make sure your computer has a wired or wireless connection to the Router 2 Connect an external USB hard disk drive or USB flash drive to the USB port of the Router Internet Ethernet 4 3 2 1 Power 12VDC USB Access the USB Storage Device 1 On your desktop double click the Computer icon Computer Icon NOTE If the Computer icon is not displayed then go to Start All Programs Accessories Windows Explore...

Страница 49: ...fault user name and password Click OK Enter Account User Name and Password User accounts are set up on the Storage Administration screen for more information refer to Storage Administration page 29 Map a Drive 1 On your desktop double click the Network icon Network Icon NOTE If the My Computer icon is not displayed then go to Start All Programs Accessories Windows Explorer 2 In the Address field e...

Страница 50: ...istration screen for more information refer to Storage Administration page 29 6 Click Finish Click Finish Access the Mapped Drive 1 On your desktop double click the Computer icon Computer Icon NOTE If the Computer icon is not displayed then go to Start All Programs Accessories Windows Explorer 2 Double click the mapped drive to access it Double Click Mapped Drive Windows XP Install the USB Storage...

Страница 51: ...he Router s serial number You can change the server name on the Storage Administration screen refer to Storage Administration page 29 If you used the setup software for installation then enter the name of your wireless network up to 15 characters in the Address field 3 Double click the Public folder By default the Router creates a shared folder called Public NOTE If the USB storage device has pre ...

Страница 52: ...x xxxxx are the last five digits of the Router s serial number You can change the server name on the Storage Administration screen refer to Storage Administration page 29 If you used the setup software for installation then enter the name of your wireless network up to 15 characters in the Address field 3 Right click the folder you want to map and click Map Network Drive Map Network Drive 4 From t...

Страница 53: ...red or wireless connection to the Router 2 Connect an external USB hard disk drive or USB flash drive to the USB port of the Router Internet Ethernet 4 3 2 1 Power 12VDC USB Access the USB Storage Device 1 From your desktop select Go Network Select Go Network 2 Double click the server name NOTE If you used the setup software to install your Router then the name of your wireless network will be the...

Страница 54: ...istration page 29 5 The window should display Connected as admin or whatever name you ve connected with The folders that you have permission to view will be displayed Double click a folder such as Public to open it Double Click to Open 6 The selected folder will open If the user name that you logged in with is in the admin group then you can read write to the folder If the user name is a member of...

Страница 55: ...onnected Servers Connected Servers Check Connected Servers 3 The shared folder will be displayed on the desktop and you can access it by double clicking on the icon Icon of Shared Folder Double Click Shared Folder Icon Add to Startup Login Items 1 Goto the Applemenuand select SystemPreferences Go to Apple System Preferences 2 Click Accounts Click Accounts 3 Select Login Items Select Login Items ...

Страница 56: ...er on your computer and enter the Router s default IP address 192 168 1 1 in the Address field Then press Enter A login screen will appear Non Windows 7 users will see a similar screen In the User name field enter admin Then enter the password created during the setup software If you did not run the setup software then use the default password admin You can set a new password on the Administration...

Страница 57: ...ct To display sub folders click Enter into Folder To return to the previous folder click Return to Upper Folder If you want to create a new folder enter its name in the New Folder field Then click Create 7 To allow a group access to the shared folder select it from the Available Groups column and then click the button NOTE Specify which user groups have read and write or read only access to the sh...

Страница 58: ...the User Management section click Create New User The User Account screen appears User Account 4 In the Name field enter a name for the user 5 In the Full Name field enter the actual name of the user 6 In the Description field enter keywords to describe the user 7 In the Password and Confirm Password fields enter the password that the user will use for login 8 From the Group Member drop down menu ...

Страница 59: ...bps 67 dBm 10 PER 802 11n HT40 MCS0 13 5 Mbps 75 dBm 10 PER 802 11n HT20 MCS15 130 Mbps 69 dBm 10 PER 802 11n HT20 MCS0 6 5 Mbps 79 dBm 10 PER 802 11g 54 Mbps 74 dBm 10 PER 802 11g 6 Mbps 84 dBm 10 PER 802 11b 11 Mbps 86 dBm 10 PER 802 11b 1 Mbps 92 dBm 10 PER Antenna Gain in dBi 802 11g 2 4 GHz 1 8 dBi 802 11n 2 4 GHz 1 8 dBi UPnP able cert Able Security Features WEP WPA WPA2 RADIUS SPI Firewall ...

Страница 60: ...ase price of the software media EXCLUSIONS AND LIMITATIONS This limited warranty does not apply if a the product assembly seal has been removed or damaged b the product has been altered or modified except by Cisco c the product damage was caused by use with non Cisco products d the product has not been installed operated repaired or maintained in accordance with instructions supplied by Cisco e th...

Страница 61: ...aining provisions shall remain in full force and effect OBTAINING WARRANTY SERVICE If you have a question about your product or experience a problem with it please go to www myciscohome com support where you will find a variety of online support tools and information to assist you with your product If the product proves defective during the Warranty Period contact Cisco Technical Support or if you...

Страница 62: ... the USA is firmware limited to channels 1 through 11 Safety Notices WARNING Do not use this product near water for example in a wet basement or near a swimming pool WARNING Avoid using this product during an electrical storm There may be a remote risk of electric shock from lightning WARNING This product contains lead known to the State of California to cause cancer and birth defects or other rep...

Страница 63: ...pose of this and other electric and electronic equipment via designated collection facilities appointed by the government or local authorities Correct disposal and recycling will help prevent potential negative consequences to the environment and human health For more detailed information about the disposal of your old equipment please contact your local authorities waste disposal service or the s...

Страница 64: ...eb sites You agree to all of the terms and conditions of the web sites including the Terms of Use located at the web site you are using as applicable and as amended from time to time Software Licenses The software licenses applicable to software from Cisco are made available at the Cisco public web site at www myciscohome com and www myciscohome com gpl respectively For Your convenience of referen...

Страница 65: ...ership The Technology and Documentation are licensed and not sold to You by Cisco and the relevant third parties set forth in Schedule 2 Cisco its suppliers and its licensors respectively retain all right title and interest including all copyright and intellectual property rights in and to the Technology and Documentation and all copies derivatives and portions thereof All rights not specifically ...

Страница 66: ...Cisco product and or Software may become inaccessible There may be circumstances where we apply an Upgrade automatically in order to comply with changes in legislation legal security or regulatory requirements or as a result of requirements to comply with the terms of any agreements Cisco has with any third parties regarding Your Cisco product and or the Software You will always be notified of any...

Страница 67: ...es costs and fees including reasonable attorney fees arising from Your use of the Technology as well as from Your failure to comply with any term of this Agreement Technical Support This limited warranty is neither a service nor a support contract Information about Cisco s current technical support offerings and policies including any fees for support services can be found at www myciscohome com s...

Страница 68: ...otect your rights with two steps 1 copyright the software and 2 offer you this license which gives you legal permission to copy distribute and or modify the software Also for each author s protection and ours we want to make certain that everyone understands that there is no warranty for this free software If the software is modified by someone else and passed on we want its recipients to know tha...

Страница 69: ...orage or distribution medium does not bring the other work under the scope of this License 3 You may copy and distribute the Program or a work based on it under Section 2 in object code or executable form under the terms of Sections 1 and 2 above provided that you also do one of the following a Accompany it with the complete corresponding machine readable source code which must be distributed unde...

Страница 70: ...tware distributed through that system in reliance on consistent application of that system it is up to the author donor to decide if he or she is willing to distribute software through any other system and a licensee cannot impose that choice This section is intended to make thoroughly clear what is believed to be a consequence of the rest of this License 8 If the distribution and or use of the Pr...

Страница 71: ...ou wish that you receive source code or can get it if you want it that you can change the software and use pieces of it in new free programs and that you are informed that you can do these things To protect your rights we need to make restrictions that forbid distributors to deny you these rights or to ask you to surrender these rights These restrictions translate to certain responsibilities for y...

Страница 72: ...brary means either the Library or any derivative work under copyright law that is to say a work containing the Library or a portion of it either verbatim or with modifications and or translated straightforwardly into another language Hereinafter translation is included without limitation in the term modification Source code for a work means the preferred form of the work for making modifications t...

Страница 73: ...bject code is made by offering access to copy from a designated place then offering equivalent access to copy the source code from the same place satisfies the requirement to distribute the source code even though third parties are not compelled to copy the source along with the object code 5 A program that contains no derivative of any portion of the Library but is designed to work with the Libra...

Страница 74: ...his requirement contradicts the license restrictions of other proprietary libraries that do not normally accompany the operating system Such a contradiction means you cannot use both them and the Library together in an executable that you distribute 7 You may place library facilities that are a work based on the Library side by side in a single library together with other library facilities not co...

Страница 75: ...written in the body of this License 13 The Free Software Foundation may publish revised and or new versions of the Lesser General Public License from time to time Such new versions will be similar in spirit to the present version but may differ in detail to address new problems or concerns Each version is given a distinguishing version number If the Library specifies a version number of this Licen...

Страница 76: ... derived from this software may not be called OpenSSL nor may OpenSSL appear in their names without prior written permission of the OpenSSL Project 6 Redistributionsofanyformwhatsoevermustretainthe following acknowledgment This product includes software developed by the OpenSSL Project for use in the OpenSSL Toolkit http www openssl org THIS SOFTWARE IS PROVIDED BY THE OpenSSL PROJECT AS IS AND AN...

Страница 77: ... include an acknowledgement This product includes software written by Tim Hudson tjh cryptsoft com THIS SOFTWARE IS PROVIDED BY ERIC YOUNG AS IS AND ANY EXPRESS OR IMPLIED WARRANTIES INCLUDING BUT NOT LIMITED TO THE IMPLIED WARRANTIES OF MERCHANTABILITY AND FITNESS FOR A PARTICULAR PURPOSE ARE DISCLAIMED IN NO EVENT SHALL THE AUTHOR OR CONTRIBUTORS BE LIABLE FOR ANY DIRECT INDIRECT INCIDENTAL SPEC...

Страница 78: ...ed trademarks of Cisco Systems Inc and or its affiliates in the United States and certain other countries All other trademarks mentioned in this document or website are the property of their respective owners The use of the word partner does not imply a partnership relationship between Cisco and any other company 10012110NC JL ...

Отзывы: