5
3. Configuration
The IP ACCESS KVM SWITCH CLASSIC’s
communication interfaces are all based on
TCP/IP. The switch comes pre-configured
with the IP configuration detailed here:
If this initial configuration does not meet your requirements, the following section describes the
configuration that is necessary to access the IP ACCESS SWITCH CLASSIC for the first time.
3.1 Initial IP Configuration via Network
If DHCP mode is enabled (IP auto configuration = DHCP), the IP Access KVM Switch Classic
will try to contact a DHCP server in the subnet to which it is physically connected. If a DHCP
server is found, it may provide a valid IP address, gateway address and net mask. Before you
connect the device to your local subnet, be sure to complete the corresponding configuration of
your DHCP server. It is recommended to configure a fixed IP assignment to the MAC address of
the IP Access KVM Switch Classic. You can find the MAC address labeled on the bottom side
of the metal housing.
There is a Network Setup Software tool (PSetup) for setting up the network configuration (IP
address, Subnet mask, DHCP, etc). It is useful when you want to change the network settings
or when you cannot access to the unit due to not knowing the network settings of the unit. In
this case, you can view or change the settings via this utility. Follow the procedure described on
the next page
(Section 3.3.)
3.2 Initial Configuration via Serial Console
The IP ACCESS KVM SWITCH CLASSIC has a
serial line interface (host side) for connecting a
serial terminal. This connector is compliant with the
RS-232 serial line standard. The serial line has to
be configured with the parameters given in this
table:
When configuring with a serial terminal, reset the IP ACCESS KVM SWITCH CLASSIC and
immediately press the ESC key. You will see some device information and a “=>” prompt. Type
config and press the Enter key. Wait a few seconds for the configuration questions to appear.
As you proceed, the following questions will appear on the screen. To accept the default values
(shown in square brackets below) press the Enter key.
IP auto configuration (non/dhcp/bootp) [dhcp]:
IP [192.168.0.70]:
Net mask [255.255.255.0]:
Gateway (0.0.0.0 for none) [0.0.0.0]:
Parameter
Value
IP auto configuration
none
IP-Address
192.168.0.70
Net-mask
255.255.255.0
Default-Gateway
none
Parameter
Value
Bits/second
115200
Data bits
8
Parity
No
Stop bits
1
Flow Control
None
6
3.3 IP ACCESS KVM SWITCH CLASSIC Setup Tool
3.3.1 MAC Address Detection
Connect the IP ACCESS KVM SWITCH CLASSIC to your computer either via a local network,
or via USB. If you use a USB connection Windows will detect the IP ACCESS KVM SWITCH
CLASSIC as a ‘Removable Disk’ and an appropriate drive letter will be assigned.
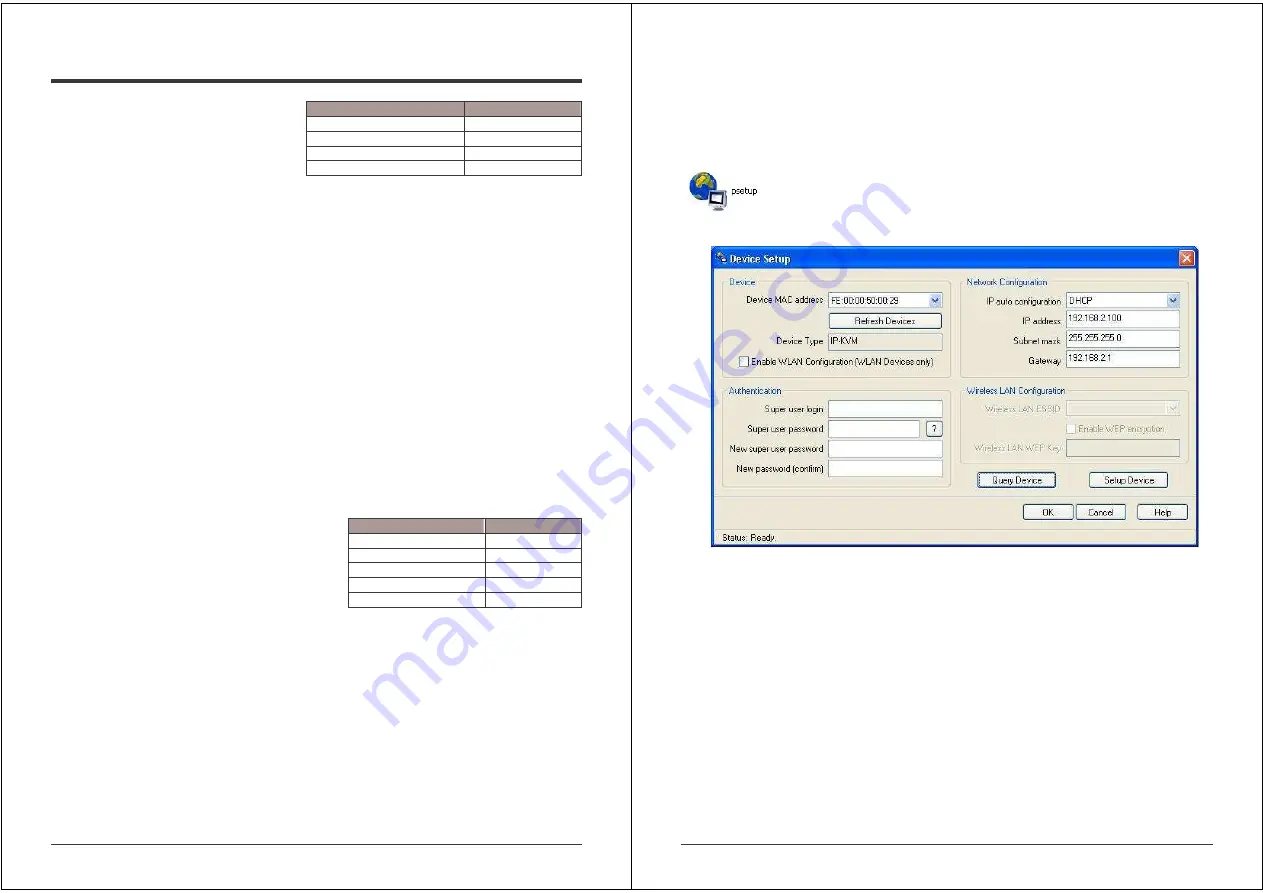
Start the setup tool from the CD ROM.
A window opens as shown below:
On the upper left corner, the MAC address of the IP ACCESS KVM SWITCH CLASSIC is
displayed. To detect the MAC address, press the Refresh Devices button. The displayed MAC
address is the same as that printed on the sticker on the base of the unit.
On the lower right corner of the window, there are two buttons: Query Device and Setup
Device. Press the Query Device button to display the preconfigured values of the network
configuration. The values are displayed in the text fields located above. If necessary, adjust the
network settings to your needs. To save the changes enter a user login and a password
(see
3.3.2 Authentication, on page 9)
and then press the Setup Device button.


