background image

GB 


22

4 Installation 


 4  Implantation 

 4  Posizionamento 

4.6 Requirements 

for 

electrical 

connection 
 

 4.6 Conditions 

du 

raccordement 

électrique 


4.6 

Premesse per il collegamento 
elettrico 

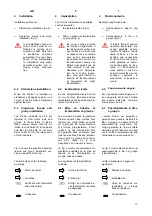
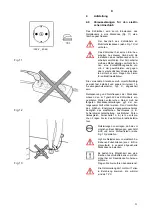
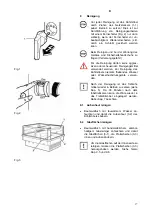
The cabinet is connected by inserting the 
power plug in a socket (fig. 11). 


Le meuble à basse température est rac-
cordé electriquement en enfonçant la 
fiche de contact dans une prise de 
courant (fig. 11). 


Il mobile viene collegata elettricamente 
inserendo la spina di alimentazione in 
una presa di corrente (fig. 11). 


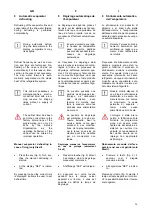
The cabinet must not be plug-
ged into a multiple outlet power 
strip (see fig. 12). 


Le raccordement du meuble à 
des preses multiples est interdit 
(voir fig. 12). 


Non è permesso collegare il 
mobile a prese multiple (vedi 
fig. 12). 


The cabinet has no ON/-
OFF switch, which is why 
we recommend provision 
remote switch must discon-
nect all poles of the cabinet 
from the mains, guarantee 
a contact opening width of 
at least 3 mm and must be 
able to be secured against 
accidental reactivation. 
Please ask your electrician.


Le meuble à basse température 
ne possède pas d’interrupteur de 
Marche/ Arrêt. C’est pourquoi il 
est recommandé d’installer un in-
terrupteur à distance à coupure 
en charge. L’interrupteur à dis-
tance doit couper le meuble du 
réseau sur tous les pôles, ga-
rantir une largeur d’oùverture de 
contact de 3 mm min. et pouvoir 
être protégé contre un réen-
clenchement non intentionnel. 
A ce sujet, demandez à votre 
électricien. 


Il mobile non dispone di un 
inseritore/disinseritore. 
Perciò viene suggerito di 
insta llare un teleruttore ad 
interruzione di carico. Il 
teleruttore deve staccare il 
mobile dalla rete in modo 
onnipolare, garantire una a-
pertura di contatto di minimo 
3 mm ed essere assicurabile 
contro restart accidentali. 
Chiedere consiglio all’elet-
tricista. 


The socket employed must be firmly 
installed, properly earthed and se-
parately fuse-protected by a 16A-circuit 
breaker, type C. 


La prise de courant utilisée doit être 
réglementairement mise à la terre, ins-
tallée à demeure et protégée sépa-
rément à l’aide d’un disjoncteur de 16 A, 
de type C. 


La presa di corrente utilizzata deve es-
sere collegata a massa conforme alle 
prescrizioni, installata in modo fisso e 
protetta separatamente con un inter-
ruttore automatico 16 A, tipo C 
 

Supply voltage and frequency of the 
socket must be in accordance with the 
data shown on the type plate of the 
cabinet. Therefore, the cross-section of 
the wires must be increased, if neces-
sary, for long wires to the socket. The 
local utility company’s regulations on the 
power connection (e.g. earth-fault pro-
tection, additional equipotential bonding, 
remote control switch etc.) must be ob-
served. 
If in doubt, consult a qualified electrician.


La tension et la fréquence du réseau doi-
vent correspondre aux valeurs imprimées 
dans la plaque signalétique du meuble. 
C’est pourquoi la section du conducteur 
doit être augmentée, le cas échéant, pour 
les conducteurs d’arrivée à la prise de 
courant assez longs. Il faut satisfaire aux 
prescriptions de l’entreprise d’électricité lo-
cale en ce qui concerne le raccordement é-
lectrique (p.ex. déclenchement par courant 
de défaut, compensation supplémentaire 
de potentiel, interrupteur à distance, et 
autres). En cas de doute, demandez à 
votre électricien. 


Tensione e frequenza di rete devono 
corrispondere ai valori riportati sulla 
targhetta di identificazione del mobile. 
Perciò se i cavi di alimentazione fossero 
lunghi, aumentare eventualmente la 
sezione del conduttore. Inoltre devono 
essere soddisfatte le prescrizioni della 
società elettrica locale relative al 
collegamento elettrico (ad es. 
protezione per correnti di guasto, 
compensazione di potenziale supplì-
mentare, teleruttore, etc.).  
In caso di dubbio chiedere consiglio 
all’elettricista.


Run the power cables so that 
they are protected from risk of 
damage and there is no risk of 
tripping (see fig. 13). 


Poser les câbles d’alimentation 
de sorte qu’ils soient protégés 
contre des détériorations éven-
tuelles et ne représentent pas 
de risque de trébuchement 
(voir fig. 13). 


Installare i cavi di alimenta-
zione in modo che siano pro-
tetti contro eventuali danni e 
che non rappresentino ostacoli 
pericolosi (vedi fig. 13). 


If necessary, put the plugs of 
electrically operated accesso-
ries (e.g. the display super-
structure) into separately 
secured sockets. 


Le cas échéant, enfoncer les 
fiches de contact de pièces ac-
cessoires en exploitation élec-
trique (comme p. ex. super-
structure à pannonceaux) dans 
des prises protégées séparément 
par fusibles. 


Eventualmente inserire le spine 
di alimentazione degli accessori 
ad azionamento elettrico (ad es. 
Sovrastruttura a display) in 
prese di corrente a promezione 
separata. 


There is the possibility of guiding 
the electrical connection from the 
cabinet to the ceiling of the room 
as an alternative. 
Consult your Service 
Organization about this. 


Il existe une alternative qui 
consiste à effectuer le rac-
cordement électrique depuis le 
meuble au plafond du local. 
 A ce sujet, demandez à votre 
service après vente. 


Alternativamente esiste la pos-
sibilità di realizzare il col-
legamento elettrico partendo dal 
mobile fino al soffitto del locale.  
Per eventuali domande rivolgersi 
al servizio assistenza. 


The power cable may not 
come into contact with parts 
over 75 °C. 


Le câble d'alimentation ne doit 
pas entrer en contact avec des 
pièces atteignant une chaleur 
supérieure à 75 °C. 


Il cavo di alimentazione non 
deve venire a contatto con 
componenti che presentano 
una temperatura superiore a 
75° C. 


Содержание Premor 1585 G

Страница 1: ...849188d 1 Premor 1585 G Premor 2085 G...

Страница 2: ...ytt ohjeet CZ esk Republika Provozn n vod PL Polska Instrukcja obs ugi H Magyarorsz g Haszn lati utas t s GR SK Slovensko Prev dzkov n vod SLO Slovenija Navodila za uporabo LV Latvija Lieto anas instr...

Страница 3: ...are numbered separately in each section e g fig 3 Verweise auf eine bildliche Darstellung sind im Text in Klammern gesetzt Dabei gibt die erste Zahl die Bildnummer und die zweite Zahl von der ersten...

Страница 4: ...dans le texte Le pre mier chiffre en indique le num ro et le second s par du premier par un trait d union la position sur la figure correspondante Exemple 4 2 signifie fig 4 position 2 I riferimenti a...

Страница 5: ...2 1 Factory thermostat setting 30 6 2 2 Werkseitige Einstellung der Steuer elektronik 31 6 2 2 Factory setting fort he electronic controller 32 7 Warenbeschickung und Preisauszeichnung 33 7 Product lo...

Страница 6: ...que ffectu l usine 32 6 2 2 Regolazione del regolatore elettronico eseguita in fabbrica 32 7 Chargement des produits et affichage des prix 34 7 Introduzione dei prodotti e indicazione dei prezzi 34 7...

Страница 7: ...ase Only store products with a temperature of 18 C or below Allein der oben beschriebene Einsatz unter Beachtung der in dieser Betriebsanleitung enthaltenen Vorschriften zu Aufstellung Anschlu Bedienu...

Страница 8: ...presentano una temperatura di 18 C o inferiore Seule l utilisation d crite ci dessus en observant les prescriptions d implantation de raccordement conduite et maintenance contenues dans le pr sent man...

Страница 9: ...en Sie niemals Geh useabdeckungen sofern es in dieser Betriebsanleitung nicht ausdr cklich beschrieben wurde denn dies k nnte Teile mit lebensgef hrlichen Betriebsspannungen freilegen Never detach any...

Страница 10: ...t d gager des pi ces sous tensions de service mortelles Non rimuovere mai le coperture del contenitore a meno che ci non venga descritto espressamente nel presente manuale d uso Si potrebbero scoprire...

Страница 11: ...hild 5 Type plate 6 Prallscheibe 6 Secondary glass panel 7 Thermometer 7 Thermometer 8 Verfl ssiger 8 Condenser 9 Verdampfer 9 Evaporator 10 Abtauuhr hinter Kunststoffkappe 10 Defrost timer behind pla...

Страница 12: ...identificazione 6 Eclairage vertical bilat ral 6 Illuminazione verticale su entrambi i lati 7 Thermom tre 7 Termometro 8 Condenseur 8 Condensatore 9 Evaporateur 9 Evaporatore 10 Pendule de d givrage d...

Страница 13: ...Ventilatoren oder offenen T ren Fig 2 aussetzen Abluft von Klima Bel ftungsanlagen Fig 3 be achten Sockelbereich des K hlm bels nicht mit Gegen st nden wie zum Beispiel mit Warenkartons Fig 4 zustelle...

Страница 14: ...om air conditionners venti lators fig 3 Observer la sortie d air des installations de conditionne ment d air d a ration fig 3 Fare attenzione all aria di scarico degli impianti di condizionamento vent...

Страница 15: ...rh hen 4 2 Einzelaufstellung Bei der Einzelaufstellung gegen eine Raumwand kann das K hlm bel vollst ndig gegen die Wand gestellt werden 4 3 Reihen und Blockaufstellung Die Premor K hlm bel k nnen zu...

Страница 16: ...t tre plac compl tement contre le mur Per il posizionamento singolo con tro una parete del locale il mobile pu essere sistemato completa mente contro il muro 4 3 Single row line up and group installat...

Страница 17: ...erausf hren An jedem der vier Stellf e mit einer Umschaltknarre SW 10 je eine Schraube herausschrauben und die Transportsicherungen ent fernen siehe Fig 8 und 9 Schrauben und Transportsi cherungen f r...

Страница 18: ...gs 8 and 9 D visser respectivement une vis chacun des pieds r glables l aide d un cliquet r versible ouverture de cl 10 et enlever les arr toirs de transport voir fig 8 et 9 Togliere una vite su ognun...

Страница 19: ...n K hlm bel mit Displayaufsatz erworben haben montieren Sie diesen gem Kap 4 7 K hlm bel am gew nschten Ort auf stellen Vorgaben zur gew hlten Aufstel lungsform beachten K hlm bel nur durch Schieben b...

Страница 20: ...splay mon tarla secondo il cap 4 7 Install the cabinet at the desired location Installer le meuble l endroit souhait Posizionare il mobile nel luogo desiderato Observe specifications on the desired in...

Страница 21: ...Netzfrequenz der Steckdose m ssen den im Typschild des K hlm bels ein gepr gten Werten entsprechen Darum mu bei l ngeren Steckdosenzuleitungen ggf der Lei tungsquerschnitt erh ht werden Den Vorschrift...

Страница 22: ...e ob served If in doubt consult a qualified electrician La tension et la fr quence du r seau doi vent correspondre aux valeurs imprim es dans la plaque signal tique du meuble C est pourquoi la section...

Страница 23: ...l verbinden 14 3 Diese Kupplung darf nur f r den Displayaufsatz und nicht f r ande re elektrische Betriebsmittel ver wendet werden bersch ssiges Kabel hinter der Sto leiste verstauen 15 4 Mittleres St...

Страница 24: ...e de couplage ne doit tre utilis e que pour la superstructure panonceaux et pas pour d autres mat riels lectriques Utilizzare il giunto solo per la sovrastruttura a display e non per altre apparec chi...

Страница 25: ...an Mehr fachsteckdosen ist verboten Das K hlm bel hat keinen Ein Ausschal ter Aus diesem Grund wird die Installa tion eines Fernschalters empfohlen Fragen Sie hierzu Ihren Elektroinstal lateur Falls v...

Страница 26: ...ol switch Please ask your electrician Le meuble ne poss de pas d interrupteur de Marche Arr t C est pourquoi il est recommand d installer un interrupteur distance A ce sujet demandez votre lectricien...

Страница 27: ...werkseitig voreingestellt und arbeiten automatisch Die Grundeinstellung wurde f r Umge bungsbedingungen von 25 C und eine relative Luftfeuchtigkeit von 60 voreingestellt Werkseitige Thermostateinstel...

Страница 28: ...r glage de base a t pr r gl pour des conditions d ambiance de 25 C et une humidit relative de l air de 60 l regolatori sono stati preregolati in fabbrica e funzionano auto maticamente La regolazione...

Страница 29: ...lgende Temperatur anzeigen Typ Sollanzeige Premor 1585 G 18 C Premor 2085 G 18 C Der Thermostat ist werkseitig eingestellt Sollte die Temperaturanzeige am Thermometer 2 1 ca 90 Minuten nach der Beschi...

Страница 30: ...1585 G 18 C Premor 1585 G 18 C Premor 2085 G 18 C Premor 2085 G 18 C Premor 2085 G 18 C The thermostat has been facto ryset If the temperature dis played on the thermometer 2 1 approx 90 minutes afte...

Страница 31: ...Nach Bet tigung der Taste set 3 sek wird an der Steuerelektronik nicht mehr die Aufbewahrungstem peratur sondern der Temperatursollwert angezeigt Die Aufbewahrungstemperatur kann erst wieder abgelese...

Страница 32: ...set Apr s l actionnement de la touche set 3 sec ce n est plus la temp rature de conservation qui est indiqu e sur l unit lectronique de commande mais la valeur de consigne de temp rature La tem p ratu...

Страница 33: ...hlkost bzw Speiseeis beschicken Lagern Sie keine ungefrorene Ware ein bzw versuchen Sie nicht Waren im K hlm bel einzufrieren Das K hlm bel darf nur mit Ware beschickt werden die eine Produkttemperatu...

Страница 34: ...1 1 Do not load the cabinet with non frozen products or try to freeze products in the cabinet Only products with a temperature of 18 C or lower may be loaded into the cabinet The cabinet may not be lo...

Страница 35: ...s anfallende Tauwasser verdunstet automatisch ber die Abw rme des K ltesystems Dieses K hlm bel besitzt eine wartungs freie elektronische Abtauuhr mit Gangre serve zur berbr ckung von Zeiten ohne Stro...

Страница 36: ...frigorifero This cabinet possesses a maintenance free electro nic defrost timer with a run ning reserve for bridging times without a supply of current Ce meuble poss de une pendule de d givrage lec t...

Страница 37: ...des K hlm bels niemals flie endes Wasser oder Wasserhochdruckger te verwen den Nach der Reinigung ist das Tiefk hl m bel wieder in Betrieb zu setzen siehe Kap 5 Ca 90 Minuten nach dem Inbetriebsetzen...

Страница 38: ...prox 90 minutes after putting into operation Observe the instructions in section 7 Apr s l ach vement des travaux de nettoyage re mettre le meuble en service voir chap 5 Les produits peuvent tre de no...

Страница 39: ...4 innen und au en s ubern Ist eine Reinigung in dem Bereich in dem die Glasschiebedeckel berlappen erforderlich bauen Sie einen der Glasschiebedeckel wie in Fig 4 gezeigt aus Nehmen Sie dann die Rein...

Страница 40: ...revoli in vetro interna mente ed esternamente fig 4 If the overlapping area of the sliding glass covers has to be cleaned remo ve one of the covers as shown in fig 4 Clean and replace the sliding glas...

Страница 41: ...ockenem Baumwolltuch sorgf ltig trockenwischen Nach der Reinigung darf keine Restfeuchtigkeit in den Warenr umen oder in der Reinigungsrinne verbleiben Ca 1 2 Stunden nach dem Inbetriebsetzen kann die...

Страница 42: ...ain in the display compartment Il ne doit pas subsister d humi dit r siduelle dans l enceinte destin e aux produits apr s le nettoyage Dopo la pulizia non deve es sere presente umidit residua nelle su...

Страница 43: ...siehe Kap 9 5 Prallscheibe am oberen Rand greifen und so weit anheben da sie aus den unteren F hrungen freikommt 8 A Prallscheibe so weit absenken da sie aus den oberen F hrungen frei und an den unte...

Страница 44: ...soulever jusqu ce qu il soit d gag des glis si res de guidage inf rieures 8 A Afferrare il vetro sul bordo superiore e sollevarlo in modo da liberarlo dalle guide inferiori 8 A Lower the secondary gla...

Страница 45: ...r ges ubert werden Tiefk hlm bel au er Betrieb nehmen siehe Kap 11 2 Schrauben 1 1 herausschrauben Sockelverkleidung 1 2 abklappen Pr fen ob eine S uberung der Verfl ssiger lamellen Fig 2 3 erforderli...

Страница 46: ...ap 11 Mettere fuori funzione il mobile vedi cap 11 Unscrew 2 screws 1 1 D visser 2 vis 1 1 Togliere 2 viti 1 1 Lift down raceway panel 1 2 Rabattre l habillage de socle 1 2 Abbassare il rivestimento z...

Страница 47: ...Starter wechseln Der Austausch von Leuchtk rpern oder Startern darf nur von einer Elektrofach kraft oder einer elektrotechnisch unter wiesenen Person durchgef hrt werden Wenden Sie sich an Ihren Elek...

Страница 48: ...ectrical engineering Contatct your electrician or the Service Organi zation Le remplacement de lampes ou de starters ne doit tre effectu que par un lectricien qualifi ou une personne initi e l lectrot...

Страница 49: ...genommen sind folgende T tigkeiten zus tzlich durchzuf hren K hlm bel reinigen siehe Kap 9 Glasschiebedeckel ffnen um die Bildung von Schwitzwasser und der damit verbundenen Geruchsentwicklung zu verm...

Страница 50: ...le seguenti operazioni Clean cabinet see item 9 Open sliding glass covers to prevent the formation of condensation and corres ponding odours When the cabinet is stored in a storage room cover the cab...

Страница 51: ...hermostat ist falsch eingestellt Extreme Umgebungsbedingun gen vermeiden Aufbewahrungs temperatur nachregeln Kap 6 Die warme Abluft von einem anderen K hlm bel wird direkt als Zuluft angesaugt Reihen...

Страница 52: ...ir outlet of another cabinet is directly taken in as air intake Observe single row line up and group installation Sect 4 Ventilation slots blocked or covered Keep ventilation slots free Lack of air in...

Страница 53: ...Chap 6 L air chaud sortant d un autre meuble est directement aspir comme air amen Observer la mise en lin aire ou l implantation en groupe Chap 4 Ou es d a ration bouch es ou recouvertes Maintenir les...

Страница 54: ...o mobile viene aspirata direttamente come aria di alimentazione Osservare il posizionamento in fila e a gruppo Cap 4 Feritoie di aerazione ostruite o coperte Tenere libere le feritoie di aerazione Man...

Страница 55: ...Displayaufsatz auf Anfrage Fahrzubeh r Die Montage des Fahrzubeh rs sollte vom Kundendienst durchgef hrt werden Scannerpreisschiene 40 mm stirnseitig zum Aufkleben Scannerpreisschiene 40 mm Premor 158...

Страница 56: ...ruote Assembly of the castor base should be carried out by the Service Organization Le montage des rou lettes doit tre effectu par le service apr s vente Il montaggio del kit ruo te dovrebbe essere e...

Страница 57: ...ar municipal waste The refrigeration circuit must not be damaged Before discarding the cabinet for disposal make it unserviceable by disconnecting the power plug and cutting off the power cable Auskun...

Страница 58: ...ngombranti Non danneggiare il circuito di refrigerazione Staccare la spina di alimentazione dalle apparecchiature fuori uso e poi tagliare il cavo di alimentazione in modo da renderle inutilizzabili V...

Страница 59: ...schild Beachten Sie bez glich der Ausf hrung der Schutzma nahmen die Vorschriften Ihres Energieversorgungs unternehmens GB 16 Specifications Type Premor 1585 G Premor 2085 G Length incl bumper 1480 mm...

Страница 60: ...rescriptions de votre entreprise d lectricit en ce qui concerne l ex cution des mesures de protection I 16 Carctteristiche tecniche Modello Premor 1585 G Premor 2085 G Lunghezza con batticarello 1480...

Страница 61: ...61...

Страница 62: ...62...

Страница 63: ...63...

Отзывы: