4 EN
FUNCTIONS
EN
3.
Do not drag, pull or lift equipment by the cables.
2.3
CONNECTION AND PREPARATION OF EQUIPMENT
FOR STICK WELDING.
• TURN OFF WELDER BEFORE MAKING CONNECTIONS.
Connect all welding accessories securely to prevent power
loss. Carefully follow safety precautions described.
Fit the selected electrode to the electrode clamp.
4.
Connect the ground cable quick connection to the negative (-
) receptacle and locate the clamp near the welding zone.
5.
Connect the electrode cable quick connection to the positive
(+) receptacle.
6.
Use the above connection for straight polarity welding; for re-
verse polarity turn the connection.
7.
On the unit preset for coated electrode welding
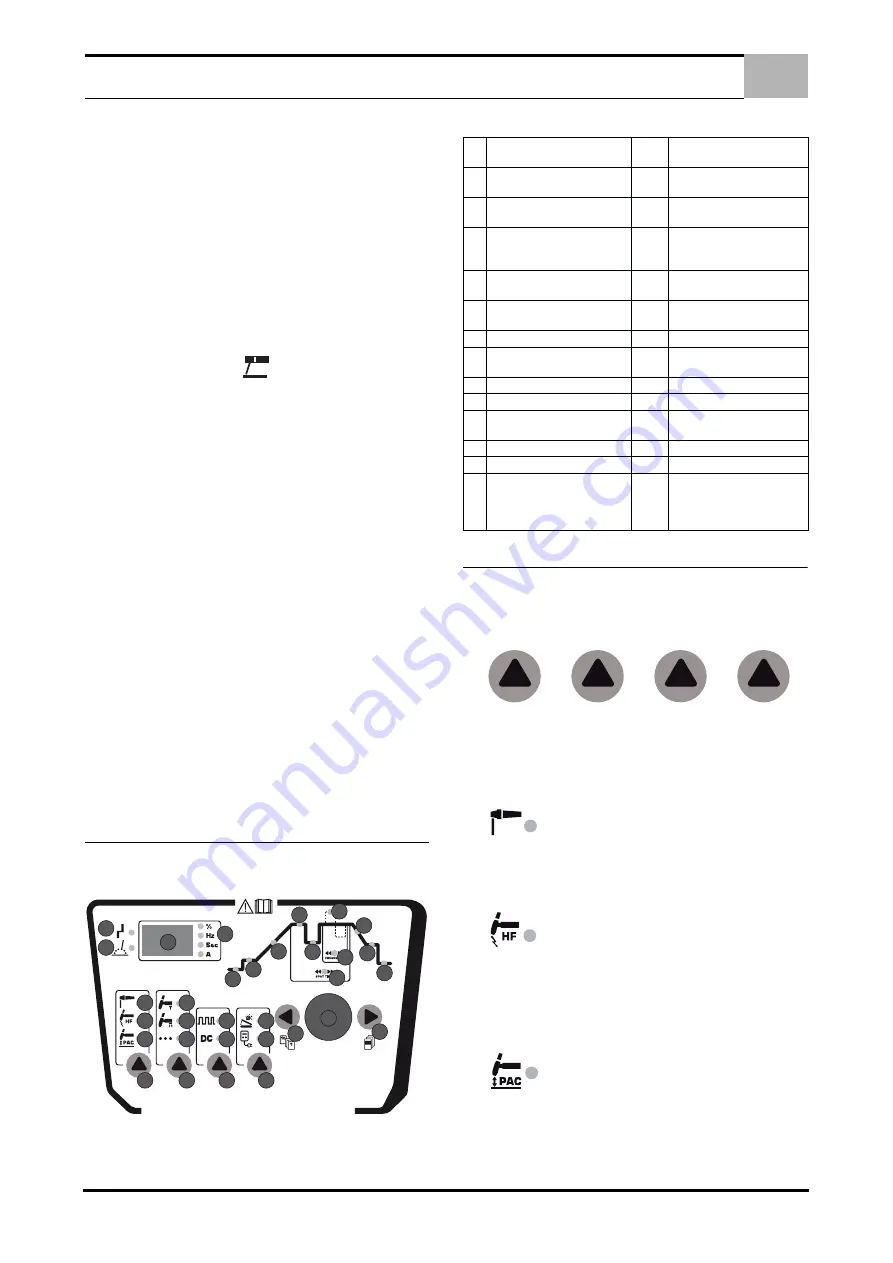
(Ref.1 - Picture 1 Page 4.).
8.
Adjust welding current with ampere selector (Ref. 30 - Picture
1 Page 4.).
9.
Turn on the power source
2.4
CONNECTION AND PREPARATION OF EQUIPMENT
FOR GAS TUNGSTEN ARC WELDING TIG.
• TURN OFF WELDER BEFORE MAKING CONNECTIONS.
Connect all welding accessories securely to prevent power
loss. Carefully follow safety precautions described.
1.
Position the welder in TIG LIFT and TIG HF mode.
2.
Fit the required electrode and nozzle to the electrode holder
(Check the protrusion and state of the electrode tip).
3.
Connect the ground cable quick connection to the positive (+)
receptacle and the clamp near the welding zone.
4.
Connect the torch power cable connector to the negative re-
ceptacle. (-) .
5.
Connect the gas hose to the regulator located on the gas cyl-
inder.
6.
Regulate the welding mode and the desired parameters
(Section 5.0) .
7.
Open the gas valve on the torch.
8.
Connection of relay command.
9.
When relay command is required connect the relay to the
socket on the front panel. In this position regulation can be
fractioned through the power gauge.
10. Turn ON the power source.
3.0
FUNCTIONS
3.1
FRONT PANEL
Picture 1.
4.0
WELDING SET UP
4.1
FUNCTION KEYS.
If you press for at least a second the function keys
On the panel as represented by the symbol.
It is possible to select the desired welding functions. With each
function key pressed you are selecting a welding function.
IMPORTANT: VERTICAL FUNCTION KEYS DO NOT WORK
DURING THE WELDING STAGE.
1.
Covered Electrode Welding MMA.
By pressing the function key 4 and taking the luminous indicator
on symbol 1 - Picture 1 Page 4.) you can select the mode of elec-
trode welding.
2.
TIG DC HF Welding.
By pressing the function key 4 - Picture 1 Page 4.) you can select
the mode of TIG welding with high-voltage start until the luminous
indicator reaches the position on symbol 2 - Picture 1 Page 4.) , If
you press the torch button you will get a high-voltage discharge
that allows the arc fusing.
3.
TIG DC Welding with Lift Start
By pressing the function key 4 - Picture 1 Page 4.) you can select
the mode of TIG welding with lift start until the luminous indicator
reaches the position on symbol 3 - Picture 1 Page 4.) .
In this mode the arc fusing occurs with the following sequence:
16
15
17
18
1
2
3
4
5
6
7
8
9
10
11
12
13
14
31
30
32
19
20
21
22
23
25
26
24
27
28
29
1
Covered Electrode Welding
Indicator (MMA)
18
Digital Instrument mode
2
TIG DC Welding Indicator
with High Freq. Start
19
Pre Gas Indicator
3
TIG DC Welding Indicator with
Lift Start
20
Initial Current Indicator (Four
Times mode)
4-8
11
14
Vertical Function Key
21
Ascent Slope Indicator
5
Welding Indicator (Two
Times)
22
Nominal Current Welding In-
dicator
6
Welding Indicator (Four
Times)
23
Reduced Current Indic. (Four
Times mode)
7
Spot Welding Indicator
24
Spot Time Indicator
9
TIG CD Pressed Indicator
25
Wave-Shaped Balance Indi-
cator
10 TIG CD Indicator
26
Pressed Frequency Indicator
12 Remote Control Indicator
27
Descent Slope Indicator
13 Remote Control Indicator
28
Final Current Indicator (Four
Times mode)
15 Alarm Indicator
29
Post Gas Indicator
16 Current Supply Indicator
30
Regulation Knob
17 Digital Instrument
31
32
Left scrolling kex/Memorized
program recall
Right scrolling key/Storage
program


