background image

21

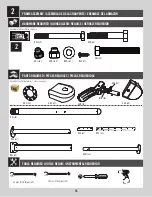
TOOLS AND HARDWARE REQUIRED / 

OUTILS ET QUINCAILLERIE REQUIS


/

 INSTRUMENTAL Y HERRAJE REQUERIDOS 

X

 SECTION 2 (CONTINUED) / 

SECTION 2 (SUITE)

 / 

SECCIÓN 2 (CONTINUACIÓN)

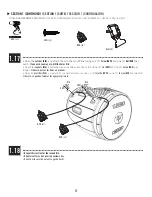
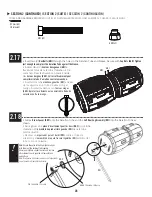
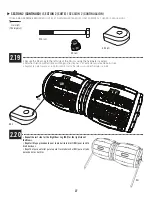
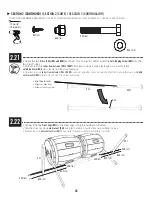
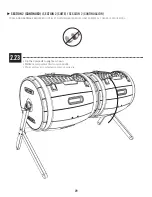
• Place a 

Spring (BIN)

 into the second 

Rear Leg (DEI)

 as shown.

• Mettre un 

ressort (BIN)

 dans le deuxième 

pied arrière (DEI)

 comme illustré.

• Colocar un 

resorte (BIN)

 en la segunda 

pata trasera (DEI)

 como se muestra.

2.7

2.8

BIN

• Insert the Locking Pin through the hole in the Leg and the Spring.

• Insérer la goupille de verrouillage à travers le trou dans le pied et le ressort.

• Insertar el pasador de cierre a través del agujero en la pata y el resorte.

DEI

BIN (x1)

• Use this hole.

• Utiliser ce trou.

• Usar este agujero.

Содержание 60309

Страница 1: ...tup Pour le français voir la page 2 Para el español ver la página 3 ASSEMBLY INSTRUCTIONS DOUBLE BIN ROTATING COMPOSTER MODEL 60309 ADDITIONAL ASSEMBLY HELP For assembly help scan or search 1201394 in the BILT app CONTACT LIFETIME CUSTOMER SERVICE Call 1 800 225 3865 7 00 am 5 00 pm Monday Friday MST and 9 00 am 1 00 pm Saturday MST English Français Español Live Chat www lifetime com customerservi...

Страница 2: ... ver la página 3 INSTRUCTIONS D ASSEMBLAGE DOUBLE CULBUTEUR ROTATIF À COMPOST MODÈLE n 60309 POUR DE L AIDE SUPPLÉMENTAIRE AVEC L ASSEMBLAGE For assembly help scan ou chercher 1201394 dans l appli BILT L ASSEMBLER AVEC BILT TÉLÉCHARGERL APPLIGRATUITAUJOUR HUI Pourdel aideavecl assemblage scanner CONTACTER LES SERVICES À LA CLIENTÈLE LIFETIME Composer le 1 800 225 3865 Du lundi au vendredi 7 h 17 h...

Страница 3: ...voir la page 2 INSTRUCCIONES DE ENSAMBLAJE DOBLE TAMBOR ROTATIVO PARA COMPOSTA MODELO n 60309 PONERSE EN CONTACTO CON LOS SERVICIOS DE CLIENTES LIFETIME Marcar 1 800 225 3865 De lunes hasta viernes 7 00 h 17 00 h MST y sábado 9 00 h 13 00 h MST English Français Español Chat en vivo www lifetime com customerservice cliquear en la lengüeta LIVE CHAT Para el servicio a clientes en el continente europ...

Страница 4: ...riel n est requis pour une page précise Indica que no se necesitan los artículos de ferretería para una página específica Indicates to use not use an electric drill for a specific step Indique quand utiliser une que ne pas utiliser de perceuse électrique pour une étape précise Indica la utilización de que no utilizar un taladro eléctrico para un paso específico ICON LEGEND LÉGENDE DES ICÔNES SIGNIFIC...

Страница 5: ...ssi un tournevis cruciforme n 2 Deux adultes sont requis pour assembler ce produit Toutes les personnes qui participent à l assemblage doivent porter des lunettes de sécurité tout le long de l assemblage Ne pas utiliser ou conserver des objets chauds près du produit L assemblge correct et complet est essentiel pour réduire le risque de dangers ou de blessures La plupart des blessures sont causées ...

Страница 6: ...x4 EGU x4 EGV x4 DBU x2 DEL x1 DEM x1 DEI x2 DEJ x2 PARTS IDENTIFIER IDENTIFICATEUR DE PIÈCES IDENTIFICADOR DE PIEZAS Metal Parts Pièces en métal Piezas de metal Plastic Parts Pièces en plastique Piezas de plástico DCV x2 DEK x1 ...

Страница 7: ...re Required for Section 2 Les accessoires requis pour la section 2 Los elementos de fijación requeridos para la sección 2 Hardware Required for Section 3 Les accessoires requis pour la section 3 Los elementos de fijación requeridos para la sección 3 1 2 3 Small Parts Box Boîte de petites pièces Caja de piezas pequeñas ADW x14 BHK x14 BIR x12 BHO x12 AAN x12 EGX x4 EGW x4 ADW x22 EGY x4 BHK x22 EHB x...

Страница 8: ...BS and the word Bottom are found on the back of this Panel On trouve les lettres DBS et le mot Bottom sur l arrière de ce panneau Se encuentran las letras DBS y la palabra Bottom en la superficie trasera de este panel The ID DBV and the word Rear are found on the back of this Panel On trouve les lettres DBV et le mot Rear sur l arrière de ce panneau Se encuentran las letras DBV y la palabra Rear en...

Страница 9: ...anel at an angle greater than 90 to better align the edge of the Side Panel with the groove at the end of the Rear Panel DBV Go directly to step 1 3 Maintenir le panneau latéral à un angle supérieur à 90 afin que le bord du panneau latéral s aligne bien avec la rainure à l extrémité du panneau arrière DBV Aller directement à l étape 1 3 Mantener el panel lateral un un ángulo más grande de 90 para p...

Страница 10: ...emarque Alinear la marca en forma de triángulo en el panel lateral con la marca en forma de triángulo en el paneltrasero DBV Empujar el panel lateral en la ranura a lo largo del borde del panel trasero hasta que se escuche un clic Nopreocuparseconlaalineacióndecualquierotramarca Triangles Triángulos Diamonds Losanges Rombos Click Déclic Clic Click Déclic Clic Attach a second Side Panel to the Rear...

Страница 11: ...similar El segundo panel inferior solapa el primer panel inferior No preocuparse con la alineación de ninguna marca en los paneles DBS DBS DBS Attach the first Bottom Panel DBS to the Side Panels in a similar manner The Bottom Panel overlaps the Rear Panel Do not worry about aligning any markings on the Panels Attacher le premier panneau inférieur DBS aux panneaux latéraux de la même manière Le pan...

Страница 12: ...e panneau inférieur Ne pas s inquiéter pour l alignement d aucune marque sur les panneaux Sujetar el panel delantero DBU a los paneles laterales en una manera similar El panel delantero solapa el segundo panel inferior No preocuparse con la alineación de ninguna marca en los paneles Press a Lid Extension EGU onto each Side Panel until you hear them click into place Pousser une rallonge du couvercl...

Страница 13: ...w EGY through the Non Threaded Pin and into the Threaded Pin Turn the Screw only two revolutions for now Insérer une vis EGY à travers la goupille non filetée et dans la goupille filetée Ne visser la vis que deux tours en ce moment Insertar un tornillo EGY por el pasador no taladrado y dentro del pasador taladrado Atornillar el tornillo sólo dos revoluciones en este momento Turn the Screw only two r...

Страница 14: ... panneaux inférieurs l un à l autre Continuer de tourner la vis jusqu à ce qu elle soit à ras du panneau et qu elle se tourne librement Usar un taladro eléctrico para insertar dos 2 tornillos ADW para sujetar los paneles inferiores el uno al otro Seguir rotando el tornillo hasta que esté a ras del panel y se gire libremente Note Repeat steps 1 7 1 9 for the other side of the bin Then tighten the S...

Страница 15: ...to insert two 2 Screws ADW to secure the Bottom and Rear Panels together If you wish you may pre drill the holes first Utiliser une perceuse électrique pour insérer deux 2 vis ADW pour attacher les panneaux inférieur et arrière l un à l autre Si besoin percer les trous en premier Usar un taladro eléctrico para insertar dos 2 tornillos ADW para sujetar los paneles inferior y trasero el uno al otro S...

Страница 16: ...e pas serrer excessivement Répéter cette étape pour joindre les panneaux restants Después de insertar los tornillos colocar una tuerca BHK en un tornillo y girarlo hasta que la tuerca esté a ras del panel Es más fácil hacer este paso usando un taladro eléctrico mas no apretar demasiado Repetir este paso para juntar los paneles restantes BHK BHK 1 16 ADW x6 Attach the Pinned Hinge EHB to the Rear P...

Страница 17: ... holes first Ouvrir les loquets BJA et attacher les au panneau avant à l aide d une 1 vis ADW et d un 1 écrou BHK par loquet Si besoin percer les trous en premier Abrir los pestillos BJA y sujetarlos al panel delantero usando un 1 tornillo ADW y una 1 tuerca BHK por pestillo Si besoin se pueden taladrar los agujeros primero BHK x4 ADW x4 Repeat this section for the second Bin Répéter cette section ...

Страница 18: ...I x4 EGZ 13 mm 1 2 in po x2 Small Parts Petites pièces Piezas pequeñas Hardware Quincaillerie Herraje TOOLS REQUIRED OUTILS REQUIS INSTRUMENTAL REQUERIDO PARTS REQUIRED PIÈCES REQUISES PIEZAS REQUERIDAS HARDWARE REQUIRED QUINCAILLERIE REQUISE HERRAJE REQUERIDO FRAME ASSEMBLY ASSEMBLAGE DE LA CHARPENTE ENSAMBLE DEL ARMAZÓN 2 2 BIN x2 AAH x2 ...

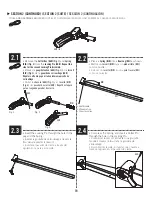
Страница 19: ...Fig 1 Fig 2 Fig 3 Place a Spring BIN into a Rear Leg DEI as shown Mettre un ressort BIN dans un pied arrière DEI comme illustré Colocar un resorte BIN en una pata trasera DEI como se muestra Use this hole Utilisez ce trou Use este agujero 2 1 2 2 2 3 2 4 BIN DEI BIN EHR AAH EHR x2 Insert the Locking Pin through the hole in the Leg and the Spring Insérer la goupille de verrouillage à travers le tro...

Страница 20: ...ipular los extremos de la chaveta Plegar los extremos de la chaveta en direcciones opuestas Insert a Foot Cap EHQ into the bottom of the Leg Set this Leg aside This Leg Assembly will be installed on the left side of the Composter Insérer un capuchon EHQ dans l extrémité inférieure du pied Mettre ce pied de côté Ce pied s attache sur le côté gauche du composteur Insertar un tapón EHQ dentro del ext...

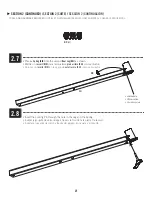
Страница 21: ... ressort BIN dans le deuxième pied arrière DEI comme illustré Colocar un resorte BIN en la segunda pata trasera DEI como se muestra 2 7 2 8 BIN Insert the Locking Pin through the hole in the Leg and the Spring Insérer la goupille de verrouillage à travers le trou dans le pied et le ressort Insertar el pasador de cierre a través del agujero en la pata y el resorte DEI BIN x1 Use this hole Utiliser ...

Страница 22: ...a goupille de verrouillage Comprimir el resorte e insertar una chaveta AAH a través el agujero en el pasador de cierre AAH AAH x1 Turn the Handle so the ends of the Cotter Pin are facing you Bend the ends of the Cotter Pin in opposite directions Tourner la manivelle afin d avoir les extrémités de la goupille fendue en face de vous Plier les extrémités de la goupille dans des directions opposées Ori...

Страница 23: ... droit du composteur Insertar un tapón EHQ dentro del extremo inferior de la pata Dejar esta pata a un lado Se instalará este ensamble de la pata en el lado derecho del compostero Insert a Foot Cap EHQ into the bottom of a Front Leg DEJ Set the Leg aside Repeat this step for the second Front Leg Insérer un capuchon EHQ dans l extrémité inférieure d un pied avant DEJ Mettre le pied de côté Répéter ...

Страница 24: ...trous Dos agujeros Slide an Aeration Tube Connection Sleeve DEK into the Aeration Tube and align the holes upward and downward Faire glisser le manchon de connection du tube d aération DEK à l intérieur du tube d aération et aligner les trous vers le haut et le bas Deslizar el mango de conexión para el Tubo de aireación DEK dentro del tubo de aireación y alinear los agujeros para arriba y bajo Hol...

Страница 25: ... le bac gauche Deslizar dos espaciadores para el barril DDC sobre la manga de conexión Entonces deslizar el otro barril sobre el mango manga de conexión El segundo barril será el barril izquierdo 2 15 2 16 DDC DDC ABI x2 ABI ABI AAN x2 Insert two 2 Hex Bolts ABI through the holes in the Aeration Tube and Sleeve Secure with Cap Nuts AAN Tighten just enough to compress the Aeration Tube against the ...

Страница 26: ...r deux 2 boulons hexagonaux ABI à travers les trous dans le tube d aération et le manchon Fixer les boulons en place à l aide des écrous borgnes AAN Serrer suffisamment pour comprimer le tube d aération contre le manchon Insertar dos 2 perno hexagonal de ABI a través de los agujeros en el tubo de aireación y el mango Sujetar los pernos con tuercas ciegas AAN Apretar lo suficiente para comprimir eltu...

Страница 27: ...cs à l aide de la quincaillerie incluse Sujetar la pata trasera al lado izquierdo de los barriles usando el herraje incluido DDE DDE x2 X SECTION 2 CONTINUED SECTION 2 SUITE SECCIÓN 2 CONTINUACIÓN DEI 2 19 2 20 Repeat the last step for the Right Rear Leg DEI for the right side of the Drums Répéter l étape précédente pour le pied arrière droit DEI pour le côté droit des bacs Repetir el paso anterio...

Страница 28: ...own Use an electric drill to insert the Self Tapping Screw BHJ into the two Cross Tubes Orienter les deux tubes transversaux DEL et DEM Employer une perceuse électrique pour insérer la vis autotaraudeuse BHJ dans les deux tubes transversaux Orientar los dos tubos transversales DEL y DEM como se muestra Usar un taladro eléctrico para introducir el tornillo autoroscante BHJ dentro de los dos tubos t...

Страница 29: ...INCAILLERIE REQUIS INSTRUMENTAL Y HERRAJE REQUERIDOS Flip the Composter upright as shown Mettre le composteur droit comme illustré Poner vertical el compostador como se muestra 2 X SECTION 2 CONTINUED SECTION 2 SUITE SECCIÓN 2 CONTINUACIÓN 2 23 ...

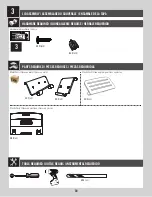
Страница 30: ...lastique Pieza de plástico Hardware Quincaillerie Herraje TOOLS REQUIRED OUTILS REQUIS INSTRUMENTAL REQUERIDO PARTS REQUIRED PIÈCES REQUISES PIEZAS REQUERIDAS HARDWARE REQUIRED QUINCAILLERIE REQUISE HERRAJE REQUERIDO LID ASSEMBLY ASSEMBLAGE DU COUVERCLE ENSAMBLE DE LA TAPA 3 DBR x2 ADW x14 BHK x14 EHE x4 EHG x1 EHC x2 3 ARA x1 ...

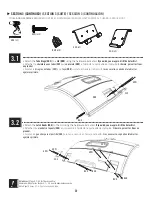
Страница 31: ...K x14 EHE x4 3 X SECTION 3 CONTINUED SECTION 3 SUITE SECCIÓN 3 CONTINUACIÓN 3 2 Note Repeat Steps 3 1 3 2 for the second Lid Remarque Répéter les étapes 3 1 3 2 pour le deuxième couvercle Nota Repetir pasos 3 1 3 2 para la segunda tapa BHK BHK BHK BHK ADW ADW EHE EHE ADW ADW EHC DBR EHC x2 ADW 3 1 ARA x1 Attach the Latch Hooks EHE to the Lid using the hardware indicated If you wish you may pre dri...

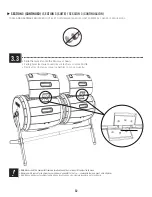
Страница 32: ... dos tapas sobre los barriles como se muestra 3 X SECTION 3 CONTINUED SECTION 3 SUITE SECCIÓN 3 CONTINUACIÓN 3 3 Note Never slide this composter from one location to another always lift composter to move Remarque Ne jamais faire glisser ce composteur d un endroit à l autre soulever le toujours avant de le déplacer Nota Nunca deslizar esta compostadora de una localización a otra siempre levantarla ...

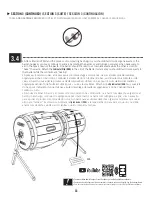
Страница 33: ...ères organiques pendant que l autre est utilisé pour cuire les matières Attacher le clip indicateur EHG au couvercle du bac pour indiquer qu on ne doit pas ajouter davantage de matières organiques à ce bac pendant que le contenu cuit Después de llenar el barril y el proceso de compostación ha comenzado no añadir más desechos orgánicos al barril sin embargo continuar de agregar aire por rotar el ba...

Страница 34: ... de tuimelaar te voorkomen Du må ikke kravle ind i eller oven på eller rundt om komposteringsmaskinen Låsestiften skal være på plads inden du åbner låget Vær forsigtig hvis du bruger skarpe genstande til at fjerne komposten med for at undgå at du beskad ger tromlen コンポスターの中や上または周辺に上らないでください 蓋を開ける前に コンポスターが回転しないように止めピン がはまっていることを確認してください 先の尖った物を使って堆肥を取り出す際 タンブラーを傷つ けないように注意してください Não entrar subir p...

Страница 35: ...35 NOTES REMARQUES NOTAS ...

Страница 36: ...36 NOTES REMARQUES NOTAS ...

Страница 37: ...37 NOTES REMARQUES NOTAS ...

Страница 38: ...s abrasifs de nettoyage risquent d égratigner le plastique et ne sont pas recommandés Pour réparer les égratignures ou taches de rouille sur le métal frotter légèrement l endroit affecté au papier de verre puis passer une couche de produit vaporisant préventif et enfin vaporiser une peinture émail ultrabrillante Éviter de placer une source de chaleur directe sur ou près des surfaces ou les protéger...

Страница 39: ...ba ser retirado del mercado o que sufra alguna modificación su registro provee la información que necesitamos para notificarle directamente El registro es rápido fácil y completamente voluntario Mantener privacidad es nuestra política permanente en Lifetime Y puede estar seguro que Lifetime no venderá ni dará datos personales a terceros ni les permitirá usar datos personales para sus propios fines RE...

Страница 40: ...hange this policy 5 This product is not intended for institutional or commercial use Lifetime Products Inc does not assume any liability for such use Institutional or commercial use will void the warranty 6 Our goods come with guarantees that cannot be excluded under the Australian Consumer Law You are entitled to a replacement or refund for a major failure and for compensation for any other reaso...

Страница 41: ...t aucune personne représentant la société ne peut déroger à cette politique ni la modifier 5 Ce produit n est pas prévu pour l usage institutionnel ni commercial Lifetime Products Inc n assume aucune responsabilité pour un tel usage L utilisation institutionnelle ou commerciale annulera cette garantie 6 Nos articles sont offerts avec des garanties qui ne peuvent connaître d exclusions au regard de ...

Страница 42: ...á pensado para el uso institucional ni comercial Lifetime Products Inc no asume ninguna otra responsabilidad en conexión con este producto El uso institucional o comercial invalidará la garantía 6 Nuestros productos vienen con garantías que no se pueden excluir bajo la Ley del consumidor de Australia Ustedes están autorizados para reemplazarlos u otorgar una devolución o reembolso en caso de falla...

Страница 43: ...7 28906 Getafe Madrid España NIF B86509460 900 111 155 www costco es Costco Wholesale Iceland ehf Kauptún 3 7 210 Gardabaer Iceland www costco is Costco Wholesale Korea Ltd 40 Iljik ro Gwangmyeong si Gyeonggi do 14347 Korea 1899 9900 www costco co kr Importado por Importadora Primex S A de C V Blvd Magnocentro No 4 San Fernando La Herradura Huixquilucan Estado de México C P 52765 RFC IPR 930907 S7...

Страница 44: ...ccesorios u otros productos Lifetime E U A visitarnos en www lifetime com ENHANCE YOUR LIFETIME PURCHASE BY ADDING ACCESSORIES OR OTHER GREAT PRODUCTS MEJORAR SU COMPRA LIFETIME Y AÑADIR ACCESORIOS U OTROS PRODUCTOS EXCELENTES Ou composer au 1 800 424 3865 Du lundi au vendredi 7 h 17 h HNR et samedi 9 h 13 h HNR Français Pour acheter des accessoires ou des autres produits Lifetime visiter le www l...

Отзывы: