10
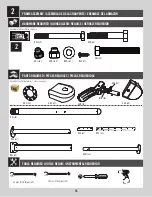
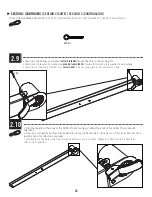
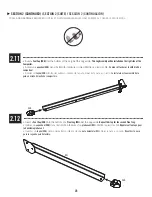
TOOLS AND HARDWARE REQUIRED /
OUTILS ET QUINCAILLERIE REQUIS
/
INSTRUMENTAL Y HERRAJE REQUERIDOS
1
X
SECTION 1 (CONTINUED) /
SECTION 1 (SUITE)
/
SECCIÓN 1 (CONTINUACIÓN)
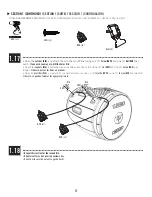
1.3
1.4
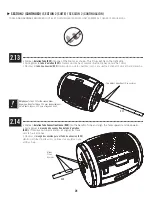
• Align the triangle-shaped marking on the Side Panel with the triangle-shaped marking on the
Rear Panel (DBV)
. Press the Side Panel
into the groove along the edge of the Rear Panel until you here it “click” into place.
Do not worry about aligning any other markings.
• Aligner la marque en forme de triangle dans le panneau latéral avec la marque en forme de triangle
dans le
panneau arrière (DBV)
. Pousser le panneau latéral dans la rainure le long du bord du panneau
arrière jusqu’à ce qu’un « déclic » s’entende.
Ne pas s’inquiéter pour l’alignement de toute autre marque.
• Alinear la marca en forma de triángulo en el panel lateral con la marca en forma de triángulo en el
panel trasero (DBV)
. Empujar el panel lateral en la ranura a lo largo del borde del panel trasero hasta que
se escuche un «clic».
No preocuparse con la alineación de cualquier otra marca.
Triangles /
Triángulos
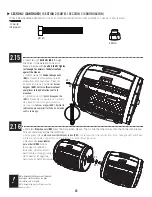
Diamonds /
Losanges
/
Rombos
Click /
Déclic /
Clic
Click /
Déclic /
Clic
• Attach a second Side Panel to the Rear Panel in the same way you did the first, but align the diamond-shaped markings.
Do not worry about aligning any other markings.
• Attacher un deuxième panneau latéral au panneau arrière de la même manière que le premier, mais aligner les marques
en form de losanges.
Ne pas s’inquiéter pour l’alignement de toute autre marque.
• Sujetar un segundo panel lateral al panel trasero en la misma manera que el primero, mas alinear las marcas en forma de
rombos.
No preocuparse con la alineación de cualquier otra marca.
Содержание 60309
Страница 35: ...35 NOTES REMARQUES NOTAS ...
Страница 36: ...36 NOTES REMARQUES NOTAS ...
Страница 37: ...37 NOTES REMARQUES NOTAS ...


