


Help Hot Line (U.S. only): 1-800-530-9960
6-11
D-620605-0-20 Rev A
CONFIDENTIAL
Fusion SingleStar Installation Procedures
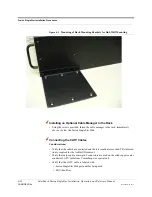
NOTE:
If wall stud spacing of 16” is not available, LGC recommends that
3/4“ plywood be pre-installed to the wall. You can then attach the bracket to
the plywood using the wood screws.
2.
Remove both of the rack mounting brackets from the Hub.
3.
Reattach each of the rack mounting brackets to the wall mount position.
4.
Attach the Hub to the plywood with wood screws.
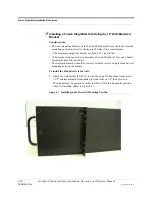
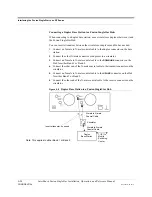
Installing a Fusion SingleStar Hub Directly to the Wall
To install the Hub directly to the wall:
1.
Pre-install 3/4” plywood to the wall.
2.
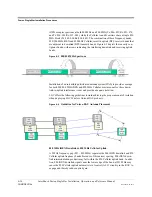
Mount both of the rack mounting brackets using #10-32 machine screws (refer to
illustration Figure 6-2).
3.
Attach the Hub to the wall so the mounting brackets are orientated at the top and
bottom of the wall mounted hub.
Use two #10 Pan Head wood screws, 1-1/2” length, to secure each bracket to the
plywood. In this orientation the enclosure fans shall face to the left.
Содержание InterReach Fusion SingleStar
Страница 1: ...D 620605 0 20 Rev A Installation Operation and Reference Manual InterReach Fusion TM SingleStar ...
Страница 2: ...D 620605 0 20 Help Hot Line U S only 1 800 530 9960 Rev A CONFIDENTIAL ...
Страница 150: ...A 4 InterReach Fusion SS Installation Operation and Reference Manual CONFIDENTIAL D 620605 0 20 Rev A ...