6.5 volts) is maintained in the
track, the standing sounds will
continue at regular intervals.
Hint: If the model is not used for a
long period of time, the internal
power capacitors will discharge,
and the sound system will operate
erratically. To recharge the capaci-
tors, operate the model at brisk
speed for a few minutes. This
model does not require a battery.
Attention: This model is equipped
with a starting delay circuit. Avoid
connecting this model together
with other locos with different star-
ting characteristics. This can
damage the internal gearing.
Power Supply
Attention! For safety and reliabili-
ty, operate this model with LGB
power supplies (transformers,
power packs and controls) only.
The use of non-LGB power sup-
plies may void your warranty.
For more information on LGB
power supplies for indoor, outdoor
and multi-train operation, see the
LGB catalog.
Attention! After extended operati-
on, this model may leave a small
amount of carbon dust around the
track. This dust can stain carpet
and other materials. The user
assumes full responsibility for any
damage.
MAINTENANCE
Attention! Improper service may
void your warranty. For factory aut-
horized service, contact an autho-
rized retailer or send this product
to an LGB service station (see
Factory Service).
Lubrication
The axle bearings and drive rod
ends should be lubricated occa-
sionally with a small amount of
LGB Maintenance Oil (50019).
Cleaning
This model can be cleaned using
a mild detergent and gentle stre-
am of water. Do not immerse this
model. If this model is equipped
with sound electronics, do not
expose the speaker directly to
water.
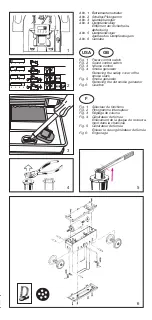
Replacing the smoke generator
(Fig. 4-5)
Pull the safety ring out of the
smoke stack. Use pliers or twee-
zers to pull the old smoke genera-
tor out of the stack. Cut the wires
to the old generator and attach
them to the replacement genera-
tor. Insulate the connections and
push the replacement generator
into the stack. Reassemble.
Replacing the traction tire
- Use a small, straight-blade scr-
ewdriver to gently pry the old
traction tire out of the wheel
groove.
- Gently warm the new traction tire
in a dish of warm water.
- Use a small, straight-blade scr-
ewdriver to gently pry the new
traction tire into the wheel groo-
ve.
- Make sure that the traction tire is
completely in the wheel groove.
Replacing the light bulbs
Front and rear lanterns: Carefully
pry the lens away from the lan-
tern. Using tweezers, remove and
replace the bulb. Reassemble.
Cab light: Using tweezers, remo-
ve and replace the bulb.
Replacing the motor
The gearbox must be removed to
replace the motor (Fig. 6).
- Remove the hex head screws
joining the drive rods and
connecting rods at the rear
wheels.
- There are six screws on the bot-
tom of the gearbox. Remove the
first and last screws.
- Pull the gearbox away from the
chassis. If necessary, disconnect
the cables connected to the
gearbox.
- Remove the two screws on the
top of the gearbox.
- Replace the motor. Reassemble.
Attention! If the motor is replaced,
generously lubricate the gears with
LGB Gear Lubricant (51020).
Attention! If the motor is repla-
ced, make sure that the drive rods
do not bind (Fig. 7). Binding can
cause serious damage to the
model.
Replacing the brushes, pick-up
shoes and wheelsets
- There are six screws on the bot-
tom of the gearbox. Remove the
middle four screws.
Hint: These screws are different
sizes. For proper reassembly, note
the position of each screw.
- Remove the bottom of the gear-
box. Note the position of the
power strips
- If necessary, replace the brus-
hes, pick-up shoes or wheelsets.
Reassemble.
Attention! If the wheelsets are
replaced, generously lubricate the
gears with LGB Gear Lubricant
(51020).
Attention! If the wheelsets are
replaced, make sure that the drive
rods do not bind (Fig. 7). Binding
can cause serious damage to the
model.
9

