background image

How to Install Solar Thermal Kit

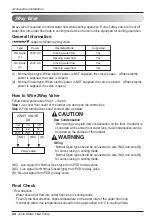
Step 1.

Check the diameter of pre-installed pipes. (symbol 

and 

)

Step 2.

If the diameter of pre-installed pipes is different from diameter of solar thermal kit, it is neces-
sary to reduce or extend of pipe’s diameter.

Step 3.

After Step 2., connect the pipe and solar thermal kit.

Step 4.

Connect solar thermal sensor to ‘CN_TH4’(Red connector) of the indoor unit PCB.
If the sanitary tank sensor is connected, disconnect the sensor from PCB first.

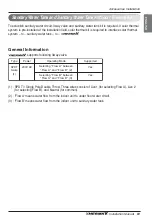
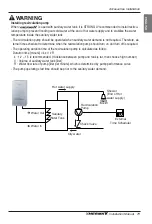
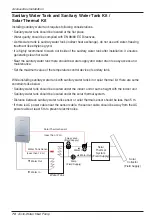
Solar

Thermal

System

(Field Supply)

Solar

Collector

(Field Supply)

Water Tank

Water Tank Sensor

(less than 12 m)

Solar Thermal Sensor

(less than 12 m)

 Water In

 Water Out

Water Out


Water In

3way valve

(Field Supply)

Pump

(Field Supply)

LG Dry Contact is a solution for automatic control of air conditioning system  at the owner's behest.
In simple words, it's a switch which can be used to  turn the unit On/Off after getting the signal from
external sources like key-in lock, door or window switch etc specially used in Hotel rooms.

How to Install Dry Contact

• 

For more information about installing Dry Contact, Please refer installation manual provided with
Dry Contact.

• For system set-up, please read chapter 8.(Especially function code No.6)

Dry Contact

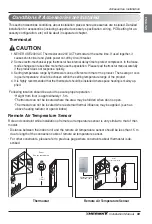
Remote temperature sensor can be installed any place a user wants to detect the temperature.

How to Install Remote Temperature Sensor

• For more information about installing Remote Temperature Sensor, Please refer installation manual

provided with Remote Temperature Sensor.

• For system set-up, please read chapter 8.(Especially function code No.3)

Remote Temperature Sensor

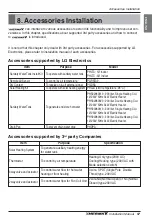
Accessories Installation   

66

Air-to-Water Heat Pump

Содержание Therma V AHUW096A2

Страница 1: ...er reading it thoroughly INSTALLATION MANUAL AIR CONDITIONER P NO MFL68681805 For more information Refer to the CD or LG Web site www lg com Representative LG Electronics Inc EU Representative LG Electronics European Shared Service Center B V Krijgsman 1 1186 DM Amstelveen The Netherlands Manufacturer LG Electronics Inc Changwon 2nd factory 84 Wanam ro Seongsan gu Changwon si Gyeongsangnam do KORE...

Страница 2: ... 17 CYCLE DIAGRAM 18 WATER CYCLE 19 PARTS AND DIMENSIONS 21 INDOOR UNIT EXTERNAL 21 INDOOR UNIT INTERNAL 22 OUTDOOR UNIT EXTERNAL 23 CONTROL PARTS 26 CONTROL BOX INDOOR UNIT 26 CONTROL PANEL 27 WIRING DIAGRAM INDOOR AND OUTDOOR INCL FIELD WIRING 28 4 INSTALLATION OF OUTDOOR UNIT 30 CONDITIONS WHERE OUTDOOR UNIT IS INSTALLED 30 DRILL A HOLE IN THE WALL 30 INSTALLATION AT SEASIDE 31 SEASONAL WIND AN...

Страница 3: ...LE 46 FINALIZING 47 PIPE FORMING 47 LEAKAGE TEST AND EVACUATION 48 PREPARATION 48 LEAKAGE TEST 48 EVACUATION 49 7 PIPING AND WIRING FOR INDOOR UNIT 50 WATER PIPING AND WATER CIRCUIT CONNECTION 50 GENERAL CONSIDERATIONS 50 WATER PIPING AND WATER CIRCUIT CONNECTION 50 WATER CHARGING 52 PIPE INSULATION 52 ELECTRICAL WIRING 53 GENERAL CONSIDERATION 53 TERMINAL BLOCK INFORMATION 54 CONNECTING WITH OUTD...

Страница 4: ...MOTE AIR TEMPERATURE SENSOR 69 SANITARY WATER TANK AND SANITARY WATER TANK KIT SOLAR THERMAL KIT 70 2WAY 3WAY VALVE 72 9 SYSTEM SET UP 73 DIP SWITCH SETTING 73 GENERAL INFORMATION 73 DIP SWITCH INFORMATION 74 INSTALLER SETTING 77 HOW TO ENTER INSTALLER SETTING MODE 77 SUMMARY 78 COMMON SETTING 84 TEMPERATURE RANGE SETTING 85 TEMPERATURE CONTROL PARAMETER SETTING 87 10 CHECK POINTS MAINTENANCE AND ...

Страница 5: ...es are installed How to perform piping for refrigerant and wiring at the outdoor unit Refrigerant pipe connection between the indoor unit and the outdoor unit Electrical wiring at the outdoor unit How to perform piping for water and wiring at the indoor unit Water pipe connection between the indoor unit and pre built under floor water loop pipe Electrical wiring at the indoor unit System set up an...

Страница 6: ...us injury This symbol indicates the possibility of injury or damage to properties only WARNING Be sure not to do Be sure to follow the instruction Do not use a defective or underrated circuit breaker Use this appli ance on a dedicated circuit There is risk of fire or electric shock For electrical work contact the dealer seller a qualified elec trician or an Author ized Service Center There is risk...

Страница 7: ...e is risk of fire elec tric shock explosion or injury Do not install the unit on a defective installa tion stand It may cause injury acci dent or damage to the unit Be sure the installation area does not deterio rate with age If the base collapses the unit could fall with it causing property dam age unit failure and per sonal injury Do not modify or ex tend the power cable There is risk of fire or...

Страница 8: ...ot store or use flammable gas or com bustibles near the unit There is risk of fire or failure of unit Do not use the unit in a tightly closed space for a long time It may cause damage to the unit When flammable gas leaks turn off the gas and open a window for ventilation before turn ing the unit on There is risk of explosion or fire If strange sounds or small or smoke comes from unit turn the brea...

Страница 9: ...sub merged contact an Authorized Service Center There is risk of fire or electric shock Be cautious that water could not be poured to the unit directly There is risk of fire elec tric shock or unit dam age Do not touch any elec tric part with wet hands you should be power off before touch ing electric part There is risk of electric shock or fire Do not touch refriger ant pipe and water pipe or any...

Страница 10: ...witch off the power supply to the unit There is risk of water freezing Ventilate the unit from time to time when oper ating it together with a stove etc There is risk of fire or electric shock Turn the main power off when cleaning or main taining the unit There is risk of electric shock Take care to ensure that nobody could step on or fall onto the unit This could result in per sonal injury and un...

Страница 11: ...art etc There is risk of damage or loss of property Use a soft cloth to clean Do not use harsh detergents sol vents etc There is risk of fire elec tric shock or damage to the plastic parts of the unit Do not step on or put anything on the unit There is risk of personal injury and failure of unit CAUTION Use a firm stool or ladder when cleaning or maintaining the unit Be careful and avoid personal ...

Страница 12: ...m Image Quantity OUTDOOR UNIT BOX 1 1 1 Outdoor Unit U3 Chassis Product heating capacity 12kW 14kW 16kW Outdoor Unit UE Chassis Product heating capacity 3kW www lg com Please read this installation manual completely before installing the product Installation work must be performed in accordance with the national wiring standards by authorized personnel only Please retain this installation manual f...

Страница 13: ...igh temperature heating heat pump Function A General heating heat pump H Domestic Hot heating only T High temperature heating heat pump Electrical ratings 6 1 phase 220 240V AC 50Hz 8 3 phase 380 415V AC 50Hz Heating Capacity kW 03 3kW 05 5kW 07 7kW 09 9kW 12 12kW 14 14kW 16 16kW Model Type W Inverter Heat Pump H Heat Pump Classification N Indoor Unit U Outdoor Unit Set Air to Water Heat Pump for ...

Страница 14: ...ce Electric Heater Capacity Power Source Unit Outdoor Unit Indoor Unit Heating kW 1 Cooling kW 1 AHUW036A2 AHNW03604A2 4 2 2 220 240 V 50Hz 3 3 220 240 V 50Hz AHUW056A2 AHNW09604A2 4 2 2 220 240V 50Hz 5 5 AHUW076A2 AHNW09604A2 4 2 2 220 240V 50Hz 7 7 AHUW096A2 AHNW09604A2 4 2 2 220 240V 50Hz 9 9 AHUW126A2 AHNW16606A2 6 3 3 220 240V 50Hz 12 12 AHUW146A2 AHNW16606A2 6 3 3 220 240V 50Hz 14 14 AHUW166...

Страница 15: ...it Floor heating loop Fan coil unit Radiator High Temperature Room Thermostat Field supply 2way valve Field supply By pass valve Field supply Low Temperature Shut off valve Typical Installation Example Note Room thermostat Type of thermostat and specification should be complied with chapter 4 and chapter 7 of installation manual 2way valve It is important to install 2way valve to prevent dew conde...

Страница 16: ...ly 2way valve Field supply 3way valve Field supply By pass valve Field supply Low Temperature Shut off valve Note Sanitary water tank It should be equipped with internal electric heater to generate sufficient heat energy in very cold season 3way valve Type of 3way valve and specification should be complied with chapter 4 and chapter 7 of installation manual General Information 16 Air to Water Heat...

Страница 17: ...diator High Temperature Room Thermostat Field supply 2way valve Field supply 3way valve Field supply By pass valve Field supply Low Temperature Shut off valve Pump Field supply Note Sanitary water tank It should have additional indirect heat exchanger to utilize heat energy by solar thermal system Pump Maximum power consumption of pump should be less than 0 25kW Installation Manual 17 ENGLISH ...

Страница 18: ...parately Not shown in diagram Th2 Inlet evaporator temperature sensor CN_PIPE Meaning is expressed based on Cooling mode Th3 Outlet evaporator temperature sensor CN_PIPE O Outdoor Unit Th4 Compressor suction pipe temperature sensor CN_TH3 Th4 and Th5 are connected at 4 pin type con nector CN_TH3 Th5 Compressor discharge pipe temperature sensor CN_TH3 Th6 Condenser temperature sensor CN_TH2 Descrip...

Страница 19: ... tan k is installed Sanitary water tan k kit is necessary Solar thermal syst em is connected Solar thermal kit i s necessary Basic installation IDU ODU Solar Thermal Componets Fan Coil Unit Underfloor Heating Radiator Installation Manual 19 ENGLISH ...

Страница 20: ...e sensor Liquid side Entering Water temperature sensor Interim Water temperature sensor Leaving Water temperature sensor Flow Switch Electric Heater Internal Water Pump Expansion Tank Remote Air temperature sensor Control Panel or To control water flow for Fan Coil Unit Remote Controller Sanitary Water Tank Electric Heater Flow control for water which is leaving from indoor unit Flow direction swi...

Страница 21: ...nd Dimensions Indoor unit External 315 490 850 315 3 474 Description No Name Remarks 1 Door Control panel is shown after this door is opened 2 Handle Used to cover or uncover the front case unit mm Installation Manual 21 ENGLISH ...

Страница 22: ...ctric heater at 90 C manual return at 55 C 3Ø Electric Heater is applied 9 Control Box PCB and terminal blocks Minimum operation range at 12 LPM 5 9kW Minimum operation range at 15 LPM 12 16kW 3kW IDU has not a flow switch 11 Plate Heat Exchanger Heat exchange between refrigerant and water 12 Pressure Gage Indicates circulating water pressure 13 Expansion Tank Absorbing Volume change of heated wat...

Страница 23: ... Outdoor unit External Supporter 490 Description No Name 1 2 3 Liquid side Service Valve Gas side Service Valve Air discharge Grill Product Heating Capacity 12kW 14kW 16kW U3 Chassis unit mm Installation Manual 23 ENGLISH ...

Страница 24: ...Description No Name 1 2 3 Liquid side Service Valve Gas side Service Valve Air discharge Grill General Information Product Heating Capacity 3kW UE Chasis unit mm 24 Air to Water Heat Pump ...

Страница 25: ...al Information Supporter Description No Name 1 2 3 Liquid side Service Valve Gas side Service Valve Air discharge Grill Product Heating Capacity 5kW 7kW 9kW U4 Chassis unit mm Installation Manual 25 ENGLISH ...

Страница 26: ...CCB optional The terminal blocks allow easy connection of field wiring The ELB protects the unit against overload or short circuit The main PCB Printed Circuit Board controls the functioning of the unit Supporter to install Dry Contact sold separately The MCCB protects the unit against overload The MCCB protects the water tank heater in sanitary water tank against overload The ELB protects the wat...

Страница 27: ...panel Wiring Diagram Outdoor Unit Refer to the attached wiring diagram in the outdoor unit Installation Manual 27 ENGLISH No Name 1 Display 2 Change Temperature Button 3 Water Heating Enable Disable Button 4 Power Button 5 Operation Mode Selection Button 6 Silent Mode On Off Button 7 Temperature Setting Mode Button 8 Temperature View Mode Button 9 Function Setting Button 10 Programming Button 11 D...

Страница 28: ...General Information Wiring Diagram Indoor and Outdoor Unit Including Field wiring Indoor Electric Heater 1Ø Outdoor 1Ø 28 Air to Water Heat Pump ...

Страница 29: ...General Information Wiring Diagram Indoor and Outdoor Unit Including Field wiring Indoor Electric Heater 3Ø 380 415V Outdoor 3Ø Installation Manual 29 ENGLISH ...

Страница 30: ...y arrows around front back and side of the unit Do not place animals and plants in the path of the warm air Take the weight of the outdoor unit into account and select a place where noise and vibration are minimum Select a place so that the warm air and noise from the outdoor unit do not disturb neighbors Conditions where Outdoor Unit is Installed 300 Fence or obstacles 700 300 600 Sunroof If maki...

Страница 31: ...like concrete to prevent the sea wind from the sea The height and width should be more than 150 of the outdoor unit It should be keep more than 700 mm of space between outdoor unit and the windbreak for easy air flow CAUTION Sea wind Sea wind Sea wind Windbreak Sufficient measures are required in a snow area or severe cold area in winter so that product can be operated well Get ready for seasonal ...

Страница 32: ...free from outdoor weather conditions such as rain snow wind frost etc Choose the place where is water resistant or good drainage Service space should be secured No flammable materials around the indoor unit Mice can not be appeared to prevent entering the indoor unit or attacking wires Do not place anything in front of the indoor unit to ensure air circulation around the indoor unit Do not locate ...

Страница 33: ...tion sheet Screw bolts with supporting plate at the hole marks on the wall When screwing bolts use M8 M11 anchor bolts to secure hanging the indoor unit Bottom screws Remove Hall marks The sheet should be attached level If not the supporting plate and the indoor unit will not be mounted correctly CAUTION Eight small holes around four large hole marks can be used as alter natives of M8 M11 anchor b...

Страница 34: ... Rp Rp 1 Rp 1 2m 3m 4m 5m 6m Δ p v m ax Constant speed I II III Tolerances of each curve according to EN 1151 1 2006 0 0 5 1 0 1 5 2 0 2 5 3 0 0 0 2 0 4 0 6 0 8 0 2 4 6 8 10 0 1 2 3 4 5 6 0 10 20 30 40 50 60 0 0 5 1 0 1 5 2 0 2 5 3 0 0 10 20 30 40 Wilo Yonos PARA RS 15 6 20 6 25 6 30 6 1 230 V Rp Rp Rp 1 Rp 1 p kPa H m P1 W Q m h Q l s Q Igpm Q m h max 800 1 min 2180 1 min 3060 1 min 30601 min 435...

Страница 35: ...l 35 ENGLISH AHNW16606A2 AHNW16809A2 Pump model Stratos Para 25 1 9 Operation cutoff range WARNING Selecting a water flowrate outside the curves can cause damage to or malfunction of the unit Installation of Indoor Unit ...

Страница 36: ...g of product can occur The water pump is operating according to below curves NOTICE Model Rated flow rate LPM Pump Head m at rated flow rate Product pressure drop m Plate heat ex changer Serviceable Head m AHNW03604A2 8 6 6 1 0 5 0 AHNW09604A2 25 8 5 1 2 3 8 AHNW16606A2 46 7 1 9 5 1 AHNW16809A2 3kW Rated 9kW Rated 16kW Rated Hydraulic Head Loss m H 2 O Water Flow rate m3 hr 0 1 2 3 4 5 6 7 8 1 2 3...

Страница 37: ...Expansion vessel bar 20 60 100 140 180 220 260 300 340 2 4 2 1 1 7 1 4 1 0 0 7 0 3 Adjusting pre pressure of expansion vessel is as following Step 1 Refer Volume Height table If installation scene is belong to Case A go to Step 2 Otherwise if it is Case B do nothing pre pressure adjustment is not required Other wise if it is Case C go to Step 3 Step 2 Adjust pre pressure by following equation Pre ...

Страница 38: ...mportant to prevent performance degrade Chemical treatment to prevent rust should be performed by installer CAUTION 38 Air to Water Heat Pump Frost protection In areas of the country where entering water temperatures drop below 0 C the water pipe must be protected by using an approved antifreeze solution Consult your AWHP unit supplier for locally approved solutions in your area Calculate the appr...

Страница 39: ...g to the table Example If 16kW model is installed at a distance of 50m 1 700g of refrigerant should be added according to following formula 50 7 5 x 40g 1 700g 2 Rated capacity of the product is based on standard length and maximum allowable length is based on the product reliability in the operation 3 Improper refrigerant charge may result in abnormal operation CAUTION Note Fill in the f gas Labe...

Страница 40: ... flaring tool for R 410A refrigerant as shown below Firmly hold copper tube in a bar or die as indi cated dimension in the table above Step 5 Check Compare the flared work with right figure If flare is seemed to be defective cut off the flared section and do flaring work again Preparation for Piping Preparation for piping is five steps As main cause of refrigerant leakage is defects in flaring wor...

Страница 41: ...y hand Step 2 Tightening Tighten the flare nut with a wrench Tightening torque is as following Step 1 Determine direction of pipes The pipes can be connectable in four directions The directions are expressed in below figure The pipes cannot be connected in downward direction Torque wrench Indoor unit tubing Open end wrench fixed Connection pipe Flare nut Indoor unit tubing Flare nut Pipings mm inc...

Страница 42: ...r small animals enter the outdoor unit it may cause a short circuit in the electrical box Finally form the pipes by wrapping the con necting portion of the indoor unit with insulation material and secure it with two kinds of vinyl tape Ensuring thermal insulation is very impor tant mm inch kgf m 6 35 1 4 1 8 2 5 9 52 3 8 3 4 4 2 12 7 1 2 5 5 6 6 15 88 5 8 6 6 8 2 19 05 3 4 9 9 12 1 Outside diamete...

Страница 43: ...the wrench clicks When tightening the flare nut with torque wrench ensure the direction for tightening fol lows the arrow on the wrench Align the center of the piping and sufficiently tighten the flare nut by hand mm inch kgf m Ø6 35 1 4 1 8 2 5 Ø9 52 3 8 3 4 4 2 Ø12 7 1 2 5 5 6 6 Ø15 88 5 8 6 3 8 2 Ø19 05 3 4 9 9 12 1 Outside diameter Torque Torque wrench Outdoor unit Gas side piping Liquid side ...

Страница 44: ...arly quali fied persons in order to avoid a hazard Terminal Specification of Power Cable and related Cautions Use round pressure terminals for connections to the power terminal block When none are available follow the instructions below Do not connect wiring of different thicknesses to the power terminal block Slack in the power wiring may cause abnormal heat When connecting wiring which is the sa...

Страница 45: ...or all other motors Load3 any other load rated 1 0A or more 2 Select wire spec based on the MCA 3 Recommended circuit breaker is ELCB Earth Leakage Circuit breaker 4 RLA is measured during each individual compressor test condition MCA Minimum Circuit Amperes A MOP Maximum rating Over current Protective device RLA Rated Load Amperes A FLA Full Load Amperes A S Heater Sanitary Water Tan Heater Model...

Страница 46: ...oltage supply such as sudden voltage in creasing or voltage drop down Chattering of a magnetic switch frequent on and off operation Physical damage of parts where magnetic switch is contacted Break of fuse Malfunction of overload protection parts or related control algorithms Failure of compressor start up 10 Ground wire to ground outdoor unit to prevent electrical shock CAUTION When connecting po...

Страница 47: ...aping Procedure 1 Tape the pipes connecting cable and power cable from down to up If taping direction is up to down rain drop may be sinking into the pipes or cables 2 Secure the taped pipe along the exterior wall using saddle or equivalent 3 Trap is required to prevent water from entering into electrical parts Trap is required to prevent water from entering into electrical parts Taping Drain hose...

Страница 48: ...is service port with charge hoses Be sure to use a manifold valve for leak age test If it is not available use a stop valve for this purpose The Hi knob of the mani fold valve must always be kept close Pressurize the system to no more than 3 0 Mpa with dry nitrogen gas and close the cylinder valve when the gauge reading reached 3 0 Mpa Next test for leaks with liq uid soap To avoid nitrogen enteri...

Страница 49: ... gas side valve counter clock wise to fully open the valve 3 Loosen the charge hose connected to the gas side service port slightly to release the pressure then re move the hose 4 Replace the flare nut and its bonnet on the gas side service port and fasten the flare nut securely with an adjustable wrench This process is very impor tant to prevent leakage from the system 5 Replace the valve caps at...

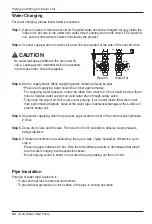
Страница 50: ...ecting valves or elbows are for example in this category Configuration of water circuit is shown in Chapter 2 All connections should be complied with pre sented diagram While installing water pipes followings should be considered While inserting or putting water pipes close the end of the pipe with pipe cap to avoid dust en tering When cutting or welding the pipe always be careful that inner secti...

Страница 51: ... Water condensation on the floor While cooling operation it is very important to keep leaving water temperature higher than 16 C Otherwise dew condensation can be occurred on the floor If floor is in humid environment do not set leaving water temperature below 18 C Water condensation on the radiator While cooling operation cold water may not flow to the radiator If cold water enters to the radiato...

Страница 52: ...ute Sudden water supply can yield water drain through safety valve Fully open the cap of air vent to assure air purging If air is exist inside the water circuit then performance degrade noise at the water pipe mechanical damage at the surface of electric heater coil Step 4 Stop water supplying when the pressure gage located in front of the control panel indicates 2 0 bar Step 5 Close drain valve a...

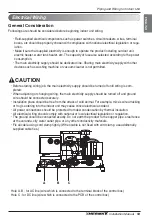
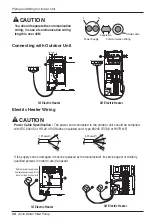
Страница 53: ...When adjusting or changing wiring the main electricity supply should be turned off and ground wire should be connected securely Installation place should be free from the attack of wild animal For example mice s wire attacking or frog s entering into the indoor unit may cause critical electrical accident All power connections should be protected from dew condensation by thermal insulation All elec...

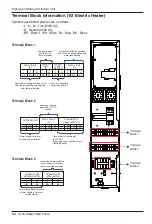
Страница 54: ...ATER TANK HEATER 3WAY VALVE A 1 L BR WH BL BR BL BR BR WH BL BL 2 L1 3 N 4 L 5 N 6 L 7 N 8 L 9 L1 10 N Power supply for Indoor unit and communication Connection for thermostat 230V AC Supporting type Heating only or Heating Cooling opening or closing water flow for FCU cooling OUTDOOR UNIT 2WAY VALVE A THERMOSTAT Default 230V AC 11 1 L BR 12 2 N BL 13 3 BK 14 L1 BR 15 L2 WH 16 N BL 17 L BR 18 N BL...

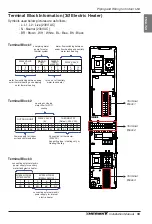
Страница 55: ...ANK HEATER 3WAY VALVE A 1 L BR WH BL BR BL BR BR WH BL BL 2 L1 3 N 4 L 5 N 6 L 7 N 8 L 9 L1 10 N Power supply for Indoor unit and communication Connection for thermostat 230V AC Supporting type Heating only or Heating Cooling opening or closing water flow for FCU cooling OUTDOOR UNIT 2WAY VALVE A THERMOSTAT Default 230V AC 11 1 L BR 12 2 N BL 13 3 BK 14 L1 BR 15 L2 WH 16 N BL 17 L BR 18 N BL 19 L1...

Страница 56: ...be complied with IEC 60245 or HD 22 4 S4 Rubber insulated cord type 60245 IEC 66 or H07RN F If the supply cord is damaged it must be replaced by the manufacturer its service agent or similarly qualified persons in order to avoid a hazard CAUTION 20mm GN YL 1 Phase Ø 3 Phase Ø 20mm GN YL 1Ø Electric Heater 1Ø Electric Heater 3Ø Electric Heater 3Ø Electric Heater L N Separation Power Supply Communic...

Страница 57: ...door Remote Air Sensor To control by air temperature PQRSTA0 Dry Contact To receive on off external signal PQDSA Solar Heating Kit To operate with solar heating system PHLLA Limit Temperature 96 Sanitary Water Tank To generate and store hot water PHS02060310 200 liter Single Heating Coil 1Ø 230V 50Hz 3kW Electric Heater PHS02060320 200 liter Double Heating Coil 1Ø 230V 50Hz 3kW Electric Heater PHS...

Страница 58: ...it inside the thermostat and electric power supply to the thermostat is not required 2 Electric circuit such as display LED buzzer etc is included in the thermostat and electric power supply is required 3 Thermostat generates Heating ON or Heating OFF signal according to user s heating target temperature 4 hermostat generates both Heating ON or Heating OFF and Cooling ON or Cooling OFF signal acco...

Страница 59: ...onnected Main PCB Heater can be seriously damaged L Live signal from PCB to thermostat N Neutral signal from PCB to thermostat H Heating signal from thermostat to PCB Thermostat L N H THERMOSTAT Default 230 V AC 17 L BR 18 N BL 19 L1 BR 20 L2 BK L Live signal from PCB to thermostat N Neutral signal from PCB to thermostat C Cooling signal from thermostat to PCB H Heating signal from thermostat to P...

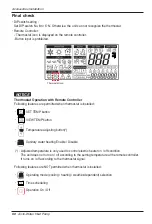
Страница 60: ...TEMP button VIEW TEMP button Temperature adjusting button Sanitary water heating Enable Disable Adjusted temperature is only used to control electric heater on off condition The unit does not turn on off according to the setting temperature at the remote controller It turns on off according to the thermostat signal Following features are NOT permitted when thermostat is installed Operating mode co...

Страница 61: ...orts following 3way valve 1 SPDT Single Pole Double Throw Three wires consist of Live1 for selecting Flow A Live 2 for selecting Flow B and Neutral for common 2 Flow A means water flow from the indoor unit to under floor water circuit 3 Flow B means water flow from the indoor unit to sanitary water tank Sanitary Water Tank and Sanitary Water Tank Kit Solar Thermal Kit Yes Selecting Flow B between ...

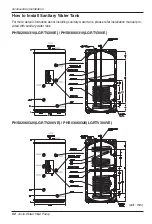
Страница 62: ...ation about installing sanitary water tank please refer installation manual pro vided with sanitary water tank PHS02060310 LGRTV200E PHS03060310 LGRTV300E PHS02060320 LGRTV200VE PHS03060320 LGRTV300VE unit mm Accessories Installation 62 Air to Water Heat Pump ...

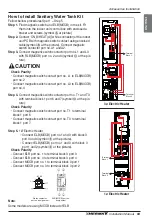
Страница 63: ...Ⓒ at the pic ture Check Poarity Connect magnetic switch contact port no L1 to ELB MCCB port no 2 Connect magnetic switch contact port no L3 to ELB MCCB port no 4 Step 4 Connect magnetic switch contactor port no T1 and T3 with terminal block 1 port 6 and 7 symbol Ⓓ at the pic ture Check Polarity Connect magnetic switch contact port no T1 to terminal block 1 port 6 Connect magnetic switch contact po...

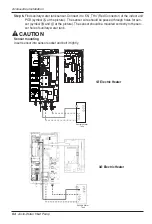
Страница 64: ...rough holes for sen sor symbol Ⓑ and Ⓒ at the picture The sensor should be mounted correctly to the sen sor hole of sanitary water tank Sensor mounting Insert sensor into sensor socket and bolt it tightly CAUTION A Sanitary Water Tank D B C Sanitary Water Tank D A B C 1Ø Electric Heater 3Ø Electric Heater Accessories Installation 64 Air to Water Heat Pump ...

Страница 65: ... are field supplied item L Live signal from PCB to Heater N Neutral signal from PCB to Heater Wire specification Cross sectional area of the wire should be 5mm2 Adjusting thermostat temperature To guarantee proper operation it is recommended to set temperature of thermostat to maximum temperature symbol at the picture WARNING L N A WATER TANK HEATER BR BL 6 L 7 N L N A WATER TANK HEATER BR BL 6 L ...

Страница 66: ... a solution for automatic control of air conditioning system at the owner s behest In simple words it s a switch which can be used to turn the unit On Off after getting the signal from external sources like key in lock door or window switch etc specially used in Hotel rooms How to Install Dry Contact For more information about installing Dry Contact Please refer installation manual provided with D...

Страница 67: ...ck followings Is water circuit both under floor water loop and sanitary water tank loop fully charged If not additional water charging is required Fast valve operation yields noise and vibration Appropriated valve operating time is 60 90 sec onds 3way valve should select water tank loop when electric power is supplied to wire W and wire N 3way valve should select under floor loop when electric pow...

Страница 68: ...When electric power is NOT supplied the valve is closed When electric power is supplied the valve is open How to Wire 2Way Valve Follow below procedures Step 1 Step 2 Step 1 Uncover front cover of the indoor unit and open the control box Step 2 Find terminal block and connect wire as below NO Live signal for Normal Open type from PCB to 2way valve NC Live signal for Normal Closed type from PCB to ...

Страница 69: ...ernal delay time to protect compressor In that case mode change can takes time more than user s expectation Please read thermostat manual carefully if the product does not response quickly 3 Setting temperature range by thermostat can be different with that of the product The heating or cool ing set temperature should be chosen within the setting temperature range of the product 4 It is highly rec...

Страница 70: ...e maximum value of the temperature control device of sanitary tank While installing sanitary water tank with sanitary water tank kit or solar thermal kit there are some constraints like below Sanitary water tank should be located under the indoor unit or same height with the indoor unit Sanitary water tank should be located under the solar thermal system Distance between sanitary water tank sensor...

Страница 71: ...rculation pump should turn on and turn off is required The operating duration time of the recirculation pump is calculated as follow Duration time minute k x V x R k 1 2 1 5 is recommended If distance between pump and tank is far then choose high number V Volume of sanitary water tank liter R Water flow rate of pump liter per minute which is determined by pump performance curve The pump operating ...

Страница 72: ...peared to prevent entering the indoor unit or attacking wires After cutting out the bottom of the indoor unit remove all burrs completely Burrs could cause personal injury 2Way valve should be located between the indoor unit and the water entering point to the under floor See below picture to identify clearly CAUTION WARNING Water In Water Out 2way valve Field Supply domain where 2way valve instal...

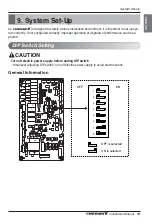
Страница 73: ...ly If not configured correctly improper operation or degrade of performance can be ex pected DIP Switch Setting Turn off electric power supply before setting DIP switch Whenever adjusting DIP switch turn off electric power supply to avoid electric shock General Information CAUTION OFF ON 1 2 3 4 5 6 7 8 OFF is selected ON is selected System Set Up ...

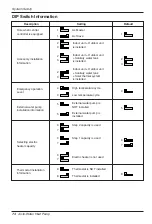
Страница 74: ...nk Solar thermal system is installed Emergency operation Level 4 4 High temperature cycle Low temperature cycle External water pump installation information 5 External water pump is NOT installed 5 External water pump is installed Selecting electric heater capacity 6 7 Step 2 capacity is used Electric heater is not used 6 7 6 7 Step 1 capacity is used Thermostat installation information 8 8 Thermo...

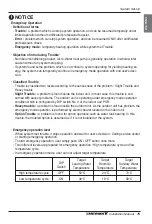
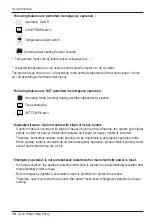
Страница 75: ...door unit In most case this trouble is con cerned with sensor problems The outdoor unit is operating under emergency mode operation condition which is configured by DIP switch No 4 of the indoor unit PCB Heavy trouble a problem is found inside the outdoor unit As the outdoor unit has problem the emergency mode operation is performed by electric heater located in the indoor unit Option Trouble a pr...

Страница 76: ...ouble with slight or heavy trouble If option trouble is occurred with slight or heavy trouble at the same time the system puts higher priority to slight or heavy trouble and operates as if slight or heavy trouble is occurred Therefore sometimes sanitary water heating can be impossible in emergency operation mode When sanitary water is not warming up while emergency operation please check if sanita...

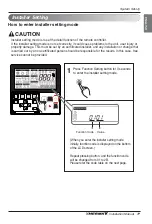
Страница 77: ...aller and any installation or change that is carried out by a non certificated person should be responsible for the results In this case free service cannot be provided 58 58 78 78 0 16 0 16 57 57 1 Function Code Value Press Function Setting button for 3 seconds to enter the installer setting mode When you enter the installer setting mode initially function code is displayed on the bottom of the L...

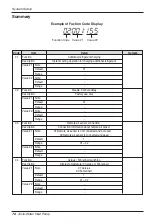
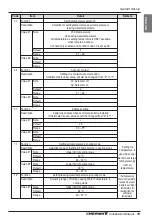
Страница 78: ...alue 1 Note Default 01 Range Value 2 Note Default Range 03 Function Remote air sensor connection Description Connection information about remote air sensor Value 1 Note 01 Remote air sensor is not connected and not used 02 Remote air sensor is connected and used Default 1 Range 01 02 Value 2 Note Default Range 04 Function Celsius Fahrenheit switching Description Display temperature in Celsius or F...

Страница 79: ...ddress setting Description Assigning address when central controller is installed If thermostat is used value should be changed from 2 to 1 Value 1 Note Default 00 Range 00 FF Value 2 Note Default Range 11 Function Setting air temperature in cooling mode Description Adjusting range of Setting Air Temperature in cooling mode Value 1 Note Upper limit of setting range Default 30 C Range 24 30 C Value...

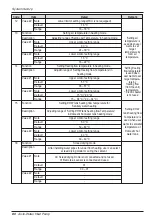
Страница 80: ...n Adjusting range of Setting DHW tank heating flow Temperature in Domestic hot water tank heating mode Value 1 Note Upper Limit of setting range Default 50 C Range 50 80 C Value 2 Note Lower Limit of setting range Default 40 C Range 30 40 C 18 Function Screed drying mode Description After installing water pipes for under floor heating user can select screed drying mode for curing the cement Value ...

Страница 81: ...e s f o t i m i L r e p p U e t o N 1 e u l a V C 0 1 t l u a f e D C 5 0 0 2 e g n a R e g n a r g n i t t e s f o t i m i L r e w o L e t o N 2 e u l a V C 5 1 t l u a f e D C 0 2 0 1 e g n a R 24 Function Setting indoor air temperature range for weather dependent operation Description Setting indoor Max Min temperature for weather dependent operation e g n a r g n i t t e s f o t i m i l r e p ...

Страница 82: ...to frequent ON and OFF of water tank heater Default 03 C Range 02 04 C Value 2 Note Determining heating demand priority between Domestic hot water tank heating and under floor heating Default 00 Sanitary water tank priority Range 01 under floor heating Only available when Domestic hot Water Tank is installed To use disinfection mode Domestic hot water heating should be enable 25 Function Setting H...

Страница 83: ...me duration defines how long time Domestic hot water tank heating can be continued 2A Function Miscellaneous setting Description Determine electric heater and water heater on and off Value 1 Note 00 Operate both electric heater and Domestic hot water tank heater 01 Operate only Domestic hot water tank heater Default 00 Range 00 01 Value 2 Note Not used Default Range Function Changing thermal on of...

Страница 84: ...ction code is not set correctly the product can not be controlled by room air temperature Function Code 04 Celsius Fahrenheit Switching Temperature is displayed in Celsius or Fahrenheit Function Code 05 Setting Temperature Selection The product can be operated according to air temperature or leaving water temperature The selec tion for setting temperature as air temperature or leaving water temper...

Страница 85: ...t flow to the radiator If cold water enters to the radiator dew generation on the surface of the radiator can be occurred NOTICE NOTICE NOTICE Function Code 14 Setting leaving water temperature in heating mode Determine heating setting temperature range when leaving water temperature is selected as setting temperature Function Code 15 Setting sanitary tank leaving water temperature Determine heati...

Страница 86: ...ess left right button to move to screed drying setting part 4Press up down button to adjust 01 or 00 00 Not Used 01 Used 5If you finish the setting press OK CLEAR button 6Press exit button to exit or system will automatically release without any input 25 seconds 7During the screed drying mode dry is displayed Left days for completing the screed drying mode are displayed Left days ...

Страница 87: ...erature or room air tempera ture is far much belower than target leaving water temperature or target room air temperature Function Code 22 Setting Cut off Temperature in Cooling Mode FCU setting included Determine leaving water temperature when the product is turned off This function is used fr pre venting condensation on the floor in cooling mode Value 1 cut off temperature Value 1 is valid when ...

Страница 88: ... 1 and Value 2 of Function Code 24 range of auto adjustable target room air temperature Value 1 and Value 2 of Function Code 25 range of auto adjustable target leaving water tem perature Note Weather dependent operation is applied for heating mode only Value 1 of Function Code 23 Auto Adjustable Target Temperature Outdoor air temperature Temperature profile of Weather dependent operation Value 2 o...

Страница 89: ...ales of Function Code 26 If Value 1 of Function Code 26 is set as 00 that is disable disinfection mode Value 2 and Value 3 is not used When Value 1 is set as 01 that is enable disinfection mode Value 2 is displayed at the po sition of Value 1 and Value 3 is displayed at the position of Value 2 It is due to limited width of the control panel display Sanitary water heating should be enable If sanita...

Страница 90: ...70 C Example If Value 2 is set as 0 that means heating priority is on sanitary water heating sani tary water is heated by AWHP compressor cycle and water heater In this case the under floor can not be heated while sanitary water heating On the other hand if the Value 2 is set as 1 that means heating priority is on under floor heating sanitary tank is ONLY heated by water heater In this case the un...

Страница 91: ...and delay time of sanitary tank heater operating Value 1 of Function Code 2B This time duration defines how long time sanitary tank heating can be continued Value 2 of Function Code 2B This time duration defines how long time sanitary tank heating can be stopped It is also regarded as time gap between sanitary tank heating cycle Value 3 of Function Code 2B This time duration defines how long time ...

Страница 92: ...g water charging air should be taken out through the hole of the air purge If water does not splash out when the tip at the top of the hole is pressed then air purging is not completed yet If well purged the water will splash out like fountain Be careful when testing air purge Splashed water may make your dress wet Two shut off valves located at the end of water inlet pipe and water outlet pipe of...

Страница 93: ...k if water is flood out through the drain hose After checking close the safety valve Look and inspect if there is loosen or defected connection on the terminal block No Category Item Check Point Water Electricity Water pressure Strainer Water filter Safety valve Terminal block wiring 1 2 3 4 Installation Manual 93 ENGLISH Test Run 1 Check to see whether there is any refrigerant leakage and check w...

Страница 94: ...Check if strainer gathers too much particles If so strainer should be cleaned Check if internal water pump speed is NOT set as High It should be set as High Check if pressure gage indicates above 30 kPa Check if water pipe is getting closed due to stacked particles or lime If water inlet temperature is above 55 C the unit does not operated for the sake of system protection If water inlet temperatu...

Страница 95: ...mbly Heater and Main PCB assembly Inverter of the unit The connector for transmission is disconnected The connecting wires are misconnected The communication line is broken Main PCB assembly Inverter is abnormal Main PCB assembly Heater is abnormal Wire connection between remote control panel and Main PCB assembly Heater should be tight 53 9 PCB program EEPROM fault Electrical or mechanical damage...

Страница 96: ...equired Factor that influence the actual level of exposure of the workforce include the characteristics of the work room and the other sources of noise i e the number of equipment and other adjacent processes and the length of time for which an operator ex posed to the noise Also the permissible exposure level can vary from country to country This infor mation however will enable the user of the e...

Страница 97: ......
Отзывы: