background image

Monitoring a Site 

32 

for example 


If not, contact us. 

2.


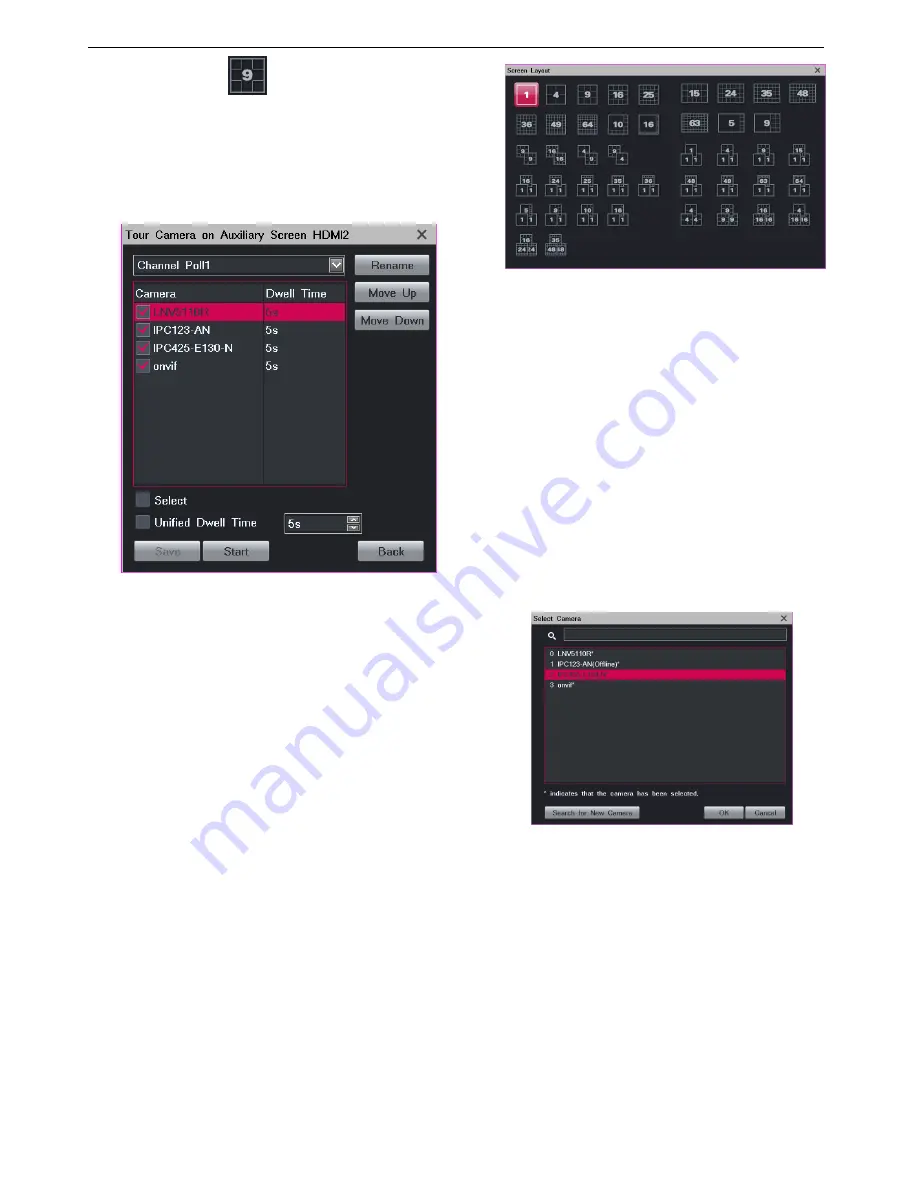
In the displayed dialog box, select a touring scheme.   

By default, the Channel Poll1 scheme is selected, as 
shown in the following figures. 


3.


Select cameras for the touring scheme. These cameras 
are to be toured. 

4.


Enter a dwell time for cameras. 

You can enter either a unique dwell time for a camera 
or a unified dwell time for several cameras. 

5.


(Optional) Change the order for each camera using 
the 

Move Up 

and

 Move Down

 buttons. 

6.


(Optional) Click 

Rename

 to rename the current 

touring scheme. 

7.


Click 

Start

 and then 

Back

Setting and Touring Screen Layouts 

When multiple view windows are displayed on the main 
screen, you can set the screen layout, create a screen layout 
scheme with cameras bound to view windows, and tour 
screen layout schemes. 

To set the screen layout: 

1.


Right-click a view window and choose 

Screen Layout

2.


Choose a layout or click 

More

Then, you will see the following. 


You can also set the screen layout for secondary 
screens in this dialog box. 

To create a screen layout scheme with cameras bound to 
view windows: 

1.


Determine a screen layout by performing the previous 
two steps. 

2.


Bind cameras and view windows. 

1)


Right-click a view window and choose 

Select 

Camera

2)


Click the target camera. 

Alternatively, click 

More

 to find the target camera, 

as shown in the following figure. 


You can also click 

Search for New Camera

 to 

search for and add a new camera. For operation 
details, see section "Adding Cameras." 

3.


Right-click a view window and choose 

Layout Scheme

4.


In the displayed dialog box, click 

Obtain the Current 

Layout

, as shown in the following figure. 

Содержание LRN8640N

Страница 1: ...USER MANUAL Network Video Recorder Please read this manual carefully before operating your set and retain it for future reference MODEL LRN8640N P N COV33488804 1601 V1 0 ...

Страница 2: ...ructions d utilisation et de maintenance entretien importantes dans la documentation qui accompagne l appareil ADVERTENCIA PARA REDUCIR EL RIESGO DE DESCARGA ELÇCTRICA NO EXTRAIGA LA CUBIERTA O PARTE POST ERIOR NO HAY EN EL INTERIOR NINGUNA PARTE QUE PUEDA REEMPLAZAR EL USUARIO PARA CUALQUIER RE PARACIÓN CONTACTE CON PERSONAL DE MANTENIMI ENTO CUALIFICADO Este símbolo de un relámpago con cabeza de...

Страница 3: ...en ligesidet trekant skal henlede brugerens opmærksomhed på at der findes vigtige betjenings og vedligehol delsesinstruktioner service i det skriftlige materiale som følger med produktet VAARA ÄLÄ AVAA KOTELOA TAI TAKALEVYÄ JOTTA VÄ LTTYISIT SÄHKÖISKUILTA SISÄLLÄ EI OLE KÄYTTÄJÄN H UOLLETTAVISSA OLEVIA OSIA JÄTÄ HUOLTOTOIMET VA LTUUTETUN HUOLLON TEHTÄVÄKSI Tämä nuolikärkinen salama tasasivuisen ko...

Страница 4: ...A COBERTURA OU PARTE TRASEIRA NEM PARTES DE ACESSO PEÆA ASSISTÊNCIA A PESSOAL QUALIFICADO Este símbolo de relâmpago com uma seta no interior de um triângulo equilátero destina se a alertar o utilizador da presença de voltagem perigosa não isolada no interior da cobertura do produto que pode possuir magnitude suficiente para constituir risco de choque eléctrico para as pessoas O ponto de exclamação...

Страница 5: ...st od strujnog udara Znak uskličnika unutar jednakostranič nog trokuta upozorava korisnika na prisutnost važnih informacija za rad i odr žavanje servisiranje uređaja u pisanim materijalima koji prate uređaje PRECAUŢII PENTRU A REDUCE RISCUL DE ELECTROCU TARE NU SCOATEŢI CAPACUL SAU PARTEA DIN SPATE ÎN INTERIOR NU EXISTĂ PIESE CARE POT FI MANIPULATE DE UTILIZATOR PENTRU LUCRĂRI DE SERVICE ADRESAŢI ...

Страница 6: ...има за цел да предупреди потребителя за наличието на важни инструкции за работа и поддръжка обслужване в ръководството съпровождащо уреда ОСТОРОЖНО ЧТОБЫ СНИЗИТЬ РИСК ПОРАЖЕНИЯ ЭЛЕКТРИЧЕСКИМ ТОКОМ НЕ СНИМАЙТЕ КОРПУС ИЛИ ЗАДНЮЮ КРЫШКУ ВНУТРИ НЕТ ДЕТАЛЕЙ ПРИГОДНЫХ ДЛЯ РЕМОНТА ПОЛЬЗОВАТЕЛЕМ ДЛЯ ПРОВЕДЕНИЯ РЕМОНТА ОБРАТИТЕСЬ К КВАЛИФИЦИРОВАННОМУ СПЕЦИАЛИСТУ Символ молнии в равностороннем треугольнике ...

Страница 7: ...دخ نت ب ي ه إل ى ألا ض ال ع تم س وا ي ال ثم ل ث خادب ل ةدوجومال ال ت ع ج ب ةمالع دهت ف ال زاهج اذه عم فرمال ةق ال ك ت ي اب ت مض ن ةماه ةمدخ UPOZORNENIE Z DÔVODU RIZIKA ÚRAZU ELEKTRICKÝ M PRÚDOM NEOTVÁRAJTE KRYT ANI ZADNÚ ČASŤ VNÚTRI NIE SÚ ŽIADNE POUŽÍVATEĽOM OPRAVITEĽNÇ SÚČIASTKY OPRAVU ZARIADENIA PRENECHAJTE KVALI FIKOVANÇMU ODBORNÍKOVI Symbol blesku so šípkou v rovnostrannom trojuholníku má upo...

Страница 8: ...TSARGIAI ELEKTROS SMŪGIO PAVOJUI SUMAŽINTI NENUIMKITE DANGČIO ARBA NUGARĖLĖS VIDUJE NĖRA DALIŲ KURIAS TURĖTŲ PRIŽIŪRĖTI NAUDOTOJAS PRIEŽIŪRĄ PATIKĖKITE SPECIALISTAMS Žaibo su strėlės antgaliu ženklas lygiakra ščiame trikampyje skirtas įspėti naudotoją apie neizoliuotus laidus ir pavojingą įtampą prietaiso viduje kurios pakaktų sukelti elektros smūgiui Šauktukas lygiakraščiame trikampyje skirtas at...

Страница 9: ... продукти WEEE трябва да се изхвърлят отделно от битовите отпадъци 2 Старите електрически продукти могат да съдържат опасни вещества и правилното изхвърляне на Вашия уред ще помогне за предотвратяване на негативните последствия за околната среда и човешкото здраве Вашият стар уред може да съдържа части за многократна употреба които биха могли да бъдат използвани за ремонт на други продукти както и...

Страница 10: ...se spild af værdifulde ressourcer 3 Du kan enten tage apparatet til den butik hvor du købte det eller kontakte dit lokale affaldskontor angående oplysninger om det nærmeste autoriserede WEEE samlepunkt Find de sidste nye oplysninger for dit land på www lg com global recycling Teie vana seadme hä vitamine 1 Läbitõmmatud ristiga prügikasti sü mbol tähendab et elektriliste ja elektrooniliste toodete ...

Страница 11: ...ariert werden können aber auch sonstige wertvolle Materialien enthalten die zur Schonung knapper Ressourcen recycelt werden können 3 Sie können Ihr Gerät entweder in den Laden zurückbringen in dem Sie das Produkt ursprünglich erworben haben oder Sie kontaktieren Ihre Gemeindeabfallstelle für Informationen ü ber die nächstgelegene autorisierte WEEE Sammelstelle Die aktuellsten Informationen für Ihr...

Страница 12: ...ullo smaltimento delle apparecchiature obsolete contattare l ufficio del comune di residenza il servizio di smaltimento rifiuti o il punto vendita in cui èstato acquistato il prodotto www lg com global recycling Jūsu vecās ierīces likvidēšana 1 Šis simbols pārsvītrota atkritumu tvertne uz riteņiem norāda ka elektrisko un elektronisko iekārtu atkritumi EEIA jālikvidē atsevišķi no sadzīves atkritumu...

Страница 13: ...nten til butikken der du kjøpte produktet eller ta kontakt med den lokale myndighetens avfallskontor for informasjon om nærmeste autoriserte innsamlingspunkt for el avfall WEEE avfall For den mest oppdaterte informasjonen for ditt land gåtil www lg com global recycling Utylizacja starego urządzenia 1 Symbol przekreślonego pojemnika na odpady na kółkach oznacza że produkty elektryczne lub elektroni...

Страница 14: ...moći sprečavanju pojave negativnih posledica po životnu sredinu i zdravlje ljudi Vaš stari aparat može da sadrži delove za višekratnu upotrebu koji se mogu koristiti za zamenu drugih proizvoda i druge vredne materijale koji se mogu reciklirati radi očuvanja ograničenih resursa 3 Vaš aparat možete da odnesete u radnju gde ste ga kupili ili da kontaktirate lokalnu vladinu kancelariju za otpad kako b...

Страница 15: ...an innehå lla farliga substanser såkorrekt avfallshantering av produkten förhindrar negativa konsekvenser för miljön och den mä nskliga hälsan Din gamla apparat kan innehålla återanvändningsbara delar som används för att reparera andra produkter och andra värdefulla material som kan återvinnas för att spara begrä nsade resurser 3 Du kan ta din gamla apparat till butiken dä r du köpte produkten ell...

Страница 16: ...uswirkungen auf Mensch Tier und Umwelt vermieden werden 4 Ausführliche Informationen zur Entsorgung von alten Akkus erhalten Sie bei den lokalen Behörden der Entsorgungseinrichtung oder dem Fachhändler bei dem Sie das Produkt erworben haben http www lg com global sustainability environment take back recycling global network europe Recyclage des batteries accumulateurs usagés 1 Ce symbole peut être...

Страница 17: ...05 кадмію понад 0 002 та свинцю понад 0 004 2 Усі батареї акумулятори слід утилізувати окремо від побутового сміття здаючи їх у спеціальні пункти збору визначені урядом або місцевою владою 3 Правильно утилізувавши старі батареї акумулятори можна попередити можливі наслідки їхнього негативного впливу на довкілля здоров я тварин і людей 4 Детальніше про утилізацію старих батарей акумуляторів можна д...

Страница 18: ... ten może występować wraz z oznaczeniami symboli chemicznych rtęci Hg kadmu Cd lub ołowiu Pb 2 Zabrania się wyrzucania zużytych baterii akumulatorów razem ze zwykłymi odpadami komunalnymi Powinny one zostać przekazane do punktów zbiórki odpadów wyznaczonych przez władze lokalne 3 Odpowiednie postępowanie ze zużytymi bateriami akumulatorami zapobiega potencjalnym negatywnym konsekwencjom dla środow...

Страница 19: ... 0 004 bly 2 Alle batterier akkumulatorer skal bortskaffes separat fra husholdningsaffald via bestemte indsamlingsfaciliteter der er godkendt af regeringen eller de lokale myndigheder 3 Korrekt kassering af dine gamle batterier akkumulatorer vil være en hjælp til at forhindre de mulige negative konsekvenser for miljøet og sundhedsskadelige virkninger 4 Hvis du vil have yderligere oplysninger om bo...

Страница 20: ... se odlagati odvojeno od komunalnog otpada na posebnim mjestima koje je odredila vlada ili lokalne vlasti 3 Ispravno odlaganje starih baterija akumulatora pomaže u sprječavanju potencijalnih negativnih posljedica po okoliš te zdravlje životinja i ljudi 4 Više informacija o odlaganju starih baterija akumulatora zatražite od gradskog ureda službe za odlaganje otpada ili trgovine u kojoj ste kupili p...

Страница 21: ...олку батеријата содржи повеќе од 0 0005 жива 0 002 кадмиум или 0 004 олово 2 Сите батерии акумулатори треба да бидат отстранети одделно од другиот отпад на посебни места назначени од страна на владата или локалните власти 3 Правилното отстранување на вашите стари батерии акумулатори ќе ги спречи потенцијалните негативни последици за животната средина и за здравјето на животните и луѓето 4 За повеќ...

Страница 22: ... 0 0005 kaadmiumi rohkem kui 0 002 või pliid rohkem kui 0 004 2 Kõik akud patareid tuleb paigutada olmeprügist eraldi selleks ette nähtud kohtadesse nagu on kehtestanud valitsus või kohalik võimuorgan 3 Vanade akude patareide õige kasutuselt kõrvaldamine aitab ennetada võimalikke kahjusid keskkonnale ja inimeste tervisele 4 Täpsemat teavet vanade akude patareide kasutuselt kõrvaldamise kohta saate...

Страница 23: ...he product and for their own safety users should not attempt to remove the battery and should contact LG Service Helpline or other independent service providers for advice Caution Internal lithium battery in the unit should not be replaced by user because of danger of explosion if battery is incorrectly replaced and must be replaced with the same type battery by expert OPEN SOURCE SOFTWARE NOTICE ...

Страница 24: ...u encounter any problems ask your dealer for assistance This may cause fire or electric shock Keep a distance of at least 15 cm between the back of the system and the wall for the cables connected to the system otherwise they may be bent damaged or cut This may cause fire electric shock or injury Install the system in a cool place without direct sunlight and always maintain room temperature Avoid ...

Страница 25: ...magnetic objects electric frequencies or vibration Do not place any heavy object on the system This may cause system breakdown Install the system on a stable level surface The system may not operate properly Install the system in a place with appropriate moisture and temperature levels Avoid installing the system in a place with high over 40 C or low under 0 C temperature The system can be damaged...

Страница 26: ...5 Contents Safety Information 1 Contents 25 Functions 26 Logging In to the LRN8640N 27 Monitoring a Site 28 Recording 37 Playing Back 39 Alarming 43 Miscellaneous 48 Specification 53 Abbreviations and Acronyms 56 ...

Страница 27: ...iple Monitor Live Viewing Image Flip This function allows you to track an object continuously as it passes beneath a camera For details on how to use this function see section Advanced PTZ Controls Playback 16 Channel 1080p Video Playback A spectacular 1920 by 1080 resolution lets you see more of your high resolution images with pixel for pixel accuracy When you play back videos on a screen the so...

Страница 28: ...an incorrect password five times in succession your account will be locked for 10 minutes If you forget your password contact your system administrator to retrieve the default password of your account NOTE The graphical user interface GUI of the LRN8640N is continuously changed Therefore do not be alarmed when you find the screenshots in this document are different from actual ones We greatly appr...

Страница 29: ...re 3 In the displayed dialog box specify User Name and Password If you want to add a number of ONVIF cameras that use the same user name and password select Using the same user name and password Then all these cameras can be added at a time 4 Click OK 5 Optional Manually search for an ONVIF or RTSP camera and add it 1 Click Search for a Device and specify parameters The following is an example 2 C...

Страница 30: ... camera list and click Remove PTZ Controls When you are monitoring a site you can use PTZ controls to look around your surveillance site Common PTZ Controls Common PTZ controls are described as follows Option Description Zooming Click to zoom in and to zoom out Only this option is available to ONVIF cameras Adjusting the Brightness Click or to increase or decrease the display brightness respective...

Страница 31: ... preset position in the text box and click Load to move the camera to the preset position This option is available to ONVIF cameras Tour Preset This option tours preset positions By default the dwell time for each preset position is 10s Note that the dwell time is unconfigurable Note that this option requires that preset positions have been configured This option is available to ONVIF cameras NOTE...

Страница 32: ...l Time drop down list The following is an example 5 Optional Change the order for each camera using the Up and Down buttons 6 Optional Click Rename to rename the current touring scheme The following is an example 7 Click Start and then Back After the preceding steps are performed live videos from these surveillance sites are toured on the view window To tour multiple surveillance sites on a second...

Страница 33: ...en layout scheme with cameras bound to view windows and tour screen layout schemes To set the screen layout 1 Right click a view window and choose Screen Layout 2 Choose a layout or click More Then you will see the following You can also set the screen layout for secondary screens in this dialog box To create a screen layout scheme with cameras bound to view windows 1 Determine a screen layout by ...

Страница 34: ...s an example 4 Click Start and then Back Enabling Dual Triple Monitor Viewing Enabling the feature The LRN8640 supports triple monitor viewing using two HDMI ports and one VGA port To enable dual monitor viewing 1 Right click a view window and choose Screen Layout More and then select a layout with two digits for example 2 Right click a view window and choose Secondary Screen 3 In the displayed Se...

Страница 35: ...trator or us Heterologous output In heterologous output mode the output from the VGA and HDMI ports is different Snapshots Capturing To capture video images right click a view window and choose Advanced Snapshot To schedule a capturing task through alarm linkage 1 Choose Main Menu Alarm Service Alarm The following figure shows the Service Alarm dialog box 2 Select an alarm type from the Type drop ...

Страница 36: ...B flash drive by clicking the Uninstall button Delete Delete specific snapshots You cannot delete snapshots that are backed up in a USB flash drive Delete All Delete all snapshots You cannot delete snapshots that are backed up in a USB flash drive Browse Browse all snapshots Settings To configure snapshot settings 1 Choose Main Menu Snapshot Settings 2 Specify parameters according to onsite condit...

Страница 37: ...ecord audio To listen to a camera 1 Right click the corresponding view window and choose Volume Control 2 Click as shown in the following figure To call a camera 1 Right click the corresponding view window and choose Volume Control 2 Click Note that the listening and calling functions can be enabled at the same time ...

Страница 38: ... or the recording scheduling function By alarm linkage Through alarm linkage a recording can automatically start when an alarm is triggered To schedule a recording 1 Choose Main Menu Alarm Service Alarm 2 Select an alarm type from the Type drop down list 3 Select a source day and period or multiple periods 4 Click Edit 5 Select a linked camera from the Linked Device drop down list 6 Select Recordi...

Страница 39: ...time in which recordings are resumed when alarms are cleared 3 Click Save Backing Up Records To back up records 1 Insert a USB flash drive to the LRN8640N 2 Choose Main Menu Record Back Up Record 3 Optional Enter a keyword in the text box next to Search Camera to quickly find the target camera 4 Select the target camera from the camera list 5 Select a recording date as shown in the following figur...

Страница 40: ...for each target camera 6 Click for each view window Note that red sections of the timeline indicate that alarms are generated during this period and that yellow sections of the timeline indicate that records are available during this period The following table describes playback options Option Description Pause Stop a playback temporarily Stop Stop a playback Low Playback Speed Slow the playback d...

Страница 41: ...ns are performed you will find blue sections on the timeline These blue sections indicate that records made during this period of time are locked and these Option Description records will not be overwritten NOTE Each record is composed of data blocks and each data block cannot be split further Therefore you may find that the eventually locked period is different from the previously specified perio...

Страница 42: ...riod of time 1 Insert a USB flash drive to the LRN8640N 2 Click Back Up 3 Use to select the period and then click the period 4 In the displayed Back Up dialog box select a start time and an end time 5 Select a partition and click Back Up NOTE Before removing the USB flash drive from the LRN8640N uninstall the USB flash drive by clicking the Uninstall button Compared with a standard single record p...

Страница 43: ...cameras those have been deleted from your LRN8640N After a camera is removed from an LRN8640N the records made from the camera may remain on the LRN8640N In such a case you can play back these records To play back such records 1 During a single or multi record playback or synchronous playback select Record Before Record is selected you can find only online cameras After Record is selected you can ...

Страница 44: ... this feature on the management software of the camera Configuring a Service Alarm To configure a service alarm 1 Choose Main Menu Alarm Service Alarm 2 In the displayed Service Alarm dialog box configure parameters as required as shown in the following figure 1 Select an alarm type for example Motion Detection 2 Select a source camera and a day 3 Optional Click Rename to add an alias to the sourc...

Страница 45: ...n for a camera 1 Right click the corresponding view window and choose PTZ Control 2 Choose a location for the camera by using PTZ controls which are Up Down Left and Right 3 Click Advanced 4 On the first page enter a digit in the text box next to the Preset Position parameter 5 Click Save The numbers of preset locations supported by cameras vary according to the camera type LG Network Client Displ...

Страница 46: ...ctions are as follows Action Description Remarks E Mail Send an alarm notification to the preset email address To configure mail settings choose Main Menu Settings Mail Service Buzzer Enable the beeper on the LRN8640N Alarm Output X Invoke an alarm output device ...

Страница 47: ...nt Recording Space No space is available for records Insufficient Snapshot Space No space is available for snapshots MAC Address Conflict An MAC address of the LRN8640N is in duplicate 3 Click Save Active Alarms To query active alarms choose Main Menu Alarm Active Alarm as shown in the following figure Alternatively right click a view window and choose Advanced Query Active Alarm When viewing acti...

Страница 48: ...example for search results 6 Optional Click Play Back to play back the recording that is started immediately after the alarm is triggered Note that the recording is stopped as soon as the exception or motion that triggers the alarm no longer exists ...

Страница 49: ...40N before you can use a monitoring keyboard to control the LRN8640N Display Language Display language Time Zone Time zone System Time System time Time Elapsed Since Startup Time elapsed since the startup of the LRN8640N Automatic Logout Period after which the current account logs out from an LRN8640N Viewing Mode Way of viewing live video The default value is Free Mode This parameter can be confi...

Страница 50: ...Setup Wizard When this option is selected the Setup Wizard is evoked every time the LRN8640N restarts Allow ONVIF cameras time synchronization Whether to allow ONVIF cameras to synchronize the time with the LRN8640N This option is not selected by default NOTE LRN8640 does not support Summer Time If Summer Time is set in camera don t use this function Maybe camera system time will be changed Resolu...

Страница 51: ...RN8640N uninstall the USB flash drive by clicking the Uninstall button User Authorization When you are authorized to manage user accounts you can add edit delete and disable standard users When you are not authorized to manage user accounts you can only query your account s user authorization information and change your account s password Adding a User Account To add a standard user 1 Choose Main ...

Страница 52: ...r a standard user 1 Choose Main Menu Settings User Authorization 2 Select the user from the user account list and click Retrieve Password 3 In the displayed dialog box click Yes to confirm your operation To change the password of your own account 1 Choose Main Menu Settings User Authorization 2 Select your account from the user account list and click Change Password 3 In the displayed Change Passw...

Страница 53: ...dialog box click Yes to confirm your operation Shutting Down the System To shut down the system 1 Choose Main Menu Shut Down Shutdown 2 In the displayed dialog box click Yes to confirm your operation Logging Out from the System To log out from the system 1 Choose Main Menu Shut Down Log Out 2 In the displayed dialog box click Yes to confirm your operation NOTE In NVR password of Sender Address can...

Страница 54: ... simultaneously output different content Multi Screen Display Local monitor Main Secondary 1 1 1 4 1 1 9 1 1 15 1 1 16 1 1 24 1 1 25 1 1 35 1 1 36 1 1 48 1 1 49 1 1 63 1 1 64 1 1 1 4 1 1 1 8 1 1 1 9 1 1 1 15 1 1 4 4 4 9 9 9 16 16 16 4 16 16 16 24 24 35 48 48 Multi Screen Display Clientup to 4 screens simultaneously 1 3 4 9 12 16 20 25 30 36 42 49 56 63 64 1 5 1 7 1 8 1 9 1 11 1 15 1 16 1 33 1 47 1...

Страница 55: ...E PTZ Storage Max Internal HDDs 16 x 3 5 HDD MAX 64TB up to 4TB each Raid RAID 0 1 5 6 10 E SATA None Function Disk group Quota Audio Compression G 711a G 711u ADPCM G 722 G 722 1c AAC LC Bit rate 32kbps 64kbps Audio Function Bi directional audio Dumb Mute Broadcasting Alarm Alarm Triggers Alarm input Motion Detection System alarm Alarm Events Snapshot Recording PTZ preset Alarm out Buzzer Email L...

Страница 56: ...45 interface Video Out 2 x HMDI 1 HDMI up to 4K x 2k TBD 1 HDMI up to 1920 x 1080 60Hz 1 x VGA up to 1920 x 1080 60Hz Audio In Out 1 x RCA Line in 1 x RCA Line out Alarm In Out 2 x Inputs 2 x Outputs Control 2 x RS485 USB 2 x USB 2 0 2 x USB 3 0 Environmental Operating Temperature 0 40 Operating Humidity 0 80 Electrical Power 100 240V AC 50 60Hz Power Consumption Max 150W HDD not included Mechanic...

Страница 57: ...bbreviations and Acronyms DHCP Dynamic Host Configuration Protocol LAN Local area network NVR Network Video Recorder ONVIF Open Network Video Interface Forum OSD on screen display RTSP Real Time Streaming Protocol WDR wide dynamic range ...

Страница 58: ......

Отзывы: