Lexmark MX310dn Скачать руководство пользователя страница 4

a

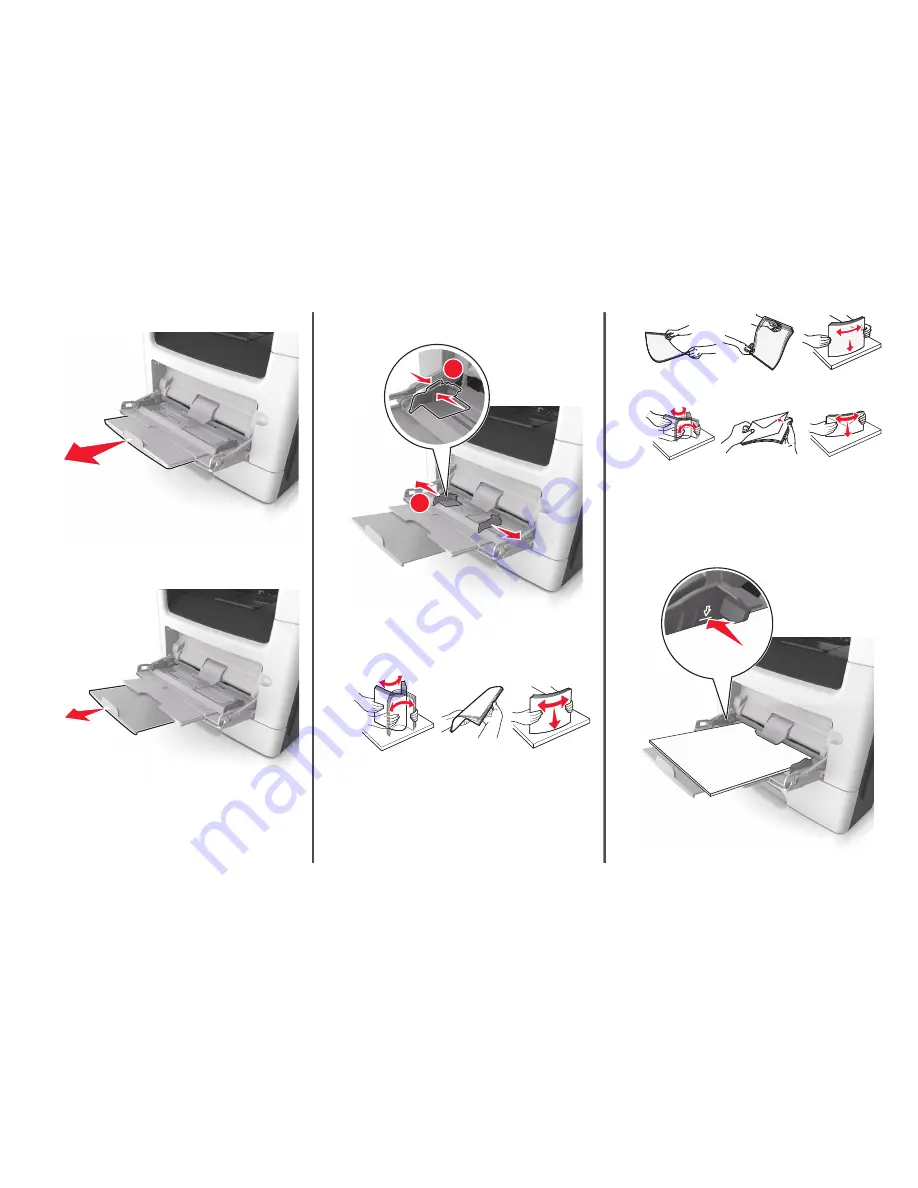
Pull the multipurpose feeder extender.

b

Pull the extender gently so that the multipurpose feeder is fully
extended and open.

2

Squeeze the tab on the left width guide, and then move the guides
for the paper you are loading.

1

2

3

Prepare the paper or specialty media for loading.

Flex sheets of paper back and forth to loosen them, and then
fan them. Do not fold or crease the paper. Straighten the edges
on a level surface.

Hold transparencies by the edges. Flex the stack of
transparencies back and forth to loosen them, and then fan
them. Straighten the edges on a level surface.

Note: 

Avoid touching the printable side of the

transparencies. Be careful not to scratch them.

Flex the stack of envelopes back and forth to loosen them, and
then fan them. Straighten the edges on a level surface.

4

Load the paper or specialty media.

Notes:

Do not force paper or specialty media into the multipurpose
feeder.

Make sure the paper or specialty media is below the
maximum paper fill indicator located on the paper guides.
Overfilling may cause paper jams.


4

Содержание MX310dn

Страница 1: ...Blinking red The printer requires user intervention Sleep button light Printer status Off The printer is off idle or in Ready state Solid amber The printer is in Sleep mode Blinking amber The printer...

Страница 2: ...s For some paper sizes like letter legal and A4 squeeze and slide the length guide tab backward to accommodate their length When loading legal size paper the length guide extends beyond the base leavi...

Страница 3: ...e the paper is below the maximum paper fill indicator located on the side of the width guide 6 Insert the tray 7 From the printer control panel set the paper size and paper type in the Paper menu to m...

Страница 4: ...e Hold transparencies by the edges Flex the stack of transparencies back and forth to loosen them and then fan them Straighten the edges on a level surface Note Avoid touching the printable side of th...

Страница 5: ...rinter IP address in the address field Notes View the printer IP address in the TCP IP section in the Network Ports menu The IP address appears as four sets of numbers separated by periods such as 123...

Страница 6: ...cument open click File Print b Click Properties Preferences Options or Setup c Adjust the settings if necessary d Click OK Print For Macintosh users a Customize the settings in the Page Setup dialog i...

Страница 7: ...to Scan the Next Page and then press 3 Press the left or right arrow button to scroll to Finish the Job and then press Copying photos 1 Place a photo facedown on the scanner glass in the upper left c...

Страница 8: ...or Setup 3 Click Fax Enable fax and then enter the recipient fax number or numbers 4 If necessary configure other fax settings 5 Apply the changes and then send the fax job Notes The fax option is av...

Страница 9: ...u are using the scanner glass and Scanning page Scan the Next Page or Finish the Job appears then press Canceling a fax job after scanning the original documents 1 From the printer control panel press...

Страница 10: ...does not guarantee that the page will reprint 1 2 3 4 5 6 7 Jam access area Printer control panel message What to do 1 Automatic document feeder ADF x page jam open automatic feeder top cover 28y xx R...

Страница 11: ...h surface Warning Potential Damage Do not expose the imaging unit to direct light for more than 10 minutes Extended exposure to light may cause print quality problems 5 Lift the green flap in front of...

Страница 12: ...pull down the rear door CAUTION HOT SURFACE The inside of the printer might be hot To reduce the risk of injury from a hot component allow the surface to cool before touching it 3 Firmly grasp the ja...

Страница 13: ...e tray completely out of the printer 2 Locate the blue lever and then pull it down to release the jam 3 Firmly grasp the jammed paper on each side and then gently pull it out Note Make sure all paper...

Страница 14: ...Make sure all paper fragments are removed 2 Flex the sheets of paper back and forth to loosen them and then fan them Do not fold or crease the paper Straighten the edges on a level surface 3 Reload pa...

Страница 15: ...ments are removed 4 Close the ADF cover 5 Straighten the edges of the original documents then load the original documents into the ADF and then adjust the paper guide 6 From the printer control panel...

Отзывы: