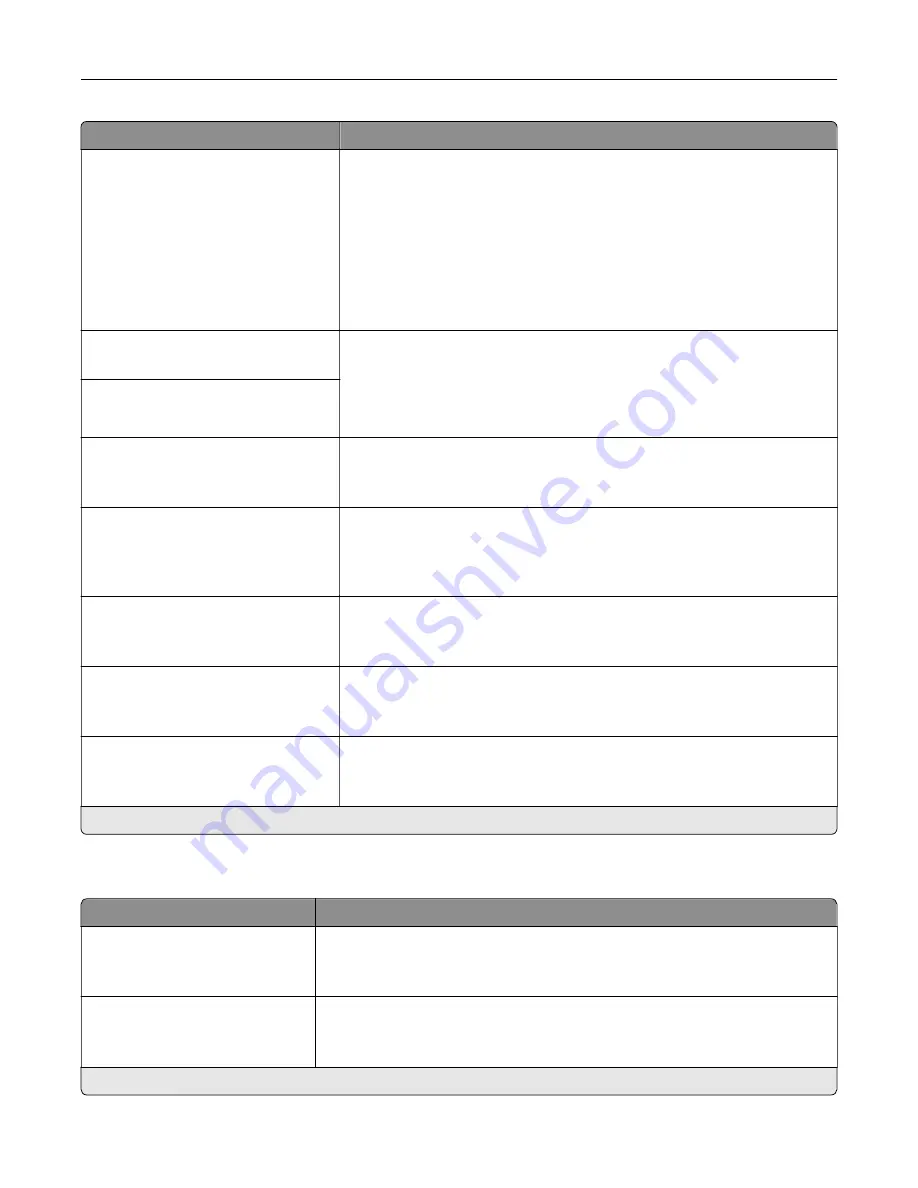
Menu item
Description
Lines per Page
1–255
Specify the number of lines of text for each page printed through the PCL
®
data stream.
Notes:
•
This menu item activates vertical escapement that causes the
selected number of requested lines to print between the default
margins of the page.
•
60 is the U.S. factory default setting. 64 is the international factory
default setting.
PCL5 Minimum Line Width
1–30 (2*)
Set the initial minimum stroke width.
Notes:
•
Jobs printed in 1200 dpi use the value directly.
•
Jobs printed in 4800 CQ use half the value.
PCLXL Minimum Line Width
1–30 (2*)
A4 Width
198 mm*
203 mm
Set the width of the logical page on A4
‑
size paper.
Note:
Logical page is the space on the physical page where data is
printed.
Auto CR after LF
Off*
On
Set the printer to perform a carriage return after a line feed control
command.
Note:
Carriage return is a mechanism that commands the printer to move
the position of the cursor to the first position on the same line.
Auto LF after CR
Off*
On
Set the printer to perform a line feed after a carriage return control
command.
Print Timeout
Disabled
Enabled*
Enable the printer to end a print job after it has been idle for the specified
amount of time in seconds.
Wait Timeout Time
1–255 (90*)
Set the time in seconds for the printer to end a print job after it has been
idle.
Note:
This menu item appears only when Wait Timeout is enabled.
Note:
An asterisk (*) next to a value indicates the factory default setting.
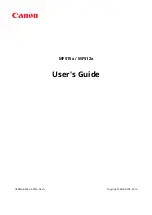
Image
Menu item
Description
Auto Fit
On
Off*
Select the best available paper size and orientation setting for an image.
Note:
When set to On, this menu item overrides the scaling and orientation
settings for the image.
Invert
Off*
On
Invert bitonal monochrome images.
Note:
This menu item does not apply to GIF or JPEG image formats.
Note:
An asterisk (*) next to a value indicates the factory default setting.
Use printer menus
68
Содержание CX331
Страница 118: ...Replacing the ADF tray 1 Open the ADF cover Maintain the printer 118 ...
Страница 119: ...2 Remove the used ADF tray 3 Unpack the new ADF tray Maintain the printer 119 ...
Страница 122: ...7 Remove the tray 8 Position the printer on its side Maintain the printer 122 ...
Страница 126: ...4 Insert the new separator pad until it clicks into place 5 Close the ADF cover Maintain the printer 126 ...
Страница 142: ... Below the fuser area Duplex unit 3 Close the door Troubleshoot a problem 142 ...


