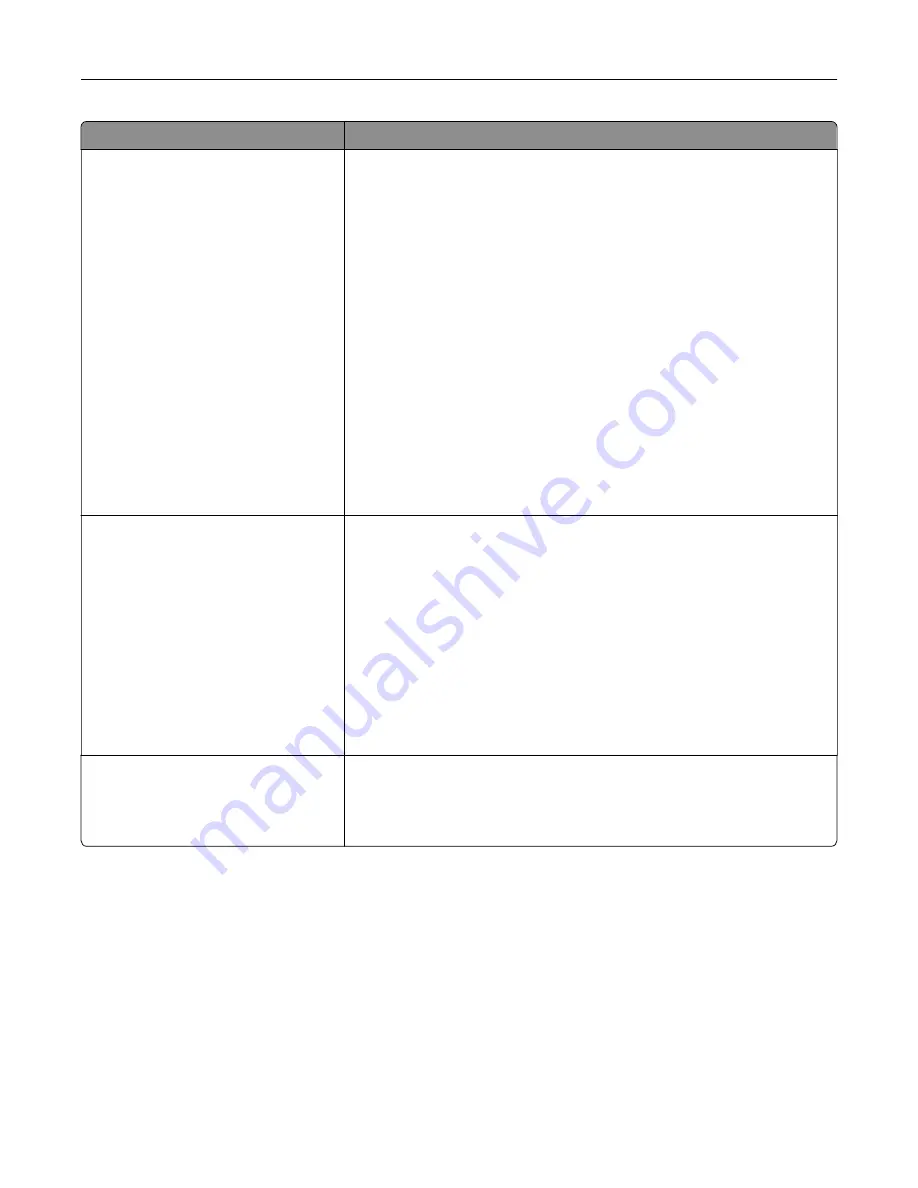
Lexmark CS310 Series Скачать руководство пользователя страница 84

Use

To

Tray Renumber

Assign MP Feeder

Off

None

0–199

Assign Tray [x]

Off

None

0–199

Assign Manual Paper

Off

None

0–199

Assign Manual Env

Off

None

0–199

Configure the printer to work with printer software or programs that use
different source assignments for trays and feeders.

Notes:

“Off” is the factory default setting.

“None” ignores the Select Paper Feed command. This option
appears only when it is selected by the PCL 5 interpreter.

“0–199” allows a custom setting to be assigned.

Tray Renumber

View Factory Defaults

MPF Default = 8

T1 Default = 1

T1 Default = 4

T1 Default = 5

T1 Default = 20

T1 Default = 21

Env Default = 6

MPaper Default = 2

MEnv Default = 3

Display the factory default setting assigned to each tray or feeder.

Tray Renumber

Restore Defaults

Yes

No

Restore all tray and feeder assignments to the factory default settings.

Understanding the printer menus

84

Содержание CS310 Series

Страница 1: ...CS310 Series and CS317 User s Guide November 2017 www lexmark com Machine type s 5027 Model s 210 230...

Страница 2: ...12 Installing hardware options 16 Attaching cables 18 Setting up the printer software 19 Networking 20 Verifying printer setup 24 Loading paper and specialty media 25 Setting the paper size and type 2...

Страница 3: ...ling 91 Securing the printer 93 Statement of Volatility 93 Erasing volatile memory 93 Erasing non volatile memory 93 Finding printer security information 94 Maintaining the printer 95 Cleaning the pri...

Страница 4: ...standard bin 123 Paper jam in the front door 123 Paper jam in trays 125 Paper jam in the manual feeder 126 Paper jam in the multipurpose feeder 127 Troubleshooting 128 Understanding the printer messa...

Страница 5: ...UTION POTENTIAL INJURY Only a Lexmark Inline Surge Protector that is properly connected between the printer and the power cord provided with the printer may be used with this product The use of non Le...

Страница 6: ...g optional hardware or memory devices sometime after setting up the printer then turn the printer off and unplug the power cord from the electrical outlet before continuing If you have any other devic...

Страница 7: ...bleshooting and solving problems User s Guide and Quick Reference Guide The guides may be available on the Software and Documentation CD For more information visit http support lexmark com Instruction...

Страница 8: ...ntries and regions See the printed warranty that came with your printer Selecting a location for the printer CAUTION POTENTIAL INJURY The printer weight is greater than 18 kg 40 lb and requires two or...

Страница 9: ...4 3 1 2 5 1 Right side 152 4 mm 6 in 2 Front 508 mm 20 in 3 Left side 76 2 mm 3 in 4 Rear 101 6 mm 4 in 5 Top 254 mm 10 in Printer con gurations 2 1 3 4 Learning about the printer 9...

Страница 10: ...n sending a print job or performing a power on reset with the main power switch wakes the printer from Sleep mode Pressing the Sleep button or performing a power on reset with the main power switch wa...

Страница 11: ...ver Note This feature is available only in network printers or printers connected to print servers If the printer is installed on a network then you can use the Embedded Web Server to do the following...

Страница 12: ...tional cards Available internal option Memory card DDR3 DIMM Installing a memory card CAUTION SHOCK HAZARD If you are accessing the controller board or installing optional hardware or memory devices s...

Страница 13: ...board 1 Access the controller board at the back of the printer Note This task requires a at head screwdriver 2 Turn the screws counterclockwise to remove them 3 Slightly open the controller board acc...

Страница 14: ...e easily damaged by static electricity Touch a metal surface on the printer before touching any controller board electronic components or connectors 5 Unpack the memory card Warning Potential Damage D...

Страница 15: ...1 on the memory card with the ridge 2 on the connector 2 1 7 Push the memory card straight into the connector and then push it into the controller board wall until it clicks into place 1 2 Additional...

Страница 16: ...ff and unplug the power cord from the electrical outlet before continuing If you have any other devices attached to the printer then turn them off as well and unplug any cables going into the printer...

Страница 17: ...n turn the printer off and unplug the power cord from the electrical outlet before continuing If you have any other devices attached to the printer then turn them off as well and unplug any cables goi...

Страница 18: ...ttaching cables Connect the printer to the computer using a USB cable or to the network using an Ethernet cable Make sure to match the following The USB symbol on the cable with the USB symbol on the...

Страница 19: ...structions on the computer screen 3 For Macintosh users add the printer Note Obtain the printer IP address from the TCP IP section in the Network Ports menu Adding available options in the print drive...

Страница 20: ...choose to use the default printer nickname or assign a name that is easier for you to remember You will need an Ethernet cable to connect the printer to the network and an available port where the pr...

Страница 21: ...f the computer network adapter and then look for the network name If you cannot nd the SSID or the security information for your network then see the documentation that came with the access point or c...

Страница 22: ...ork adapter is installed in your printer and working properly For more information see the instruction sheet that came with the adapter Using the Wireless Setup Utility Windows only 1 Check if the pri...

Страница 23: ...with the wireless network adapter 1 Open a Web browser and then type the printer IP address in the address eld Notes View the printer IP address on the printer control panel The IP address appears as...

Страница 24: ...menu settings then the menu settings page lists all the factory default settings When you select and save other settings from the menus they replace the factory default settings as user default settin...

Страница 25: ...is loaded only in the multipurpose feeder and manual feeder The largest supported Universal size is 215 9 x 359 9 mm 8 5 x 14 17 inches and is loaded only in the multipurpose feeder and manual feeder...

Страница 26: ...de the width guide tab to the correct position for the paper you are loading 2 1 3 Squeeze and then slide the length guide tab to the correct position for the paper you are loading 1 2 Loading paper a...

Страница 27: ...If the paper is longer than letter size paper then push the length guide and the length guide tab to extend it 2 1 4 Flex the sheets back and forth to loosen them and then fan them Do not fold or crea...

Страница 28: ...avoid paper jams and print quality problems Loading the 650 sheet duo tray The 650 sheet duo tray Tray 2 consists of a 550 sheet tray and an integrated 100 sheet multipurpose feeder The tray is loade...

Страница 29: ...tability load each tray separately Keep all other trays closed until needed 1 2 3 1 Length guide tab 2 Paper size indicator 3 Width guide tab Loading the multipurpose feeder 1 Push the multipurpose fe...

Страница 30: ...o loosen them and then fan them Do not fold or crease the paper Straighten the edges on a level surface Hold transparencies by the edges and then fan them Straighten the edges on a level surface Note...

Страница 31: ...ty media is below the maximum paper ll indicator located on the paper guides 1 2 5 4 3 1 Width guide tab 2 Maximum paper ll indicator 3 Width guide 4 Feeder extender 5 Paper size indicator 6 Load the...

Страница 32: ...ze and type in the Paper menu to match the paper loaded in the tray Loading the manual feeder The standard 250 sheet tray has an integrated manual feeder that can be used to print on different types o...

Страница 33: ...t force the paper into the feeder Forcing the paper may cause jams Linking and unlinking trays Linking and unlinking trays Note This feature applies only in network printers 1 Open a Web browser and t...

Страница 34: ...lick Settings Paper Menu Custom Names 3 Select a custom name and then type a new custom paper type name 4 Click Submit 5 Click Custom Types and then verify if the new custom paper type name has replac...

Страница 35: ...s separated by periods such as 123 123 123 123 If you are using a proxy server then temporarily disable it to load the Web page correctly 2 Click Settings Paper Menu Custom Types 3 Select the custom n...

Страница 36: ...prevent sheets from sticking together Page orientation is important when printing on letterhead Source Printing Printable side Paper orientation Trays A B C One sided Faceup Load the sheet with the to...

Страница 37: ...feeder A B C Two sided Faceup Load the sheet with the bottom edge entering the printer rst Multipurpose feeder One sided Facedown Load the sheet with the top edge entering the printer rst Note Check w...

Страница 38: ...ngerprints on the transparencies to prevent print quality problems Before loading transparencies ex fan and straighten the stacks to prevent sheets from sticking together Tips on using envelopes From...

Страница 39: ...ive Before loading labels on the tray ex and fan labels to loosen them Straighten the edges on a level surface Tips on using card stock Card stock is heavy single ply specialty media Many of its varia...

Страница 40: ...amount of moisture in paper affects both print quality and the ability of the printer to feed the paper correctly Leave paper in its original wrapper until it is time to use it This limits the exposur...

Страница 41: ...oisture 4 5 Bending resistance and proper stiffness means optimum feeding through the printer Thickness impacts how much can be loaded into a tray Surface roughness measured in Sheffield units impacts...

Страница 42: ...rinter Preprinted papers that can be affected by the temperature in the printer fuser Preprinted papers that require a registration the precise location on the page greater than 2 3 mm 0 9 in such as...

Страница 43: ...B5 182 x 257 mm 7 2 x 10 1 in 1 1 1 X Letter 216 x 279 mm 8 5 x 11 in 1 1 1 Legal 216 x 356 mm 8 5 x 14 in 1 1 1 Executive 184 x 267 mm 7 3 x 10 5 in 1 1 1 X O cio Mexico 216 x 340 mm 8 5 x 13 4 in 1...

Страница 44: ...6 4 x 9 in X X 1 X B5 Envelope 176 x 250 mm 6 9 x 9 8 in X X 1 X Other Envelope 98 x 162 mm 3 9 x 6 3 in up to 176 x 250 mm 6 9 x 9 8 in X X 1 X 1 Source supports paper size without size sensing 2 Uni...

Страница 45: ...egrated multipurpose feeder supports different paper sizes types and weights Labels transparencies envelopes and card stock always print at reduced speed Paper type 250 sheet tray 650 sheet duo tray M...

Страница 46: ...he Embedded Web Server 1 Open a Web browser and then type the printer IP address in the address eld Notes View the printer IP address in the TCP IP section in the Network Ports menu The IP address app...

Страница 47: ...n the TCP IP section in the Network Ports menu The IP address appears as four sets of numbers separated by periods such as 123 123 123 123 If you are using a proxy server then temporarily disable it t...

Страница 48: ...3 Send the print job Printing from a mobile device using Google Cloud Print Google Cloud PrintTM is a mobile printing service that allows enabled applications on mobile devices to print to any Google...

Страница 49: ...feature For more information see the documentation that came with the application 2 Select a printer 3 Print the document Canceling a print job Canceling a print job from the printer control panel Fr...

Страница 50: ...t General Settings Print Settings Security Network Ports2 Set Date and Time Active NIC Standard Network1 Standard USB 1 Depending on the printer setup this menu item appears as Standard Network or Net...

Страница 51: ...ure MP to Cassette for MP Feeder to appear as a menu setting If two trays contain paper of the same size and type and the trays have the same settings then the trays are automatically linked When one...

Страница 52: ...tray supports transparency Multipurpose Feeder Size A4 A5 A6 JIS B5 Letter Legal Executive O cio Mexico Folio Statement Universal 7 3 4 Envelope 9 Envelope 10 Envelope DL Envelope C5 Envelope B5 Envel...

Страница 53: ...ecutive O cio Mexico Folio Statement Universal Specify the size of the paper being manually loaded Note Letter is the U S factory default setting A4 is the international factory default setting Manual...

Страница 54: ...etermine when the printer selects paper from the multipurpose feeder Notes Cassette is the factory default setting Cassette con gures the multipurpose feeder as the automatic paper source Manual sets...

Страница 55: ...y Texture Smooth Normal Rough Specify the relative texture of the glossy paper loaded Note Normal is the factory default setting Labels Texture Smooth Normal Rough Specify the relative texture of the...

Страница 56: ...e relative texture of the custom paper loaded Notes Normal is the factory default setting The options appear only if custom type is supported Paper Weight menu Use To Plain Weight Light Normal Heavy S...

Страница 57: ...actory default setting Preprinted Weight Light Normal Heavy Specify the relative weight of the preprinted paper loaded Note Normal is the factory default setting Colored Weight Light Normal Heavy Spec...

Страница 58: ...s the paper type Colored Loading Duplex Off Determine and set two sided printing for all print jobs that specify Colored as the paper type Light Loading Duplex Off Determine and set two sided printing...

Страница 59: ...versal Setup menu Use To Units of Measure Inches Millimeters Identify the units of measure Notes Inches is the U S factory default setting Millimeters is the international factory default setting Port...

Страница 60: ...This menu appears only in network printers or printers connected to print servers Network x Setup Page Print a report containing information on network printer settings such as the TCP IP address info...

Страница 61: ...ting PCL SmartSwitch On Off Set the printer to automatically switch to PCL emulation when a print job requires it regardless of the default printer language Notes On is the factory default setting Whe...

Страница 62: ...s Changing this setting from the control panel and then exiting the menus causes the printer to restart The menu selection is then updated Mac Binary PS On Off Auto Set the printer to process Macintos...

Страница 63: ...ters that are attached to print servers Use To Set Hostname Set the current TCP IP hostname IP Address View or change the current TCP IP address Note Manually setting the IP address sets the Enable DH...

Страница 64: ...ess Enable HTTPS Yes No View or change the current HTTPS setting Note Yes is the factory default setting IPv6 menu To access the menu navigate to either of the following Network Ports Standard Network...

Страница 65: ...Start Push Button Method or Start PIN Method Note Disable is the factory default setting Network Mode BSS Type Infrastructure Ad hoc Specify the network mode Notes Infrastructure is the factory defau...

Страница 66: ...s not examine incoming data and it uses the default printer language speci ed in the Setup menu PS SmartSwitch On Off Set the printer to automatically switch to PS emulation when a print job received...

Страница 67: ...updated Mac Binary PS On Off Auto Set the printer to process Macintosh binary PostScript print jobs Notes Auto is the factory default setting On processes raw binary PostScript print jobs Off lters pr...

Страница 68: ...General Settings menu Use To Display Language English Francais Deutsch Italiano Espanol Dansk Norsk Nederlands Svenska Portugues Suomi Russian Polski Greek Magyar Turkce Cesky Simpli ed Chinese Tradi...

Страница 69: ...Mode Off On Minimize the printer noise Note Off is the factory default setting Run Initial Setup Yes No Run the setup wizard Keyboard Keyboard Type English Francais Francais Canadien Deutsch Italiano...

Страница 70: ...rvice Name Zero Con guration Name Custom Text x Model Name Notes IP Address is the factory default setting for Left Side Date Time is the factory default setting for Right Side Displayed Information c...

Страница 71: ...o Settings Change the icons that appear on the home screen For each icon select from the following options Display Do Not display Date Format MM DD YYYY DD MM YYYY YYYY MM DD Format the date Note MM D...

Страница 72: ...Mode Disabled 1 240 Set the amount of time in minutes before the printer enters a lower power state Note 15 is the factory default setting Timeouts Sleep Mode Disabled 1 120 Set the amount of time in...

Страница 73: ...eceive an end of job message before canceling the rest of the print job Notes 90 is the factory default setting When the timer expires any partially printed page still in the printer is printed and th...

Страница 74: ...rints jammed pages Notes Auto is the factory default setting The printer reprints jammed pages unless the memory required to hold the pages is needed for other printer tasks On sets the printer to alw...

Страница 75: ...lt printer language Notes PS Emulation is the factory default setting PS Emulation uses a PS interpreter for processing print jobs PCL Emulation uses a PCL interpreter for processing print jobs This d...

Страница 76: ...dge is the factory default setting Copies 1 999 Specify the default number of copies for each print job Note 1 is the factory default setting Blank Pages Do Not Print Print Specify whether blank pages...

Страница 77: ...Notes Horizontal is the factory default setting Positioning depends on the number of page images and whether they are in portrait or in landscape orientation Paper Saver Orientation Auto Landscape Po...

Страница 78: ...f Enable a print mode preferable for les such as architectural drawings maps electrical circuit diagrams and ow charts Notes Off is the factory default setting To set this option using the Embedded We...

Страница 79: ...to use to get the printed output you want To access a complete list of color sample pages using the Embedded Web Server type the network printer IP address in the Web browser address eld Manual Color...

Страница 80: ...ion tables and allow the printer to make adjustments for color variations in output Notes Adjusting color starts when the menu is selected Adjusting color appears on the display until the process is n...

Страница 81: ...rint is the factory default setting PostScript menu Use To Print PS Error On Off Print a page containing the PostScript error Note Off is the factory default setting Lock PS Startup Mode On Off Allow...

Страница 82: ...font name Notes 10U PC 8 is the US factory default setting 12U PC 850 is the international factory default setting A symbol set is a set of alphabetic and numeric characters punctuation and special s...

Страница 83: ...ge Paper Size and Orientation settings Select the Paper Size and Orientation you want before setting Lines per Page PCL Emulation Settings A4 Width 198 mm 203 mm Set the printer to print on A4 size pa...

Страница 84: ...es the Select Paper Feed command This option appears only when it is selected by the PCL 5 interpreter 0 199 allows a custom setting to be assigned Tray Renumber View Factory Defaults MPF Default 8 T1...

Страница 85: ...ault font for HTML documents Note The Times font is used in HTML documents that do not specify a font Use To Font Size 1 255 pt Set the default font size for HTML documents Notes 12 pt is the factory...

Страница 86: ...g is automatically set to Best Fit Orientation Portrait Landscape Reverse Portrait Reverse Landscape Set the image orientation Note Portrait is the factory default setting Help menu Menu item Descript...

Страница 87: ...Provides information about connecting the printer locally USB or to a network Moving Guide Provides instructions for safely moving the printer Supplies Guide Provides information about ordering suppl...

Страница 88: ...gestions such as printing on both sides of the paper and printing multiple pages on one side of a single sheet of paper For information on how you can quickly save paper and energy using one printer s...

Страница 89: ...tings Quiet Mode select a setting you want Use To On Reduce printer noise Print jobs will process at a reduced speed Printer engine motors do not start until a document is ready to print There is a sh...

Страница 90: ...3 Press Using Hibernate mode Hibernate is an ultra low power saving mode Notes Three days is the default amount of time before the printer enters Hibernate mode Make sure to wake the printer from Hibe...

Страница 91: ...er Modes lets the user schedule when the printer goes into a reduced power state or into the Ready state 1 Open a Web browser and then type the printer IP address in the address eld Notes View the pri...

Страница 92: ...use emissions energy savings and natural resource savings Lexmark cartons are 100 recyclable where corrugated recycling facilities exist Facilities may not exist in your area The foam used in Lexmark...

Страница 93: ...organization The printer is being removed from your premises for service The printer is being sold to another organization Erasing volatile memory The volatile memory RAM installed in your printer req...

Страница 94: ...ssed by unauthorized persons For more information visit the Lexmark security Web page You can also see the Embedded Web Server Security Administrator s Guide for additional information 1 Go to www lex...

Страница 95: ...around the printer using a soft brush or vacuum 4 Wipe the outside of the printer with a damp soft lint free cloth Notes Do not use household cleaners or detergents as they may damage the nish of the...

Страница 96: ...ies To order parts and supplies in the U S contact Lexmark at 1 800 539 6275 for information about Lexmark authorized supplies dealers in your area In other countries or regions go to the Lexmark Web...

Страница 97: ...HY0 70C8HY0 70C8HY0 For more information on countries located in each region go to www lexmark com regions CS310 Regular cartridges Item Worldwide High yield regular toner cartridges Black 70C0H10 Cya...

Страница 98: ...ns Black imaging kit 700Z1 Color imaging kit 700Z5 Ordering a waste toner bottle Item All countries and regions Waste toner bottle C540X75G Storing supplies Choose a cool clean storage area for the pr...

Страница 99: ...bottle 3 Right side cover 4 Front door 1 Unpack the replacement waste toner bottle 2 Open the front door CAUTION HOT SURFACE The inside of the printer might be hot To reduce the risk of injury from a...

Страница 100: ...top door 2 1 4 Remove the right side cover 1 2 5 Remove the waste toner bottle 1 2 6 Pack the used waste toner bottle For more information see Recycling Lexmark products on page 92 Maintaining the pr...

Страница 101: ...the top door 10 Close the front door Replacing a black and color imaging kit 1 Open the front door CAUTION HOT SURFACE The inside of the printer might be hot To reduce the risk of injury from a hot c...

Страница 102: ...2 Open the top door 2 1 3 Remove the toner cartridges 1 2 Maintaining the printer 102...

Страница 103: ...4 Remove the right side cover 1 2 5 Remove the waste toner bottle 1 2 6 Lift the blue levers on the imaging kit and then pull the imaging kit until it stops 1 1 2 2 Maintaining the printer 103...

Страница 104: ...the imaging kit and the cyan magenta yellow and black developer units Black imaging kit includes the imaging kit and the black developer unit 9 Pack the used imaging kit For more information see Recy...

Страница 105: ...om the developer units 12 Insert the yellow cyan magenta and black developer units into the matching color slots 13 Remove the red packing strip from the imaging kit Warning Potential Damage Do not to...

Страница 106: ...14 Align and then insert the imaging kit 15 Push the blue levers down until the imaging kit is fully seated into place Maintaining the printer 106...

Страница 107: ...16 Insert the waste toner bottle 17 Insert the right side cover Maintaining the printer 107...

Страница 108: ...Warning Potential Damage Damage caused by use of a non Lexmark toner cartridge is not covered under warranty Note Reduced print quality may result from using non Lexmark toner cartridges 1 Slide the r...

Страница 109: ...2 Remove the toner cartridge by lifting the handle and then gently pulling it away from the imaging kit 1 2 3 Unpack the new toner cartridge and then remove its packaging Maintaining the printer 109...

Страница 110: ...disposing For more information see Recycling Lexmark products on page 92 Replacing a developer unit Replace the developer unit when a print quality defect occurs or when damage occurs to the printer...

Страница 111: ...2 Open the top door 2 1 3 Remove the toner cartridges 1 2 Maintaining the printer 111...

Страница 112: ...4 Remove the right side cover 1 2 5 Remove the waste toner bottle 1 2 6 Lift the blue levers on the imaging kit and then pull the imaging kit until it stops 1 1 2 2 Maintaining the printer 112...

Страница 113: ...t the imaging kit Warning Potential Damage Do not touch the underside of the imaging kit This could damage the imaging kit 1 2 8 Remove the used developer unit 9 Gently shake the replacement developer...

Страница 114: ...10 Remove the red shipping cover from the developer unit 11 Insert the developer unit 12 Align and then insert the imaging kit Maintaining the printer 114...

Страница 115: ...13 Push the blue levers down until the imaging kit is fully seated into place 14 Insert the waste toner bottle Maintaining the printer 115...

Страница 116: ...bag that the replacement developer unit came in before disposing For more information see Recycling Lexmark products on page 92 Moving the printer Moving the printer to another location CAUTION POTENT...

Страница 117: ...have a caster base but is con gured with optional trays then lift the printer off the trays Do not try to lift the printer and the trays at the same time Always use the handholds on the printer to lif...

Страница 118: ...mbers separated by periods such as 123 123 123 123 2 Click Settings Remote Operator Panel Settings 3 Select the Enable check box and then customize the settings 4 Click Submit To use the application c...

Страница 119: ...n the menus page and status page Warning The printer shows the warning message and generates an email about the status of the supply The printer does not stop when the supply condition is reached Cont...

Страница 120: ...nting a menu settings page on page 24 If you want a more comprehensive method of restoring the printer factory default settings then perform the Wipe All Settings option For more information see Erasi...

Страница 121: ...ect loading of paper Incorrect loading of paper Do not load or remove a tray while the printer is printing Do not load too much paper Make sure that the stack height is below the maximum paper ll indi...

Страница 122: ...mmed by hand Do not mix paper sizes weights or types in the same tray Make sure that the paper size and type are set correctly on the computer or printer control panel Store paper according to manufac...

Страница 123: ...ents are removed Paper jam in the front door Paper jam in the fuser 1 Open the front door CAUTION HOT SURFACE The inside of the printer might be hot To reduce the risk of injury from a hot component a...

Страница 124: ...Below the fuser In the fuser access door 3 Close the front door Clearing jams 124...

Страница 125: ...r jam in the duplex unit 1 Open the front door 2 Remove the jammed paper Note Make sure that all paper fragments are removed 3 Close the front door Paper jam in trays 1 Pull out the tray Clearing jams...

Страница 126: ...e Make sure that all paper fragments are removed 3 Insert the tray Paper jam in the manual feeder 1 Remove the tray 2 Remove the jammed paper Note Make sure that all paper fragments are removed 3 Inse...

Страница 127: ...purpose feeder 1 Remove paper from the multipurpose feeder 2 Remove the jammed paper Note Make sure that all paper fragments are removed 3 Flex fan and align the paper edges before loading 4 Reload pa...

Страница 128: ...hange paper source to custom string Try one or more of the following Load the correct size and type of paper in the tray and then press on the printer control panel Note Make sure the paper size and t...

Страница 129: ...the message and continue printing Color cartridge very low x estimated pages remain 88 xy You may need to replace the toner cartridge very soon For more information see the Replacing supplies section...

Страница 130: ...printer cannot nd a tray or feeder that has the correct size and type of paper then it prints from the default paper source Cancel the current job Load paper source with paper size Try one or more of...

Страница 131: ...ob Load Manual Feeder with paper size Try one or more of the following Load the feeder with the correct size of paper From the printer control panel press to clear the message and continue printing No...

Страница 132: ...emory full 38 Try one or more of the following From the printer control panel press to clear the message Decrease the resolution setting Install additional printer memory Memory low no Resource Save 3...

Страница 133: ...ciated components Warning Potential Damage Use of third party supplies or parts can affect warranty coverage Damage caused by the use of third party supplies or parts may not be covered by the warrant...

Страница 134: ...sage appears after reinstalling the supply then the cartridge may be defective Replace the cartridge Reinstall missing or unresponsive black and color imaging kit and all cartridges 31 xy Try one or m...

Страница 135: ...ging kit to clear the message For more information see the Replacing supplies section of the User s Guide Replace missing waste toner bottle 31 xyz Install the missing waste toner bottle to clear the...

Страница 136: ...e power cord to the electrical outlet 5 Turn the printer back on Type imaging kit low 84 xy Note The type can be a black imaging kit or a black and color imaging kit You may need to replace the imagin...

Страница 137: ...ther to a properly grounded electrical outlet Is the power cord plugged into the printer and a properly grounded electrical outlet Go to step 4 Plug one end of the power cord into the printer and the...

Страница 138: ...print server option or other network device Go to step 9 Connect the printer cable securely to the printer and the computer print server option or other network device Step 9 Make sure to install all...

Страница 139: ...olved Turn off the printer and then contact customer support Option problems Cannot detect memory card Action Yes No Make sure the memory card is installed a Install the memory card For more informati...

Страница 140: ...ck to see if the internal option is listed in the Installed Options list Is the internal option listed in the menu settings page Go to step 4 Reinstall the internal option Step 4 Check if the option i...

Страница 141: ...Step 3 Check if the tray is installed Print a menu settings page and then check if the tray is listed in the Installed Options list Is the tray listed in the menu settings page Go to step 4 Reinstall...

Страница 142: ...e paper size indicators on the paper guides are aligned with the paper size indicators on the tray Check if the paper guides are aligned against the edges of the paper Make sure the paper is below the...

Страница 143: ...nue printing Does the paper jam message remain Contact customer support The problem is solved Solving print problems Printing problems Incorrect characters print Action Yes No Step 1 Make sure the pri...

Страница 144: ...the paper type b Resend the print job Did the job print from the correct tray or on the correct paper The problem is solved Go to step 4 Step 4 a Check if the trays are not linked b Resend the print j...

Страница 145: ...rease The problem is solved Contact customer support Print jobs do not print Action Yes No Step 1 a From the document you are trying to print open the Print dialog and check if you have selected the c...

Страница 146: ...nter software on page 19 Note The printer software is available at http support lexmark com b Resend the print job Do the jobs print The problem is solved Contact customer support Print job takes long...

Страница 147: ...The problem is solved Contact customer support Tray linking does not work Notes The trays can detect paper length The multipurpose feeder does not automatically detect the paper size You must set the...

Страница 148: ...on Yes No Step 1 Adjust the print timeout settings a From the printer control panel navigate to Settings General Settings Timeouts Print Timeout b Select a higher setting and then depending on your pr...

Страница 149: ...lved Contact customer support Clipped pages or images Leading edge Trailing edge ABCDE ABCDE ABCDE Action Yes No Step 1 a Move the width and length guides in the tray to the correct positions for the...

Страница 150: ...ight may cause print quality problems Warning Potential Damage Do not touch the underside of the imaging kit This could damage the imaging kit b Resend the print job Is the page or image clipped Conta...

Страница 151: ...are program is using a correct ll pattern b Resend the print job Do horizontal voids appear on prints Go to step 2 The problem is solved Step 2 a Load the speci ed tray or feeder with a recommended ty...

Страница 152: ...rom the printer control panel set the paper size in the Paper menu to match the paper loaded in the tray Does the paper size match the paper loaded in the tray Go to step 3 Do one or more of the follo...

Страница 153: ...ch the paper loaded in the tray Step 3 a Depending on your operating system specify the paper type and weight from Printing Preferences or from the Print dialog b Resend the print job Is the paper sti...

Страница 154: ...pending on your operating system specify the paper type and weight from Printing Preferences or from the Print dialog b Resend the print job Do print irregularities still appear Go to step 4 The probl...

Страница 155: ...aper loaded in the tray b Resend the print job Is the tray set to the type texture and weight of the paper loaded Go to step 4 Change the paper loaded in the tray to match the paper type texture and w...

Страница 156: ...ol panel select Color Adjust b Resend the print job Is the print still too light Go to step 2 The problem is solved Step 2 a From the Quality menu on the printer control panel increase the toner darkn...

Страница 157: ...r From the printer control panel set the paper texture in the Paper menu to match the paper loaded in the tray Go to step 5 Step 6 a Load paper from a fresh package Note Paper absorbs moisture due to...

Страница 158: ...Replace the imaging kit and then resend the print job Is the printer still printing blank pages Contact customer support The problem is solved Printer is printing solid black pages Action Yes No Step...

Страница 159: ...ce the photoconductor unit c If the distance between the defects equals 43 9 mm 1 72 in or 45 5 mm 1 79 in then replace the developer unit Do the repeating defects still appear 1 Check if the distance...

Страница 160: ...ht to match the paper loaded in the tray Step 3 a Depending on your operating system specify the paper type and weight from Printing Preferences or from the Print dialog b Resend the print job Do shad...

Страница 161: ...p 2 From the printer control panel set the paper type and weight in the Paper menu to match the paper loaded in the tray Do the paper type and weight match the paper in the tray Go to step 3 Do one or...

Страница 162: ...ked vertical lines appear on prints ABCDE ABCDE ABCDE Leading edge Trailing edge Action Yes No Step 1 a Depending on your operating system specify the paper type texture and weight from Printing Prefe...

Страница 163: ...b Resend the print job Do streaked vertical lines appear on prints Go to step 5 The problem is solved Step 5 Replace the imaging kit and then resend the print job Do streaked vertical lines appear on...

Страница 164: ...texture and weight Do the paper type texture and weight match the paper loaded in the tray Go to step 2 Specify the paper type texture and weight from the tray settings to match the paper loaded in th...

Страница 165: ...cy b Resend the print job Is the print quality still poor Contact customer support The problem is solved Uneven print density Action Yes No Replace the imaging kit and then resend the print job Is the...

Страница 166: ...ace the imaging kit and then resend the print job Do vertical voids appear on prints Contact customer support The problem is solved Color quality problems FAQ about color printing What is RGB color Re...

Страница 167: ...in the software program RGB or CMYK combinations Notes Manual color correction is not useful if the software program does not specify colors with RGB or CMYK combinations It is also not effective in...

Страница 168: ...or correction may be necessary to utilize the selected color conversion table for the particular object Selecting which Color Samples set to use for a particular color matching problem depends on the...

Страница 169: ...is based on the print job information and no color conversion is implemented b Resend the print job Does the color of the print match the color of the le on the computer screen The problem is solved...

Страница 170: ...the IP address Note Depending on the network settings you may need to type https instead of http before the printer IP address to access the Embedded Web Server c Press Enter Does the Embedded Web Ser...

Страница 171: ...certain Web sites including the Embedded Web Server Does the Embedded Web Server open The problem is solved Contact your system support person Contacting customer support Before contacting customer su...

Страница 172: ...eference to a product program or service is not intended to state or imply that only that product program or service may be used Any functionally equivalent product program or service that does not in...

Страница 173: ...used in various application programs and that the printer emulates the functions corresponding to the commands PostScript is a registered trademark of Adobe Systems Incorporated in the United States...

Страница 174: ...icular installation If this equipment does cause harmful interference to radio or television reception which can be determined by turning the equipment off and on the user is encouraged to try to corr...

Страница 175: ...r electronic products in countries of the European Union We encourage the recycling of our products If you have further questions about recycling options visit the Lexmark Web site at www lexmark com...

Страница 176: ...y with Environmental Protection Agency EPA ENERGY STAR requirements as con gured when shipped by Lexmark Temperature information Ambient operating temperature 15 6 to 32 2 C 60 to 90 F Shipping temper...

Страница 177: ...aan de laser DANGER Rayonnements laser invisibles lors du retrait des cartouches et du d verrouillage des loquets Eviter toute exposition au rayon laser VAARA N kym t nt lasers teily on varottava kun...

Страница 178: ...eout for this product in minutes 20 By using the con guration menus the Sleep Mode Timeout can be modi ed between 1 minute and 180 minutes Setting the Sleep Mode Timeout to a low value reduces energy...

Страница 179: ...EC Council directives 2014 30 EU 2014 35 EU 2009 125 EC and 2011 65 EU on the approximation and harmonization of the laws of the Member States relating to electromagnetic compatibility safety of elect...

Страница 180: ...f original purchase and this statement to that user Limited warranty service The warranty period starts on the date of original purchase as shown on the purchase receipt and ends 12 months later provi...

Страница 181: ...or remanufacture by a third party of products supplies or parts Products supplies parts materials such as toners and inks software or interfaces not furnished by Lexmark TO THE EXTENT PERMITTED BY AP...

Страница 182: ...are intended bene ciaries of this limitation Additional rights Some states do not allow limitations on how long an implied warranty lasts or do not allow the exclusion or limitation of incidental or...

Страница 183: ...parts and supplies 95 cleaning exterior of the printer 95 interior of the printer 95 cleaning the printer 95 Close door 129 color quality troubleshooting color of print and color on computer screen d...

Страница 184: ...wer Modes 91 H hardware options adding print driver 19 Help menu 86 Hibernate mode using 90 Hibernate Timeout setting 90 HTML menu 85 I Image menu 86 imaging kit replacing 101 imaging kits ordering 98...

Страница 185: ...ng Guide where to nd 118 noise emission levels 175 Non Lexmark supply type see User s Guide 33 xy 133 non volatile memory 93 erasing 93 notices 174 175 176 177 178 179 number of remaining pages estima...

Страница 186: ...g blank pages 157 printer messages Color cartridge low 88 xy 129 Color cartridge nearly low 88 xy 129 Color cartridge very low x estimated pages remain 88 xy 129 Type imaging kit low 84 xy 136 Type im...

Страница 187: ...imated pages remain 84 xy 135 Replace maintenance kit 80 xy 135 Replace missing color cartridge 31 xy 135 Replace missing type imaging kit 31 xy 135 Replace missing or unresponsive black and color ima...

Страница 188: ...have jagged edges 148 clipped pages or images 149 gray background on prints 150 horizontal voids appear on prints 151 print irregularities 153 print is too dark 155 print is too light 156 printer is...

Отзывы: