


• Watching the LCD TV in 16:9 format for a long period of time may
leave traces of borders displayed on the top, bottom and centre of
the screen caused by the difference of light emission on the screen.
Damages caused by the above effect are not covered by the
Warranty.
• Displaying still images from Video games and PC for longer than a
certain period of time may produce partial after-images. To prevent
this effect, reduce the “brightness” and “contrast” when displaying
still images.
NOTE ON TV:
The TFT LCD panel uses sophisticated technology to produce.
However, there may be few bright or dark pixels on the screen.
These pixels will have no impact on the performance of the product.
NOTES ON CLEANING:
Use a soft, dry cloth for cleaning
For stubborn dirt, soak the cloth in a weak detergent solution, wring
well and wipe. Use a dry cloth to wipe it dry. If you use a chemical-
saturated cloth to clean the unit, follow that product’s instructions.
Warning: Cleaning and adjustment of lenses and /or other
components of playback mechanism should be performed by a
qualified service technician.
TV SECTION
TV - POWER SOURCE
1. Insert the small plug of AC cord to the AC/DC adapter.
2. Insert the DC plug on AC/DC adapter to the TV.
3. Insert the AC plug of the AC cord into a conveniently located AC
outlet having AC~ 100-240V, 50/60Hz.
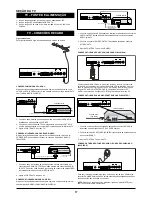
CONNECTION USING COAXIAL CABLE:
Follow the instructions below to connect an external unit, such as a
VCR or DVR (DVD Recorder) to your unit using a 75 ohm coaxial
cable. (CABLES NOT INCLUDED.)
1. Connect the cable, satellite or incoming antenna to the VHF/UHF
IN jack on the rear of the VCR/DVR.
2. Connect a 75 ohm coaxial cable from the external unit’s 75 ohm
OUT jack to the ANT jack on the bottom of the TV.
3. Set the SOURCE of the TV to TV mode.
CONNECTION USING AUDIO/VIDEO CABLES:
Follow the instructions below to connect an external unit, such as a
VCR/DVR/DVD player to your unit using Audio/Video cables.
(CABLES INCLUDED)
From external unit's AV OUTPUT jacks
AV connection cable
external unit
T
N
A
O
E
D
I
V
-
S
S
E
N
O
H
P
N
I
O
I
D
U
A
-
C
P
AV IN
VIDEO
L
R
SCART
1. Connect the left and right audio connection cable from the
external unit’s AUDIO OUTPUT jacks to the AUDIO IN jacks of
the TV. Connect the video cable from the external unit’s VIDEO
output jack to the VIDEO IN jack of the TV.
2. Set the SOURCE of the TV to AV mode.
To A U DIO IN jacks
external unit
Connection cable
S-VIDEO IN
From external unit's AUDIO OUTPUT jacks
T
N
A
O
E
D
I
V
-
S
S
E
N
O
H
P
N
I
O
I
D
U
A
-
C
P
A
G
V
AV IN
VIDEO
L
R
SCART
DC IN
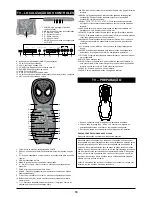
1. Connect the left and right audio cable from the external unit’s
AUDIO OUTPUT jacks to the TV’s AUDIO IN jacks.
2. Connect the external unit’s S-VIDEO OUTPUT jack to the TV’s
SVIDEO IN jack.
3. Set the SOURCE of the TV to S-VIDEO mode.
CONNECTION USING S-VIDEO CABLE:
Follow the instructions below to connect an external unit by S-VIDEO
connection cable. (CABLES NOT INCLUDED.)
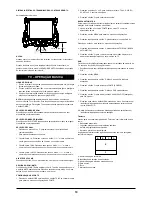
CONNECTION USING VGA CABLE (CABLES NOT
INCLUDED):
T
N
A
O
E
D
I
V
-
S
S
E
N
O
H
P
N
I
O
I
D
U
A
-
C
P
A
G
V
AV IN
VIDEO
L
R
SCART
DC IN
Using a VGA 15 pin D-SUB connection cable (not included) to
connect the VGA output jack on the PC to the TV’s VGA input jack.
Using a 3.5mm stereo mini jack connection cable (not included) to
connected the PC AUDIO OUTPUT/PHONE jack on the PC to the TV’s
PC AUDIO IN jack. Set the SOURCE of TV to PC mode.
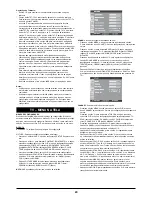
TV-CABLE CONNECTIONS
CONNECTING AN ANTENNA:
To connect an antenna, plug the antenna into the antenna input jack.
ANT.75
T
N
A
O
E
D
I
V
-
S
S
E
N
O
H
P
N
I
O
I
D
U
A
-
C
P
A
G
V
AV IN
VIDEO
L
R
SCART
DC IN
ANT.75
INCOMING CATV CABLE
external unit
From VCR/DVR RF OUTPUT JACK
T
N
A
O
E
D
I
V
-
S
S
E
N
O
H
P
AV IN
VIDEO
L
R
SCART


