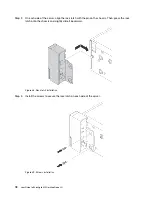
Step 2. On each side of the server, align the rack latch with the pin on the chassis. Then, press the rack
latch onto the chassis and slightly slide it backward.
Figure 48. Rack latch installation
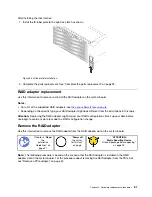
Step 3. Install the screws to secure the rack latch on each side of the server.
Figure 49. Screws installation
78
User Guide forThinkAgile MX Certified Node 2U
Содержание ThinkAgile MX Certified Node 2U
Страница 1: ...User Guide for ThinkAgile MX Certified Node 2U Machine Type 7Z20 ...
Страница 4: ...ii User Guide forThinkAgile MX Certified Node 2U ...
Страница 14: ...10 User Guide forThinkAgile MX Certified Node 2U ...
Страница 38: ...34 User Guide forThinkAgile MX Certified Node 2U ...
Страница 94: ...90 User Guide forThinkAgile MX Certified Node 2U ...
Страница 98: ...94 User Guide forThinkAgile MX Certified Node 2U ...
Страница 100: ...96 User Guide forThinkAgile MX Certified Node 2U ...
Страница 103: ......
Страница 104: ......

