


Defender Press Brake Guarding System Operation Manual
LS-CS-M-069
Page 45
Original Language Version: 1.04
Released:
01/04/2020
8.8
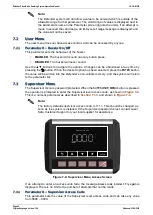
Setting the Laser Position
Refer to
Section 3
Lazer Safe Alignment Guide (LS-CS-M-017 Rev 2.0)
for a
detailed description on laser alignment.
•
Explain and demonstrate how to adjust the Transmitter and Receiver height.
•
Get the operator to adjust the brackets and check the alignment of the laser.
•
Demonstrate how the alignment cards are used to set the distance of the laser from the
punch ensuring that it is parallel.
•
Show how the receiver sensor status can be viewed by the indicator LEDs on the PGS-2
and the receiver, and in the Sensor window of the User Interface Panel.
•
Explain that if the transmitter and receiver are not correctly aligned, the mute point can
be inaccurately detected when bending and that errors conditions can be generated that
will prevent normal operation.
8.9
Back Gauge Interference
•
Ensure that the operator understands the effect of the back gauge on the rear
sensor section.
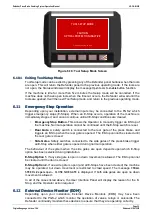
If an obstruction occurs, the system will react by stopping the machine.
•
Get the operator to activate/de-activate Back Gauge mode using the Defender panel.
8.10
Running the System
•
Have the operator perform each of the main functions.
•
Using each mode of the system have the operator bend some test pieces of material and
also making sure to utilise the Tray / Box mode for a demonstration of the operation during
box bending.
•
Ensure the operator is aware of each mode they are in, and the different
Status/Action/Sensor windows in the Defender panel display.
8.11
Tool Set-up Mode Option
•
Demonstrate how to select Tool Set-up Mode via the Defender User Interface Panel.
•
Explain that the laser protective field is deactivated and that the tool will close in safe
speed only.
Warning: NO OPTICAL PROTECTION IN TOOL SET-UP MODE
In Tool Set-up Mode, all optical guarding is deactivated. Although the Defender
Press Brake Guarding System ensures that the machine does not exceed safe
speed in this mode, particular caution must still be exercised.
8.12
Up-Acting Option (if installed)
•
Explain the difference in operation of an up-acting machine.
•
Demonstrate the use of the Open Tools Enable pushbutton, to close the Enable contacts.
8.13
Restricted Mode (if installed)
•
Note the Mute Mode symbol on the Sensor window indicating if the press is in Standard,
Restricted 1 or Restricted 2 mode.
•
Explain why Restricted mode is enabled (i.e. the machine does not support dual speed)
and how this is different from standard Sentinel operation.


