Larson Davis SoundAdvisor 831C Скачать руководство пользователя страница 78

SoundAdvisor Model 831C

Using the Data File Manager

8-11

1.  

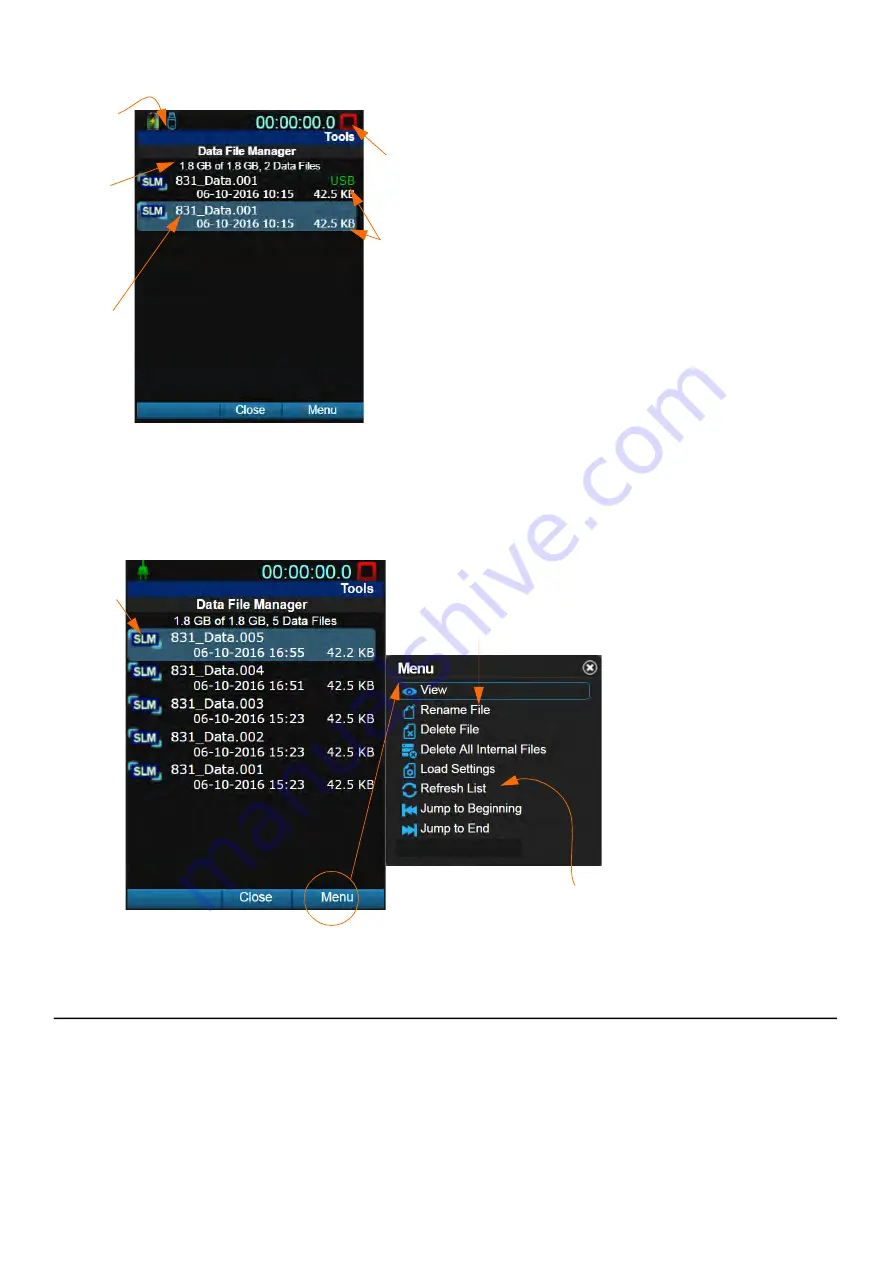
When a USB drive is inserted, the USB icon displays.

2.  

Shows the available internal storage by default. If you 

insert a USB drive and set your File Storage Meter Prefer

-

ence to 

Store

 (

Setup Manager 

System Properties 

Preferences

), this information refers to the available 

USB storage.

3.  

The name includes the 

Default Data File 

prefix you 

defined on the General tab in the measurement setup.

4.  

The current measurement can be running, paused, or 

stopped while viewing data files.

5.  

This data file is stored in 2 locations. The top file is 

saved on the USB drive. The bottom file is saved on the 

meter’s internal memory.

Step 2   

Use the File  Manager  as  shown  in 

Figure  8-3

,  and press 

Close

  (

/*/

)when

finished.

FIGURE 8-3  

Using the Data File Manager Menu

1.  

Highlight a data file, press 

Menu

 (

//*

), and choose an 

option from the pop-up menu.

2.  

Regarding data files stored 

in the 831C internal memory: 

you can 

Rename

Delete

, and 

Delete All Internal Files

.

3.  

You can also use the follow

-

ing menu items to navigate the 

data file list: 

Refresh List

Jump to Beginning

Jump to 

End

.

8.2.1 Viewing a Measurement Data File

Step 1  

Navigate to 

Tools 

3


Data File Manager

.

Step 2  

Highlight a data file, press 

Menu

 (

//*

), then choose 

View

. This opens a read-

only  display  of  the  Overall  and  Session  Log  tabs  for  the  measurement.  The

2.

3.

1.

5.

4.

1.


2.


3.


Содержание SoundAdvisor 831C

Страница 1: ...Larson Davis SoundAdvisor Model 831C Sound Level Meter Reference Manual...

Страница 2: ...otronics Inc will periodically update the material for inclusion in new editions Changes and improvements to the information described in this manual may be made at any time Safety If the equipment is...

Страница 3: ...Creating a Measurement Setup 6 1 Module 7 Making a Measurement 7 1 Module 8 Managing Measurement Data Files 8 1 Module 9 System Properties 9 1 Module 10 System Information 10 1 Module 11 Managing 831C...

Страница 4: ...SoundAdvisor Model 831C ii 2 Module 18 Using 831C Sound Recording 18 1 Appendix A Technical Specifications A 1 Appendix B Measuring Sound Using IEC 61672 1 B 1 Appendix C Glossary C 1...

Страница 5: ...operations TRY THIS Explore the interface press buttons change settings and test the operations Measure all area sound using stop pause and resume measurement Display broadband and spectral sound val...

Страница 6: ...320 full color graphic LCD display with touchscreen user interface Quiet Touch elastomeric keypad Meter uses NiMH photo lithium lithium Ion and alkaline cells 4 AA batteries provide upwards of 8 hours...

Страница 7: ...adeable firmware 1 5 Standard 831C Package Contents The 831C is available as part of a specialized system or in a standard configuration The following accessories come with the standard configuration...

Страница 8: ...standards Note You can use other microphones with the 831C For more information see 1 6 2 Hardware Options for more information Microphone Preamplifiers PRM831 PRM2103 Accessory Kit 831 ACC includes t...

Страница 9: ...essories In this section 1 6 1 Firmware Options 1 6 2 Hardware Options 1 6 1 Firmware Options LEARN MORE To purchase these options see Contact Larson Davis on page ii 2 The following upgrades options...

Страница 10: ...nd cables For a complete listing of standard and system accessories see http www larsondavis com products soundlevelmeters soundadvisor soundadvisorordering Table 1 2 Accessory Type Available Options...

Страница 11: ...eather sensor wind speed and direction with no moving parts temperature humidity pressure and rainfall requires CBL170 and DVX008A SEN032 Ultrasonic Anemometer wind speed and direction only sensor req...

Страница 12: ...Options and Accessories 1 8 Table 1 3 Cables Extension and Interface Cables Microphone Extension Cable EXCXXX shielded where XXX is the length in feet XXX 010 020 050 100 and 200 available CBL138 USB...

Страница 13: ...s 2 7 2 2 4 Powering On or Off 2 8 2 2 5 Using the Power Control Page 2 8 2 3 Instrument Hardware Overview 2 9 2 3 1 Using the Keypad 2 10 2 3 2 Navigating and Selecting 2 11 2 3 3 Basic Run Functions...

Страница 14: ...ophone body should seat smoothly against the preamplifier body To disconnect the microphone Lightly grip the 2 engraved lines on the microphone body and gently turn 2 1 2 Connecting the Preamplifier t...

Страница 15: ...831C SLM In this section 2 2 1 Using Battery Power 2 2 2 Using External Power 2 2 3 Understanding 831C Power Events and Indicators 2 2 1 Using Battery Power Current Battery Voltage is displayed on th...

Страница 16: ...recognized brands of these battery types AA nickel metal hydride NiMH AA Alkaline AA 1 5 Volt Lithium CAUTION Optimal battery temperature is 0 C 45 C Understanding the Low Battery Indicator As the ba...

Страница 17: ...own here Charging Batteries in the 831C Before you begin Install batteries as shown in Installing Batteries on page 2 5 You can charge batteries NiMH only in the meter in about 7 hours when the meter...

Страница 18: ...times per second Charger fault Green light fastest blink three times per second Meter is powering up or shutting down Resolving a Charging Stopped Session Log Entry To resolve a Charging Stopped Sess...

Страница 19: ...powers off When the 831C shuts down due to a low battery it automatically attempts to power up after a short reprieve If there s adequate power it remains on However if the battery is still discharge...

Страница 20: ...There are 3 ways to power off the 831C 1 Press the ON OFF button 0 once to access the Power Control page then press the top left softkey to select Off 2 From any screen press and hold the ON OFF butt...

Страница 21: ...n to disconnect the preamp from the meter 240 x 320 full color graphic LCD display with touchscreen user interface shown with Dark color theme Display navigation softkeys Multicolor back lit keypad To...

Страница 22: ...or intended for use with USB mass storage cellular modem GPS headphones speak ers and future devices 2 Hardware Power Switch when set to 0 com pletely powers down the 831C for storage Set to for instr...

Страница 23: ...re are times when a content specific menu appears Press the associated top soft key to access that menu Exit a menu Press the top middle soft key to close or save To exit without saving press it and t...

Страница 24: ...4 1 Changing Display Color Themes The 831C has a full color back lit LCD touchscreen and allows you to select your preferred color theme The Dark theme is featured in this manual For more information...

Страница 25: ...screen displays the meter measurement connection alert status and battery status as shown in Figure 2 6 FIGURE 2 6 Status Bar 1 Power Indicator 2 WiFi Status 3 SLM Indicator 4 Run Status 5 File Name 6...

Страница 26: ...ved during a measurement the same icon appears the measurement ends and data with that measurement is not visible on the meter When the USB drive is reinserted the USB caution icon appears The meter n...

Страница 27: ...the instrument and the preamplifier influence the measurement an Under Range condition exists When all filters of the OBA are under range the OBA Under Range Icon flashes Measurement Status Icons FIGU...

Страница 28: ...5 features Setup Manager The Setup Manager is a menu on the 831C divided into tabs just like the 831C main display that enables you to customize measurement settings in a setup file or Setup To acces...

Страница 29: ...2 4 5 Tools Menu Overview Press the Tools 3 button to access the following menus and settings on the 831C File Manager Access all data files on the meter or the inserted USB drive For more information...

Страница 30: ...nication Quick access to communication properties See Module 13 831C Network and Connections 2 4 6 Power Control Menu Overview To access the following actions on the Power Control menu press power 0 o...

Страница 31: ...ORE Depending on your measurement type and installed firmware options Modules 15 18 may be helpful while creating the measurement setup file Step 3 Calibrate your 831C as shown in Module 5 Calibrating...

Страница 32: ...ur mobile device b Search for LD Atlas and follow the prompts to install it Step 2 Launch LD Atlas on your mobile device Step 3 Establish a WiFi connection from the meter to your mobile device For mor...

Страница 33: ...the screen To find your meter s IP address when using Ethernet go to Tools3 Communication Step 5 For step by step instructions to create a measurement follow the process outlined in 3 1 Operating the...

Страница 34: ...there s no USB drive available the USB not available icon displays in the top status bar and data files save to the 831C internal memory USB Backup With this option data files save to both the 831C i...

Страница 35: ...8 4 6 4 2 Understanding the Overall Tab 4 7 4 2 1 About the Overall SLM Page Overall Page 4 7 4 2 2 About the Overall Big Digit Page Overall Page 4 7 4 2 3 About the Overall Leq Page Overall Page 4 8...

Страница 36: ...er from those shown in this section 4 1 1 About the SLM Page Live Tab Page 1 The Live tab page 1 presents a recent history of metrics You can customize the displayed metrics as shown in FIGURE 4 1 Det...

Страница 37: ...Exceedance Trigger level you selected in the measurement setup 4 1 3 About the Octave Band Analyzer Page Live Page 3 TAKE NOTE This feature requires the 831C OB3 firmware option Four pages on the Liv...

Страница 38: ...or between the following options Ref Set Reference and back to the Octave 3 View References 1 2 3 4 A A C and C 4 Save the current selected values to use as a reference by selecting Set Reference high...

Страница 39: ...fier is installed this page provides information like temperature and humidity as well as desiccant maintenance information 4 1 7 About the Power Page Live Page 7 The Power page shows the meter status...

Страница 40: ...on rechargeable cells or batteries are failing 4 1 8 About the Memory Page Live Page 8 The Memory page displays a helpful data storage calculator that can help you estimate the amount of storage a mea...

Страница 41: ...during a pause 2 This Leq value uses the frequency weighting and detector from the measurement setup file It is the equivalent sound based on the run time of the measurement 3 The data graph presents...

Страница 42: ...un time of the measurement A date and time of occurrence is recorded with this event 4 2 4 About the Octave Band Analyzer Page Overall Page TAKE NOTE This feature requires the 831C OB3 firmware option...

Страница 43: ...ghlighted frequency band for the duration of the measurement Lmax Lmax is the maximum sound level of the highlighted frequency band The maximum spectrum is determined by the Max Spec setting Bin Max W...

Страница 44: ...atistical measurement of the level that exceeds the selected value n percent of the time The statistics are based on the level defined by the current weighting and detector The Ln Percentiles page dis...

Страница 45: ...ed during a run the counter for that level advances from 14 to 15 and the value displays in orange or red 1 of exceedances 2 Time of last exceedance 4 2 8 About the Overloads Page Overall Page FIGURE...

Страница 46: ...5 June 2002 relating to the assessment and management of environmental noise It is important to verify prior to the measurement that the values have been properly defined for your purposes 4 2 10 Abou...

Страница 47: ...You can use the ENTER 5 button to move the cursor and enable more information for example if you want to see when a peak was measured as shown in Figure 4 21 4 2 14 Viewing the Power Page Overall Page...

Страница 48: ...ive duration and wind direction To view additional weather related data download and open the data file in G4 Locate the Event History data and look for the following columns Wind Speed Lmax mi h Wind...

Страница 49: ...lso recorded Session Log meter actions include the following 4 5 Adjusting the Graph Scale The default amplitude dB setting for the graphic display of sound pressure level versus time and frequency sp...

Страница 50: ...o save your changes 4 6 Enabling or Disabling Display Tabs Step 1 On the 831C go to Tools System Properties Step 2 Use the top right softkey to navigate to Displays Step 3 From the Start drop down men...

Страница 51: ...the sound level at the diaphragm of the microphone and the voltage measured by the meter so that the sound pressure level can be read directly from the display of the meter in dB The result of a cali...

Страница 52: ...3 Understanding Calibration Stability The 831C maintains a stable value of sensitivity over long periods of time Significant changes in sensitivity or a pattern of small but regular sensitivity chang...

Страница 53: ...your 831C go to Tools3 Calibrate When you perform a calibration using any preamplifier prelisted for the 831C the SoundAdvisor updates the saved calibration information for that preamplifier If you i...

Страница 54: ...bration is logged as an event in the Calibra tion History 2 Delta dB isthe difference between the level measured during the current calibration and the level from the previous calibration 3 Sensitivit...

Страница 55: ...brate Step 2 Choose your calibrator from the Select Calibrator drop down menu LEARN MORE Refer to the calibrator s user guide for more information TAKE NOTE For more information on the Other option se...

Страница 56: ...can still calibrate the meter when the measurement is stopped Before you begin Lock the meter interface as shown in 11 1 2 Unlocking the Meter from the Meter Interface on page 11 3 Step 1 Press the Ca...

Страница 57: ...he Setup File List is the first page of the Setup Man ager To edit a Setup highlight it then press 5 The Settings line displays the name of the Setup you are currently editing 2 To navigate to other p...

Страница 58: ...the Meter Step 1 On the 831C go to Tools 3 Setup Manager Step 2 In the Setup Manager File list highlight the Default setup in the list and press 5 This opens the Setup Manager pop up menu Step 3 Sele...

Страница 59: ...the SLM tab as shown in Figure 6 4 FIGURE 6 4 Setup Manager SLM Tab 1 Select a Frequency Weighting Detector and Peak Weighting Your choice for the Detector setting com municates to the meter hardware...

Страница 60: ...he OBA tab as shown in Figure 6 5 FIGURE 6 5 Setup Manager OBA Tab 1 Normal or High For measurement range specifi cations see Table A 8 Octave Band Analysis 1 1 Octave Linearity Range on page A 13 2 S...

Страница 61: ...ntrol tab as shown in Figure 6 7 FIGURE 6 7 Setup Manager Control Tab 1 The Sound Advisor 831C has 6 Run Modes to control the meter during a measurement For more information on each run mode see 6 2 4...

Страница 62: ...n choosing these settings see Module 18 Using 831C Sound Recording Step 12 Use the right softkey to navigate to the Day Night Setting tab as shown in Figure 6 9 FIGURE 6 9 Setup Manager Day Night Sett...

Страница 63: ...resis before sound exceedance pause is turned off 6 2 3 Saving the Setup File Before you begin Complete 6 2 1 Creating a New Setup File On the Meter Complete 6 2 2 Customizing Setup Values On the Setu...

Страница 64: ...esired enable any additional settings on the Control tab and return to Step 8 on page 6 5 Using Timed Stop Mode The measurement is initiated manually and stops automatically after the period you indic...

Страница 65: ...e stored in the Time hh mm ss field TAKE NOTE At the end of the Auto Store period the 831C saves measurement record to a new incrementally named data file throughout the day based on the Time hh mm ss...

Страница 66: ...ery day until the End date Step 1 Select Daily Timer Mode from the Run Mode drop down menu a Enter a Start y m d date and Time and an End y m d date and Time where Time is the time of day b If desired...

Страница 67: ...the Active setup can clear the meter when it s doing something unexpected and you don t know why Step 1 On the meter select Menu Setup Manager Step 2 Select Default by highlighting it then pressing 5...

Страница 68: ...o Overall display Step 3 Press Run 9 Step 4 When finished press Stop 7 Step 5 Press Store 7 and save your data file In this module In this module In this module In this module In this module In this m...

Страница 69: ...und recording is to mount the 831C on a tripod If held in hand position your body away from and on an angle to the meter to minimize interference of the sound field at the microphone resulting from bo...

Страница 70: ...mmended that you place a windscreen over the microphone and preamplifier Larson Davis provides the WS001 windscreen which is a 3 inch diameter ball made of open cell foam FIGURE 7 2 WS001 Windscreen 7...

Страница 71: ...Area Sound Field Check as shown in 7 1 2 Performing an Area Sound Field Check Step 2 Navigate to Overall on the 831C and press RUN 9 Keypad LED Indicators When performing a measurement the state of th...

Страница 72: ...xists Under Range When the sound pressure level is lower than the meter s noise floor the noise level of the instrument and the preamplifier the Under Range icon flashes while the condition exists 7 2...

Страница 73: ...the following have been enabled in the Active setup TAKE NOTE Pressing any other key besides the back erase option will end the back erase state Measurement History Event History Spectral Ln Event Sou...

Страница 74: ...be reset when a radical noise event takes place that is unnecessarily recorded in your data For example an aircraft passes overhead when attempting to measure the background noise in a normally quiet...

Страница 75: ...e with the same name as a currently saved data file If you want the new data file to replace the old data file rename or delete the old file first See Module 8 Managing Measurement Data Files Step 2 P...

Страница 76: ...ow you want the meter to react when a measurement stops and it s time to store a measurement record Step 1 On your 831C navigate to Tools System Properties Preferences Step 2 Choose an option from the...

Страница 77: ...nd the first user s session before they can begin their own TRY THIS G4 LD Utility provides a simplified way to access and examine resulting data files For more information see the G4 LD Utility Manua...

Страница 78: ...top file is saved on the USB drive The bottom file is saved on the meter s internal memory Step 2 Use the File Manager as shown in Figure 8 3 and press Close when finished FIGURE 8 3 Using the Data F...

Страница 79: ...nu No confirmation appears Step 3 Close the Data Manager go to Tools Setup Manager and select Active from the file list Press the right or left softkeys to examine the Setup properties 8 2 3 Using Cre...

Страница 80: ...s to a USB Drive 8 3 1 About Data File Naming Conventions In addition to manually naming a data file there are 2 conventions the 831C uses to automatically generate unique file names These are a produ...

Страница 81: ...le will be copied onto the USB drive The original file will remain saved on the 831C Move File to USB The original data file moves from the internal memory to the USB drive Copy All Internal to USB Co...

Страница 82: ...is removed during a measurement the USB not available icon appears the measurement ends and data with that measurement is not visible on the meter When the USB drive is reinserted the USB caution icon...

Страница 83: ...n the Displays Tab 9 9 9 8 Enabling or Disabling Options 9 10 9 9 Setting Network Preferences 9 10 9 10 Configuring an Email Server On the Meter 9 10 9 11 Enabling or Disabling Cloud Storage 9 12 9 12...

Страница 84: ...he measurement before setting time otherwise the time waits to update until the next Stop 4 Close and select Yes to save your changes TAKE NOTE You can also sync the 831C with the time on your PC by u...

Страница 85: ...emoved When your time is successfully synced with NTP servers the NTP icon appears in line with the current time on the Live and Overall tabs 9 4 Editing Power Settings In this section 9 4 1 Changing...

Страница 86: ...rger is enabled This can result in fire or injury with alkaline or lithium batteries Step 1 On your 831C go to Tools 3 System Properties Step 2 Press the top right softkey until the Power tab displays...

Страница 87: ...urement after a short 10 second power up 9 4 4 Setting the Backlights On Period On your 831C go to Tools System Properties then press the top right softkey until the Power tab displays Backlights On i...

Страница 88: ...lts if your battery usage is other than a standard 12V SLA battery For more information see Table A 3 on page A 6 9 5 Setting Meter Preferences In this section 9 5 1 Selecting a Microphone Correction...

Страница 89: ...red L level while running FIGURE 9 5 831C AC DC Output Step 1 On your 831C go to Tools 3 System Properties then press the top right softkey until the Preferences tab displays Table 9 1 Microphone Corr...

Страница 90: ...tion Use this feature to indicate where your data files are stored Step 1 On your 831C go to Tools 3 System Properties then press the top right softkey until the Preferences tab displays Step 2 Select...

Страница 91: ...h Swedish Czech Turkish Chinese and Thai Selecting a Decimal Symbol Depending on your preference select a period or a comma for the decimal place and save your change Selecting a Date Format Select on...

Страница 92: ...lt options don t appear in the list since they cannot be disabled Step 1 On your SoundAdvisor 831C go to Tools3 System Properties Step 2 Press the top right softkey until you see the Options page Step...

Страница 93: ...or your mail server and a Username and Password for your mail account as shown in Figure 9 8 FIGURE 9 8 Email Account Properties Step 4 Select the Security level for the account Check your email provi...

Страница 94: ...meter to a USB drive or upload directly to a remote storage service such as Dropbox1 or an SFTP account You can also receive an alert notification via email or text when a file is saved to Cloud stora...

Страница 95: ...Utilizing the Logic Out Feature 9 12 1 Utilizing the Logic In Feature The Logic Input line receives a signal from an external device which is usually connected using the included I O Interface cable...

Страница 96: ...Out signal is triggered by the following items Run Stop When the Logic Out is set to Run Stop the output is driven high when the 831C is running and is driven low when it is stopped Event When Logic...

Страница 97: ...e recommend using this setting FIGURE 9 10 Recommended Heater Settings Timer Turns the heater on and off automatically according to the Start Time 24 hr time and End Time 24 hr time you set here Off T...

Страница 98: ...an be defined for 1 3 Octave As you use the navigation buttons to move through the list the page scrolls down Step 3 When finished editing press Close to save your changes TRY THIS If desired you can...

Страница 99: ...ther organization and can t use this feature You ve turned on Advanced Protection for your account Step 4 At the bottom choose Select app and choose the app you re using Step 5 Choose Select device ch...

Страница 100: ...or Model 831C 10 1 Module 10 System Information System information is contained on the About Menu On the 831C go to Tools 3 About to view the following details on 3 tabs FIGURE 10 1 About Standards Op...

Страница 101: ...e Meter from the Meter Interface 11 3 11 1 3 Unlocking the 831C in G4 LD Utility 11 3 11 2 Using Network Security 11 3 11 1 Using the Meter Lock If you are concerned about preventing tampering or unau...

Страница 102: ...ocked see 5 4 1 Calibrating While Using Meter Security Lock Mode Step 5 Press Close then choose Yes to save your changes Table 11 1 Allowed Operations Per Lock Mode Lock Mode Available Operations Mete...

Страница 103: ...ck for 831C in G4 11 2 Using Network Security Features in this section are available only when using the 831C SLM firmware version 4 5 with G4 LD Utility software version 4 5 The SoundAdvisor 831C net...

Страница 104: ...by Using G4 LD Utility on page 14 1 Step 4 Set up an Administrator account as described in Section 2 2 of the G4 LD Utility Manual Be sure to choose a security option Step 5 Reboot the meter to update...

Страница 105: ...and Restore also clears the AudCal database TAKE NOTE If a measurement is running stopped or paused a Reset is required 12 1 Troubleshooting a Bad Flash Block Error The Flash memory device used by the...

Страница 106: ...2 13 2 1 Setting a Static IP Address 13 2 13 2 2 Connecting the 831C to an Email Server 13 3 13 3 Using WiFi On Your 831C 13 4 13 3 1 Connecting to a WiFi Network 13 4 13 3 2 Using 831C as a WiFi Acce...

Страница 107: ...tly with other devices when you set a static IP address instead of using a dynamically assigned IP address Step 1 On your meter go to Tools 3 System Properties to Network tab as shown in Figure 13 1 S...

Страница 108: ...ake effect LEARN MORE You can also complete this process in G4 For more information launch G4 and go to Help Manuals G4 LD Utility Manual 13 2 2 Connecting the 831C to an Email Server If you entered a...

Страница 109: ...st select Menu and select Refresh List as shown in Figure 13 3 TRY THIS To connect to a hidden network click Menu Add Network and provide the network name Step 3 If required enter the network password...

Страница 110: ...e LD Atlas app is available for iOS and Android devices For more information see 3 2 2 Operating the 831C from the LD Atlas App 13 4 Disconnecting a Cloud Storage Dropbox Account When you want to disc...

Страница 111: ...taller on the LD USB Drive included with your meter or from www LarsonDavis com G4 Step 2 Double click to download the G4 installer Step 3 Once the file is downloaded unzip or extract the folder to yo...

Страница 112: ...ware button followed by progress screens until the firmware is upgraded Step 6 To confirm the installation do the following On 831C navigate to Tools 3 About Options to view your currently installed o...

Страница 113: ...select the file you want to install and click Open Step 5 Confirm your choice by clicking Upload Options A progress bar under the Upload Options button shows the status of your update and a series of...

Страница 114: ...e or disable on the meter TAKE NOTE If you have unsaved data or are currently running a measurement the meter notifies you that a reset is needed to save the Options settings Select OK and press the R...

Страница 115: ...urement stops all intervals are saved together in one file While measurement parameters can be indicated directly in the Active setup it s a good practice to save a setup file for each specific measur...

Страница 116: ...he Setup Manager Tabs d Press Close and save your Setup e Set it as the Active setup file f Go to System Properties Preferences and verify the Auto Store setting With Measurement History enabled in Ma...

Страница 117: ...t when the interval ends d Select any additional settings on the Setup Manager tabs For more information see 6 2 2 Customizing Setup Values On the Setup Manager Tabs e Press Close and save your Setup...

Страница 118: ...ter any other Interval Time hh mm value of 01 00 or more the measurement syncs to the hour e If you want to send a measurement interval exceedance alert select a checkbox in line with Alerts f Select...

Страница 119: ...s On the Setup Manager Tabs e Press Close and save your Setup f Set it as the Active setup file Selecting Daily Timer Mode With Measurement History a Enter a Start y m d date and Time and an End y m d...

Страница 120: ...rement interval is underway metrics and data display on the Current tab When the measurement interval is complete that data displays on the Measurement tab The Current tab resets and begins displaying...

Страница 121: ...a frequency spectrum is displayed at the top use the RIGHT and LEFT navigation buttons 4 and 6 to highlight a frequency band and display the associated levels To change the displayed measurement recor...

Страница 122: ...urement With Time History Time History describes the measured sound as a table of metrics recorded at regular intervals Before you begin Verify that firmware option 831C LOG is installed and enabled o...

Страница 123: ...e Time History and select the desired time Period from the drop down menu Step 4 Enable the desired Time History Options Not all options are available for every time period Table 16 1 shows data that...

Страница 124: ...l l l l L FSPL l l l l L ISPL l l l l LCeq LAeq l l l LIeq Leq l l l l OBA Bandwidth Leq 1 1 l l l l l 1 3 l l l l l Lmax 1 1 l l l 1 3 l l l Lmin 1 1 l l l 1 3 l l l SPL 1 1 l l l l 1 3 l l l l LAFTM...

Страница 125: ...ws you to place sound type markers in the time history data as the sounds occur or during your post measurement analysis To make a measurement with sound markers follow these steps Before you begin Co...

Страница 126: ...Select the checkbox in line with a sound type to mark the beginning of the sound Deselect it to mark the end 16 3 Viewing Time History Data Time History data displays on the Time History tab as shown...

Страница 127: ...o see which values you can edit on each page FIGURE 16 4 Time History 1 1 Octave Page 1 Use the ENTER 5 button to switch from the fre quency graph to the record number 2 The highlighted band is the L...

Страница 128: ...Up the Event History Measurement 17 1 17 2 Storing Event Data 17 4 17 2 1 Using Continuous Daily Auto Store With Event History 17 4 17 3 Viewing Event History Data on the Events Tab 17 4 17 3 1 Viewin...

Страница 129: ...Duration This is the length of time in seconds that levels must exceed the trigger levels to be labeled an event This value can be 60 seconds or less TAKE NOTE If you are using this feature with Sound...

Страница 130: ...les value indicates the maximum number of samples you want to record for each event Choose any value 10 9999 Once the maximum is reached no samples are logged even if the event continues or post trigg...

Страница 131: ...on For example when a sound event persists across an Auto Store boundary the 831C will store and begin a new data file which will contain the remainder of the event data However when a sound event per...

Страница 132: ...ing for an event 2 Trigger When this symbol displays the sound level exceeds the Trigger Level 3 Valid When this symbol displays the sound level exceeds the Trigger Level for the Minimum Duration 4 Co...

Страница 133: ...yed below the chart reflect the selected frequency FIGURE 17 6 Changing Record Number To jump to a different record number press the Menu softkey and select Locate from the pop up menu 17 4 Setting Ad...

Страница 134: ...tep 3 Enter a Running Leq period in seconds Enter whole numbers only such as 1 3600 1 hour FIGURE 17 7 Setup Manager SLM Tab In this example the period is set to be the Leq of the last 1200 seconds of...

Страница 135: ...ceeds the Reference Spectra selected for the Full Octave Spectrum from the Third Octave drop down menu ALL as described above but for the Third Octave Spectra ANY as described above but for the Third...

Страница 136: ...ry with Level Triggering and Events 1 The bars represent events logged during the measurement At a mini mum of 3 seconds there are about 5 17 5 2 Understanding Dynamic Triggering With dynamic triggeri...

Страница 137: ...namic triggering events only occur if the level exceeds the back ground level plus the offset Here the offset is 20 dB 2 The bars represent events logged during the measurement There are about 11 with...

Страница 138: ...r Level SPL 1 Offset Initial Background Level As the sound level increases above the background tracking level the tracking level will increase at the rise rate As the sound decreases below the tracki...

Страница 139: ...Enabling Measurement History Sound Recording 18 5 18 5 Understanding Recording Settings and Sound Quality 18 6 18 5 1 Understanding Resolution Peak Overload and Range 18 6 18 5 2 Choosing a File Forma...

Страница 140: ...p 5 Run a measurement and manually mark the sound types as shown in 18 2 Making a Manual Sound Recording Using Mark Sound Type 18 2 Making a Manual Sound Recording Using Mark Sound Type During a measu...

Страница 141: ...Automated Event Sound Recording Before you begin Create a setup file with Event History enabled as shown in 17 1 Setting Up the Event History Measurement on page 17 1 Step 1 On your meter go to Tools...

Страница 142: ...recording after the measurement you will find that the sound recording is associated to the first event even though it contains sound recordings for the subsequent events 18 3 1 About Sound Recording...

Страница 143: ...8 5 Understanding Recording Settings and Sound Quality Step 4 Select the checkbox in line with Save Measurement Sound and enter a Snapshot Time FIGURE 18 5 Measurement Sound Tab 1 When you select Save...

Страница 144: ...e Settings and reference section 5 4 Calibrating Your SoundAdvisor 831C The 831C automatically calculates the sound recording range based on the Peak Overload value Step 2 Go to Tools 3 Setup Manager...

Страница 145: ...imations since every compressed file will be unique Event sound recordings are available to play back directly from the 831C or in G4 Step 2 If you are finished editing press Close save the Setup file...

Страница 146: ...Session Log tab Step 4 Select a sound event from the list This opens the sound player FIGURE 18 7 Session Log Playback 18 6 2 Playback After Saving in G4 After the sound recording is stored you can ac...

Страница 147: ...nmental Conditions Specs A 7 A 1 19 Physical Characteristics A 7 A 2 Model PRM831 A 7 A 2 1 Model PRM831 Specifications A 7 A 3 Base Software A 10 A 3 1 Standards Met A 10 A 3 2 Correction Filters A 1...

Страница 148: ...reamplifier Attenuation 0 08 dB Connector 5 Pin Male Switchcraft TA5MLAUX Mating Connector 5 Pin Female Switchcraft TA5FLAUX Extension Cables You can use a preamplifier extension cable between the met...

Страница 149: ...4 96 36 140 35 120 23 140 15 120 26 140 24 120 Peak Range2 A 65 143 44 123 65 143 46 123 64 143 45 123 C 66 143 45 123 63 143 46 123 65 143 46 123 Z 68 143 59 123 64 143 46 123 66 143 48 123 SPL Max L...

Страница 150: ...USB Client Interface Specifications Type USB 2 0 High Speed Mini B connector Power Draw 500mA from PC USB Hub or PSA029 Supported Hosts Computer with SLM Utility G4 Ethernet Dock 831INT ET NoiseTutor...

Страница 151: ...floating This can be done with a momentary push button switch from pin 4 to pin 13 with a 10k pull down resistor to ground 10k from pin 4 to pin 1 or 5 0 dB Gain 20 dB Gain AC Output Setting Output re...

Страница 152: ...minutes Real Time Clock Drift 0 3 s drift per 24 hour period over full operating temperature range battery back up powered Backup Time 1 year rechargeable battery backup Table A 3 Low Power At Boot Up...

Страница 153: ...ret microphone preamplifier for use with a Larson Davis Model 831 Sound Level Meter It requires little supply current and is capable of driving 300 feet of cable The preamplifier operates over wide ra...

Страница 154: ...kHz with 328 100 m cable To 18 kHz with 400 122 m cable To 15 kHz with 500 152 m cable To 6 3 kHz with 1000 305 m cable Model 831 3 V rms signal 10 5 dB below full scale To 80 kHz with 200 61 m cable...

Страница 155: ...5 89 0 01 0 016 0 04 0 06 158 49 0 01 0 016 0 05 0 05 199 53 0 01 0 016 0 05 0 05 251 19 0 01 0 016 0 05 0 05 316 23 0 01 0 016 0 05 0 05 398 11 0 00 0 016 0 05 0 05 501 19 0 00 0 016 0 05 0 05 Freq H...

Страница 156: ...to FF FF 90 For microphone 377B02 with EPS2116 FF to RI FF to FF FF 90 Table A 7 SLM with PRM831 and 377B02 Microphone Frequency 0 Free Field Corrections1 2 1 1 Add numbers in this column to levels re...

Страница 157: ...n1 through n6 selectable 0 01 to 99 99 Statistics are sampled every 10ms from the selected frequency and time weighted detector Exceedance Metrics exceedance levels L1 L2 P1 P2 and P3 selectable in dB...

Страница 158: ...3 6 Measurement Control Multiple control modes provide for manual and automated measurements Manual Manually control measurements RUN PAUSE RESUME STOP STORE Timed Stop Start manually and runs for se...

Страница 159: ...ference input signal is 5 Volt rms at 1 kHz 1 1 Octave Center Frequencies 8 Hz to 16 kHz 1 3 Octave Center Frequencies 6 3 Hz to 20 kHz Measurement Range Normal 107 dB full scale and High 140 dB full...

Страница 160: ...105 15 to 120 96 14 to 110 78 13 to 90 500 112 110 to 28 111 9 to 120 104 6 to 110 91 1 to 90 1000 109 31 to 140 105 15 to 120 97 14 to 110 79 12 to 90 1000 109 110 to 31 109 12 to 120 101 9 to 110 8...

Страница 161: ...1 1 to 110 98 8 to 90 125 121 20 to 140 104 17 to 120 95 16 to 110 75 15 to 90 125 120 20 to 140 119 2 to 120 111 1 to 110 99 9 to 90 160 121 20 to 140 105 16 to 120 96 15 to 110 76 14 to 90 160 119 2...

Страница 162: ...90 6300 106 35 to 140 104 16 to 120 96 14 to 110 82 9 to 90 6300 106 35 to 140 105 15 to 120 97 13 to 110 86 5 to 90 8000 105 36 to 140 103 17 to 120 95 15 to 110 81 9 to 90 8000 105 36 to 140 104 16...

Страница 163: ...generated noise levels for 1 3 octave filters with PRM831 30 0 20 0 10 0 0 0 10 0 20 0 30 0 40 0 50 0 1 10 100 1000 10000 Direct 1 1 OBA Noise Floor High 0dB High 20dB Normal 0dB Normal 20dB 30 0 20...

Страница 164: ...le Spectrum Levels uses same percentages n1 through n6 selected in SLM 0 01 to 99 99 Statistics are sampled every 100ms from the selected OBA frequency weighting and time weighting into 0 1 dB wide am...

Страница 165: ...acking rate and tracking percentile Minimum Duration Selectable from 0 to 9 9 s Continuation Period Selectable from 0 to 9 s Event Time History Selectable On or Off Period Selectable for periods 20 ms...

Страница 166: ...l Temperature Internal Humidity SEN031 Metrics Windspeed Wind Gust Speed Wind Direction Temperature Avg Min Max Humidity Avg Min Max Barometric Pressure SEN032 Metrics Windspeed Wind Gust Speed Wind D...

Страница 167: ...preamplifier at degrees increasing by 10 starting with 0 and rotating to 250 The frequency was measured in Hertz and ranged from 200 Hz to 20K Hz A 8 1 Plane Parallel To Display Screen FIGURE A 6 Mod...

Страница 168: ...e FIGURE A 8 Model 831 with 377B02 Microphone 14 13 12 11 10 9 8 7 6 5 4 3 2 1 0 200 2000 20000 Decibels dB re 1000 Hz 0 Frequency Hz 40 80 120 160 Mic at n 14 13 12 11 10 9 8 7 6 5 4 3 2 1 0 200 2000...

Страница 169: ...onal Characteristics 14 13 12 11 10 9 8 7 6 5 4 3 2 1 0 200 2000 20000 Decibels dB re 1000 Hz 0 Frequency Hz 0 30 70 110 150 Mic at n 22 18 14 10 6 2 2 0 10 20 30 40 50 60 70 80 90 100 110 120 130 140...

Страница 170: ...320 330 340 350 281 84 354 81 446 68 562 34 707 95 891 25 1122 02 1412 54 1778 28 2238 72 2818 38 3548 13 4466 84 5623 41 7079 46 8912 51 11220 18 Frequency Hz 22 18 14 10 6 2 2 0 10 20 30 40 50 60 7...

Страница 171: ...10 320 330 340 350 298 54 375 84 473 15 595 66 749 89 944 06 1188 5 1496 24 1883 65 2371 37 2985 38 3758 37 4731 51 5956 62 7498 94 9440 61 11885 02 Frequency Hz 22 18 14 10 6 2 2 0 10 20 30 40 50 60...

Страница 172: ...e FIGURE A 16 Model 831 with 377C20 Microphone 14 13 12 11 10 9 8 7 6 5 4 3 2 1 0 200 2000 20000 Decibels dB re 1000 Hz 0 Frequency Hz 20 60 100 140 180 Mic at n 14 13 12 11 10 9 8 7 6 5 4 3 2 1 0 200...

Страница 173: ...FIGURE A 18 Model 831 with 377C20 Microphone 14 13 12 11 10 9 8 7 6 5 4 3 2 1 0 200 2000 20000 Decibels dB re 1000 Hz 0 Frequency Hz 10 50 90 130 170 Mic at n 14 13 12 11 10 9 8 7 6 5 4 3 2 1 0 200 2...

Страница 174: ...320 330 340 350 281 84 354 81 446 68 562 34 707 95 891 25 1122 02 1412 54 1778 28 2238 72 2818 38 3548 13 4466 84 5623 41 7079 46 8912 51 11220 18 Frequency Hz 22 18 14 10 6 2 2 0 10 20 30 40 50 60 7...

Страница 175: ...10 320 330 340 350 298 54 375 84 473 15 595 66 749 89 944 06 1188 5 1496 24 1883 65 2371 37 2985 38 3758 37 4731 51 5956 62 7498 94 9440 61 11885 02 Frequency Hz 22 18 14 10 6 2 2 0 10 20 30 40 50 60...

Страница 176: ...30 A 8 2 Perpendicular to Plane of Display Screen FIGURE A 23 Model 831 with 377B02 Microphone 14 13 12 11 10 9 8 7 6 5 4 3 2 1 0 200 2000 20000 Decibels dB re 1000 Hz 0 Frequency Hz 20 340 60 300 100...

Страница 177: ...odel 831 with 377B02 Microphone 14 13 12 11 10 9 8 7 6 5 4 3 2 1 0 200 2000 20000 Decibels dB re 1000 Hz 0 Frequency Hz 40 320 80 280 120 240 160 200 Mic at n 14 13 12 11 10 9 8 7 6 5 4 3 2 1 0 200 20...

Страница 178: ...2 1 0 200 2000 20000 Decibels dB re 1000 Hz 0 Frequency Hz 10 350 50 310 90 270 130 230 170 190 Mic at n 22 18 14 10 6 2 2 0 10 20 30 40 50 60 70 80 90 100 110 120 130 140 150 160 170 180 190 200 210...

Страница 179: ...90 200 210 220 230 240 250 260 270 280 290 300 310 320 330 340 350 282 355 447 562 708 891 1122 1413 1778 2239 2818 3548 4467 5623 7079 8913 11220 Frequency Hz 22 18 14 10 6 2 2 0 10 20 30 40 50 60 70...

Страница 180: ...40 50 60 70 80 90 100 110 120 130 140 150 160 170 180 190 200 210 220 230 240 250 260 270 280 290 300 310 320 330 340 350 251 316 398 501 631 794 1000 1259 1585 1995 2512 3162 3981 5012 6310 7943 100...

Страница 181: ...odel 831 with 377C20 Microphone 14 13 12 11 10 9 8 7 6 5 4 3 2 1 0 200 2000 20000 Decibels dB re 1000 Hz 0 Frequency Hz 40 320 80 280 120 240 160 200 Mic at n 14 13 12 11 10 9 8 7 6 5 4 3 2 1 0 200 20...

Страница 182: ...2 1 0 200 2000 20000 Decibels dB re 1000 Hz 0 Frequency Hz 10 350 50 310 90 270 130 230 170 190 Mic at n 22 18 14 10 6 2 2 0 10 20 30 40 50 60 70 80 90 100 110 120 130 140 150 160 170 180 190 200 210...

Страница 183: ...90 200 210 220 230 240 250 260 270 280 290 300 310 320 330 340 350 282 355 447 562 708 891 1122 1413 1778 2239 2818 3548 4467 5623 7079 8913 11220 Frequency Hz 22 18 14 10 6 2 2 0 10 20 30 40 50 60 70...

Страница 184: ...Model with the PRM2103 preamplifier see the Larson Davis PRM2103 Outdoor Microphone Preamplifier Manual 22 18 14 10 6 2 2 0 10 20 30 40 50 60 70 80 90 100 110 120 130 140 150 160 170 180 190 200 210...

Страница 185: ...C A 39 FIGURE A 40 Z Frequency Weighting Direct Input 30 0 20 0 10 0 0 0 dB Z Frequ 80 0 70 0 60 0 50 0 40 0 30 0 20 0 10 0 0 0 1E 1 1E 0 1E 1 1E 2 1E 3 1E 4 1E 5 Response dB Frequency Hz Z Frequency...

Страница 186: ...SoundAdvisor Model 831C A 40 A 9 Declaration of Conformity...

Страница 187: ...nd Corrections See Table A 7 SLM with PRM831 and 377B02 Microphone on page 10 A Table B 1 831C with PRM831 and 377B02 Microphone average frequency responses and corrections Required by IEC 61672 1 Exa...

Страница 188: ...6 97 0 03 0 03 0 20 0 23 0 23 0 45 4466 84 0 35 0 35 0 22 0 13 0 13 0 45 4731 51 0 06 0 06 0 39 0 33 0 33 0 45 5011 87 0 08 0 08 0 39 0 47 0 47 0 45 5308 84 0 04 0 04 0 04 0 00 0 00 0 45 5623 41 0 02...

Страница 189: ...0 0 03 0 03 0 03 0 03 0 03 0 00 375 84 0 03 0 07 0 03 0 00 0 03 0 03 0 00 0 03 0 03 0 00 0 10 0 00 0 00 398 11 0 00 0 00 0 10 0 03 0 03 0 00 0 00 0 03 0 07 0 03 0 07 0 07 0 07 421 70 0 00 0 00 0 07 0...

Страница 190: ...0 43 0 50 0 43 2818 38 0 57 0 53 0 57 0 60 0 50 0 50 0 53 0 53 0 57 0 57 0 43 0 57 0 50 2985 38 0 40 0 50 0 43 0 57 0 43 0 50 0 57 0 53 0 57 0 57 0 37 0 50 0 50 3162 28 0 40 0 40 0 53 0 50 0 33 0 57 0...

Страница 191: ...2589 25 0 57 0 73 0 83 0 87 0 97 0 97 1 00 1 00 1 00 1 17 1 07 0 90 0 90 13335 21 0 70 0 67 0 63 0 83 1 00 1 17 1 10 1 07 1 07 1 37 1 53 1 20 1 13 14125 38 0 40 0 50 0 57 0 60 0 90 1 00 1 00 1 20 1 17...

Страница 192: ...Random Incidence EPS2116 Correction Factor Expanded Uncertainty Hz dB dB dB dB 63 10 0 00 0 00 0 00 0 20 79 43 0 00 0 00 0 00 0 20 100 00 0 00 0 00 0 00 0 20 125 89 0 00 0 00 0 00 0 20 158 49 0 00 0 0...

Страница 193: ...5 0 02 0 11 0 20 562 34 0 34 0 05 0 09 0 20 595 66 0 29 0 01 0 06 0 20 630 96 0 29 0 01 0 07 0 20 668 34 0 31 0 01 0 09 0 20 707 95 0 40 0 05 0 12 0 20 749 89 0 36 0 01 0 07 0 20 794 33 0 35 0 00 0 08...

Страница 194: ...0 70 0 79 0 20 3758 37 0 21 1 05 0 97 0 20 3981 07 0 30 1 55 1 23 0 20 4216 97 0 16 2 05 1 39 0 30 4466 84 0 06 2 54 1 56 0 30 4731 51 0 19 2 61 2 00 0 30 5011 87 0 02 2 78 2 08 0 30 5308 84 0 20 3 3...

Страница 195: ...5 38 8 87 7 91 0 30 18836 49 6 56 10 06 9 40 0 30 19952 62 8 15 11 24 10 80 0 30 Table B 5 Linearity Range Nominal Values Weighting Gain 31 5 Hz 1 kHz 4 kHz 8 kHz 12 5 kHz Lower Upper Lower Upper Low...

Страница 196: ...n The mode of operation of the 831C that produces the greatest radio frequency emission levels is with the 831C set to run with the LCD backlight on an external charger PSAA20R 120 charger Ethernet do...

Страница 197: ...SoundAdvisor Model 831C B 11 FIGURE B 3 EM Field Orientation EM Field Principal Direction...

Страница 198: ...area for 2 hours and 31 minutes he will have accu mulated a Noise Dose of 100 Standard ANSI S12 19 See Exchange Rate Q Exchange Rate Factor q Exposure Factor k At Lmax At Lmax is one of 2 choices for...

Страница 199: ...essened tolerance for noise during evening activities They are energy summed and converted to an average noise exposure rating Criterion Duration Tc It is the time required for a constant sound level...

Страница 200: ...c unit Pascal for acoustic measurements It is not possible to directly add or subtract physical quantities when expressed in decibel form since the addition of logarithmic values correspond to multipl...

Страница 201: ...t they remain the same even if we use sound pressure or sound power Compare this to the use of voltage and power units in electrical engineering units being related by P V2 In table 2 an illustration...

Страница 202: ...electro mechanical meter so that the amplitude could be determined Slow and Fast detector settings are still useful in modern sound measurement instruments Slow has a time constant of 1 second Fast h...

Страница 203: ...re two types of far fields the acoustic far field and the geometric far field Acoustic Far Field The distance from a source of sound is greater than an acoustic wavelength In the far field the effect...

Страница 204: ...ed a lower cutoff frequency and below a certain fixed frequency called an upper cutoff frequency The difference between the two cutoff frequencies is called the bandwidth It is used to discriminate ag...

Страница 205: ...cies Hz Weighting Network Frequency Response 1 3 Octave 1 Octave A B C 20 50 4 24 2 6 2 25 44 7 20 4 4 4 31 5 31 5 39 4 17 1 3 0 40 34 6 14 2 2 0 50 30 2 11 6 1 3 63 63 26 2 9 3 0 8 80 22 5 7 4 0 5 10...

Страница 206: ...dy sound such as environmental noise To calculate Ln values the 831C creates an amplitude distribution table over the range 0 to 200 dB in amplitude increments of 0 1 dB This data permits the calculat...

Страница 207: ...res We would like the microphone to measure sound pressure force per unit area instead of sound force If the pressure is applied uniformly over the microphone diaphragm a simple constant the diaphragm...

Страница 208: ...from a source of sound is less than the largest dimension of the sound source In the near field effect of source geometry is significant Sound sources often have a variety of specific sources within...

Страница 209: ...s a spe cial form of the Sound Exposure Level where the time period is defined as the start and end times of a noise event such as the passing of an aircraft or automobile Sound Sound is comprised of...

Страница 210: ...he square root this is called rms for root mean square This method is one of several ways to mathematically measure sound Moving Average The averaging process is continually accepting new data so it i...

Страница 211: ...nergy as the actual time varying sound over the same period This descriptor is widely used It is a fixed average See Sound Pressure on page C 13 Impulse The value of an impulsive sound The reading wil...

Страница 212: ...maximum A weighted fast exponential time weighted sound pressure level for each n 5 second time period and n is the number of 5 second periods accumulated during the measurement Threshold Sound Level...

Страница 213: ...Vibration The oscillatory movement of a mechanical system generally taken to be solid It is used as a broad descriptor of oscillations Wavelength l The distance between peaks of a propagating wave wi...

Страница 214: ...LarsonDavis com P N I831C 01 Rev N firmware version 4 5 0 2020 PCB Piezotronics Inc Worldwide Corporate Headquarters 3425 Walden Avenue Depew NY 14043 2495 USA Toll free in the US 888 258 3222 Phone...

Отзывы: