background image

2

Assembly Instructions

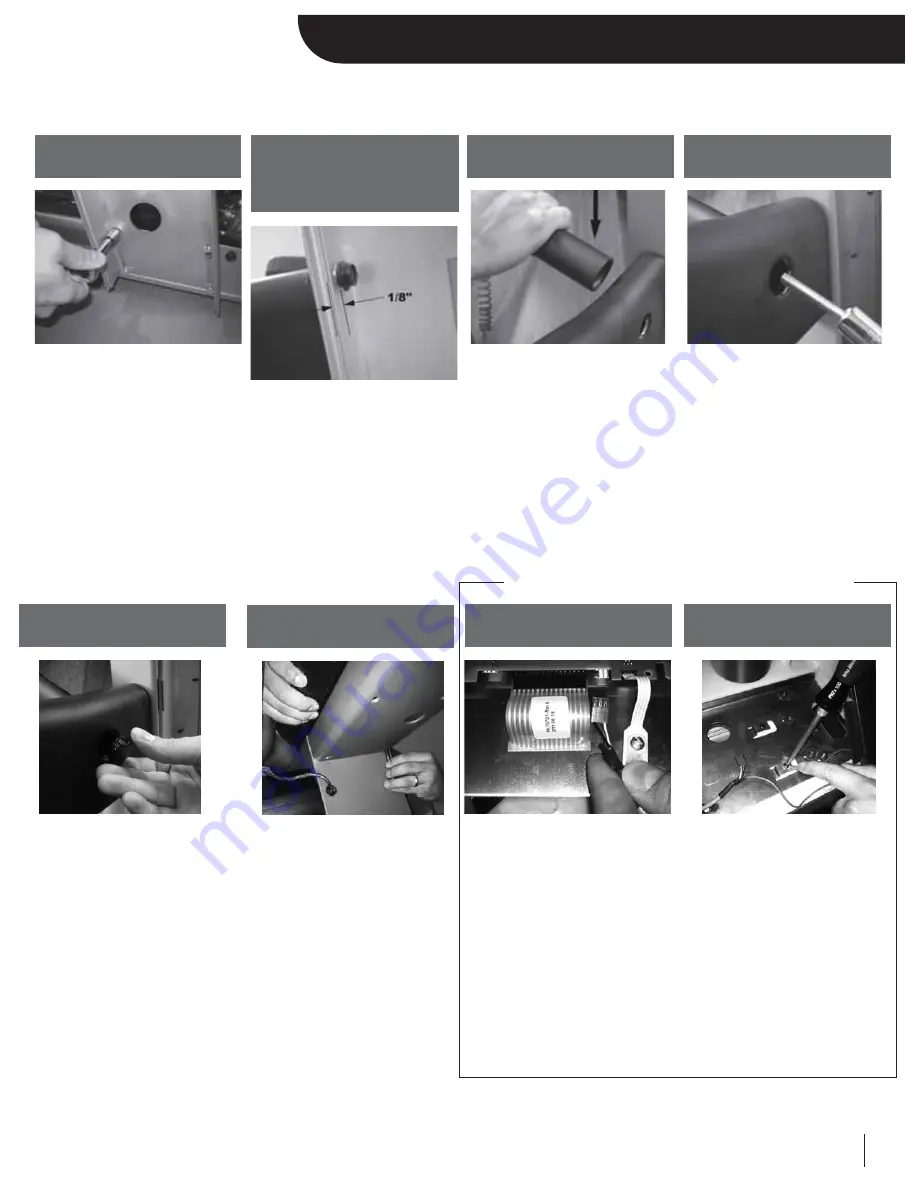
• Slide the upright down onto the

8-side frame bolts.

• Tighten bolts with a 7/16”

extended socket.

• The handrail mounting bolts

have been threaded into the rails
for shipping. Remove them.

• Attach both handrails by first

hand-starting the bolts through
the upright and then using a
1/2” socket. Leave about 1/8”
of slack. 

(DO NOT TIGHTEN FLUSH TO
SURFACE).

• After mounting both handrails,

gently lower the curved crossbar
into position between them. 

• Each end of the crossbar

should cover the two smaller
access holes that are cut into
the handrails.

• Leave contact heart rate

connection harness hanging
for now. 

• Using an extended 1/2” socket,

carefully guide the 2 inch bolt
with lock washer into the big
access hole in the side of the
handrail. 

• Once the bolt reaches the

crossbar, tighten it. 

• Repeat this step with the other

handrail. 

• Remove “POD” console from its

box.

• Carefully mount it on top of the

upright.  SUPPORT IT AT ALL
TIMES, IT DOES NOT
SECURELY REST ON TOP
UNTIL IT’S BOLTED DOWN.

• Remove the partially threaded

bolts from the inside of the
POD, and bolt them from the
bottom up (see picture below)
using a ½” socket.

STEP 4:

Secure upright to frame

STEP 2:

Cut the box off the pallet

STEP 6:

Place crossbar

STEP 7:

Secure crossbar

  STEP  9:

Mount the POD

• Carefully  insert display membrane

into the bottom edge of the POD
exposing back connections

• Feed the contact heart rate 

harness through the access hole
in the inside of the left upright
(insert strain relief provided).
Feed harness up into the 
control panel.

• Pull back the membrane and

connect harness to white 3-pin
connector along the bottom edge
of the display board.

STEP 10:

Connect contact bar

• Temporarily back out the nearest

Philips head screw in reach of
the ground harness from the
POD mount plate (see picture)

• Insert ground eyelet, and secure

the screw to mount plate once
again.

• SOME CONTACT BARS DO

NOT USE A GROUND WIRE

STEP 11:

Ground the contact

bar

STEP 5: 

Prepare to install

hand rails (Med Rails: the
word 

handrails

refers to the 4”

clamps for steps 5-8)

• Press the dome plugs into the

large access holes on the side of
the handrails.

• Finish tightening the handrail

bolts from STEP 5.

• 

Note: Med Rails go to
Appendix A.   

STEP 8:

Secure hand rail

*OPTIONAL Contact Heart Rate Assembly

Skip to Step 12 if treadmill has standard crossbar

Landice_RTM_Manual_8.2011.qxd:Landice CT Manual-2/05  10/11/11  10:04 AM  Page 8

Содержание Rehabilitation Treadmill

Страница 1: ...Rehabilitation Treadmill Owner s Manual PART NUMBER 72104...

Страница 2: ...ps the treadbelt The treadmill will shut off and all current statistical information will be cleared To change speed Hold speed key down to increase speed Holding speed key depressed for longer than 2...

Страница 3: ...e rail until the belt starts moving 5 Always wear the emergency stop safety strap securely around your wrist while exercising Failure to do so can result in severe injuries should you accidentally fal...

Страница 4: ...to reduce risk of electric shock This product is equipped with a cord that has an equipment grounding conductor and a grounding plug The plug must be plugged into an outlet that is properly installed...

Страница 5: ...uction 1 Assembly Instructions 2 Features 4 Getting Started 5 Manual Mode 6 Heart Rate Monitoring Heart Rate Monitors 7 Heart Monitors Wireless and AccuTrack 8 Maintenance Maintenance 9 Appendices App...

Страница 6: ...the user accidentally trip and fall while exercising Be sure the line cord has plenty of slack and does not get pinched underneath the treadmill when the treadmill elevates up and down Make sure the...

Страница 7: ...f the POD and bolt them from the bottom up see picture below using a socket STEP 4 Secure upright to frame STEP 2 Cut the box off the pallet STEP 6 Place crossbar STEP 7 Secure crossbar STEP 9 Mount t...

Страница 8: ...turn the bolt underneath the motor pan attached to the motor s hook screw STEP 17 Check drive belt tension The treadbelt is tracked and tensioned via the take up screws located at the back of the tre...

Страница 9: ...r arms to maintain balance Since contact heart rate systems require your arms to remain stationary we recommend using the system only at speeds of less than approximately 4 mph 6 4 km h or the fastest...

Страница 10: ...will show Note Your body weight is used to calculate calories burned during a workout Press to scroll to your body weight Once your weight is displayed press or wait three seconds to begin your workou...

Страница 11: ...n the Manual mode you can view one of the 6 statistics by pressing or all of them by holding and activating the scan feature TIME Time logged on treadmill Minutes Seconds DISTANCE Miles logged on trea...

Страница 12: ...ow these steps SECURE THE CHEST STRAP Center the transmitter on the chest as high under the pectoral muscles breasts as possible Tighten the strap so that the belt is as tight as possible without bein...

Страница 13: ...heart will beat briefly and then display your heart rate Your heart rate will be continuously monitored while your hands remain on the grips NOTE If you are wearing the wireless chest strap the AccuT...

Страница 14: ...admill to 5 mph Then while jogging lightly check for any sudden slipping hesitating of the treadbelt Repeat treadbelt tensioning instructions if required MOTOR DRIVE BELT TENSIONING pre set from facto...

Страница 15: ...plug compatible with any audio source with a standard headphone jack and the iPod docking connector Speakers only operate when the treadmill is ON Once you connect your personal player you ll be able...

Страница 16: ...1 Canfield Avenue Randolph NJ 07869 1 800 LANDICE Tel 973 927 9010 Fax 973 927 0630 www landice com 111 Canfield Avenue Randolph NJ 07869 1 800 LANDICE Tel 973 927 9010 Fax 973 927 0630 www landice co...

Отзывы: