7
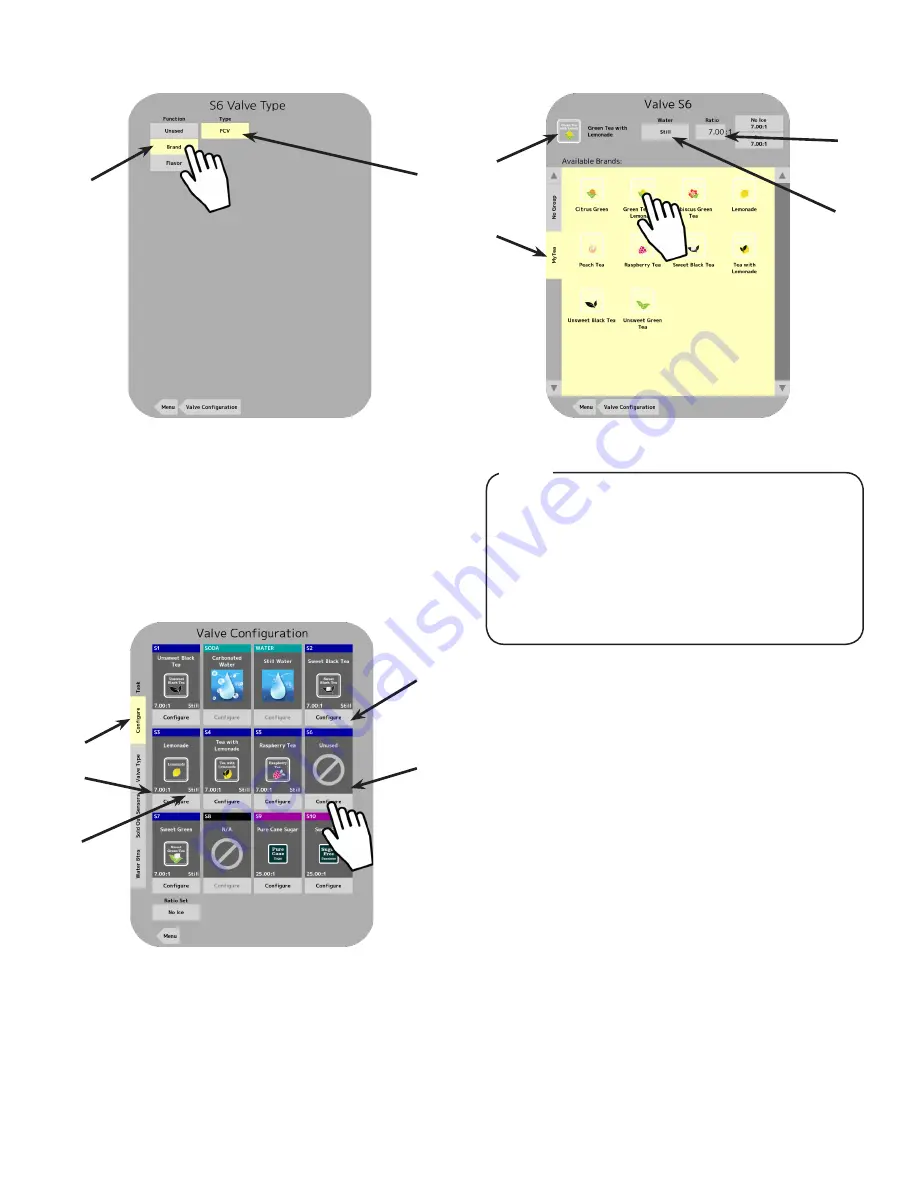
A. Valve Function
B. Valve Type
A
B
4. From here, choose the desired function and valve type for
the incorporated valve module.
5. Press the
Valve Configuration
button to return to the Valve
Configuration menu.
6. Repeat steps 3 and 4 for any other desired brand or flavor
modules.
7. From the Valve Configuration menu, press the
Configure
tab
on the far left side of the screen.
8. Press the
Configure
button under any of the activated brand
or flavor modules to open its Configuration Page.
9. Select a new brand from the available Brands Library tabs
on the left side of the screen.
Each brand has a default water type and ratio when
they are selected. The water type and ratio can be
adjusted if necessary, however, adjusting the ratio here
is purely representational and does not set the ratio
for the finished drink. Adjust the ratio by selecting the
Ice or No Ice ratio using the buttons in the upper right
corner of the screen, or by manually adjusting the ratio
by tapping the number and entering the new value on
the keypad.
NOTE
10. Once a brand/flavor has been selected to a corresponding
module, press the
Valve Configuration
button to return to the
Valve Configuration Screen.
11. Repeat Steps 8 and 9 for any other desired brand or flavor
modules.
12. Press the
Menu
button to return to the Service menu.
13. From the Service Menu, press the
Maintenance
button.
14. Press the
Purge
tab on the far left side of the screen.
15. Purge any new brand or flavor module until there is a steady
flow of syrup. (See page 6)
16. Press the
Menu
button to return to the Service Menu.
A. Configure Tab
D. Brand Water Type
B. Configure Button
E. Brand Ratio
C. Activated Module
A
B
C
D
E
A
B
D
C
A. Brand Library Tab
C. Brand Ratio
B. Replacement Brand
D. Water Type


