background image

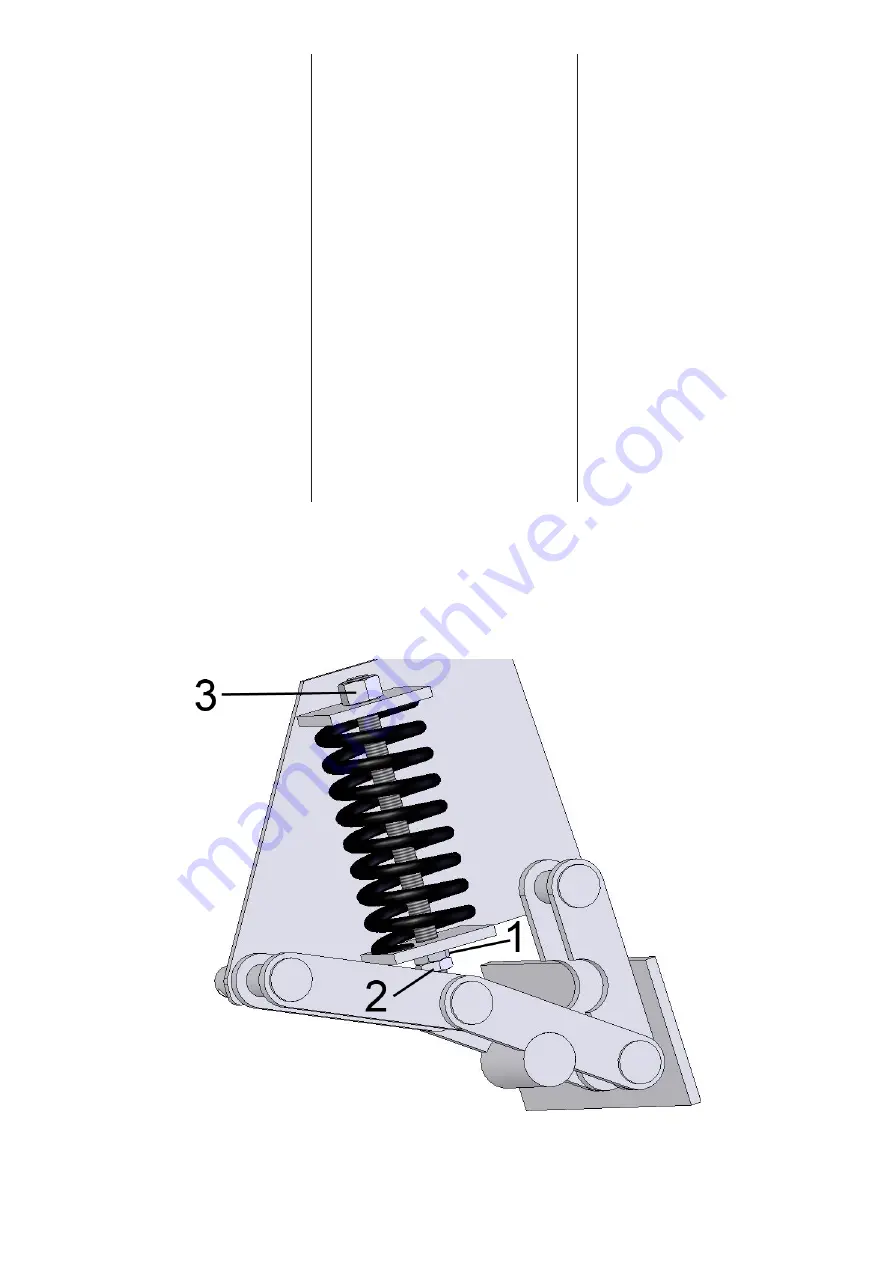
Регулировка  возвратной  силы  но

-

жей  плуга  производится  находя

-

щимися  под  пружиной  гайками. 

Ослабить сначала гайку 2  и затем 

подтянуть пружину гайкой 1. После 

того,  как  пружину  отрегулировали, 

затянуть  гайку  2,  тогда  пружина 

получается  заблокированной.  Гай

-

кой 3, находящейся над пружиной, 

регулируется чувствительный спус

-

ковой  механизм  пластины  плуга 

и  от  подтягивания  гайки  3  работа 

пружинного механизма плуга очень 

чувствительна. 

Балансировку ходовой части не

-

льзя регулировать напрямую,так 

как  иначе  пружинный  механизм 

не работает!

От  многочисленных  столкновений 

пружины  ослабевают  и  тогда  их 

нужно заменять.

Aurausterän palautusvoiman säätö 

tehdään jousen alla olevista muttereis-

ta. Löystytä aluksi mutteria 2 ja kiristä 

sitten jousta mutterilla 1. Säädön jäl

-

keen kiristä mutteri 2 jolloin säätö saa-

daan lukittua. Jousen päällä olevasta 

mutterista 3 säädetään aurauslevyn 

laukaisu  herkkyyttä,  eli  kiristämällä 

mutteria 3 auran joustomekanismi toi-

mii herkemmin. 

Keinuteliä  ei  saa  säätää  suoraksi, 

koska  muuten  joustomekanismi  ei 

toimi!

Jouset väsyvät lukuisista törmäyksistä 

ja silloin ne pitää vaihtaa.

The restoring force of the plowing 

blade is adjusted from the nuts under 

the  spring.  First  untighten  nut  2  and 

then tighten the spring with nut 1. After 

adjusting  the  spring,  tighten  nut  2  to 

lock the adjustment. Nut 3, which is on 

top of the spring, is used to adjust the 

trigger sensitivity of the plowing blade, 

so  by  tightening  nut  3,  the  spring 

mechanism works more sensitively. 

The bogie must not be adjusted to a 

straight position, because that will 

disable the spring mechanism!

When the springs get weary from 

multiple collisions they should be re-

placed.

Kuva 1, bild 1, picture 1

Auran säätäminen

Регулировка плуга

Adjusting the Plow

Механический замок (рис.1)

Mekaaninen lukko (kuva 1)

Mechanical lock (picture 1)

Содержание STARK U-PLOW

Страница 1: ...Alkuper iset ohjeet Original instructions Relax aurat K ytt ja huolto ohjekirja Relaz plows Operating and maintenance manual...

Страница 2: ...t minen Aurausasento NIVELAURA ALUEAURA PERHOSAURA PUSKULEVY U aura CONTENTS Read Before Using the Product Purpose of Use Installation Using the Plow Removing the Plow Safety Precautions Maintenance A...

Страница 3: ...nctioning of the product Check the risks before using the prod uct Tarkasta laitteen kunto jos havaitset puutteita tai vaurioita tuotteessa ota yhteytt tuotteen valmistajaan Tutustu t m n ohjekirjan s...

Страница 4: ...ting and plowing snow from yards and streets 1 2 3 4 5 1 2 3 4 Check that the basic machine allows the installation of the plow The plow can be attached to the front loader or front lifter of a tracto...

Страница 5: ...Make yourself familiar with the plow before using it Only people who know how to use the device are allowed to operate it Before connecting the hydraulics make sure that there is nobody between the ba...

Страница 6: ...vaihtaa The restoring force of the plowing blade is adjusted from the nuts under the spring First untighten nut 2 and then tighten the spring with nut 1 After adjusting the spring tighten nut 2 to loc...

Страница 7: ...The attachment bolts are released and the blade is moved lower until the attachment hole is showing The attachment bolts are now attached to the adjoining holes picture 3 from their original positions...

Страница 8: ...ws legs are adjusted from the lever shown in the pictures 8 9 Remem ber to adjust both levers otherwise the plow doesn t lower rise equally Lift the lever in to the position shown in the pictures 8 9...

Страница 9: ...an j vapaata tilaa yht paljon When working with a plow please en sure that you push the plow straight ahead in the plowing position The frame must be at a 90 degree angle relative to the frame The plo...

Страница 10: ...nt kaaviot Fittings marked with a circle are to be lubricated every 50 hours of operation or weekly Notice that there are two fit tings in the middle axle The device can be attached to a 2 3 or 5 hose...

Страница 11: ...kytkent kaavio Fittings marked with a circle are to be lubricated every 50 hours of operation or weekly The device can be attached to a sys tem which has at least 2 hoses The circuit diagrams are demo...

Страница 12: ...eekly Notice that there are four fittings in the wing axles and two on the middle axle The U plow can be attached to a 3 5 or 7 hose system The circuit dia grams are demonstrated below The U plow can...

Страница 13: ...Kaskenviert j ntie 2 73100 Lapinlahti FINLAND tel 358 0 17 731 565 fax 358 0 17 731 567 info lametal fi www lametal fi...

Отзывы: