Machine Operation
41
Supermax Infeed/Outfeed Assembly
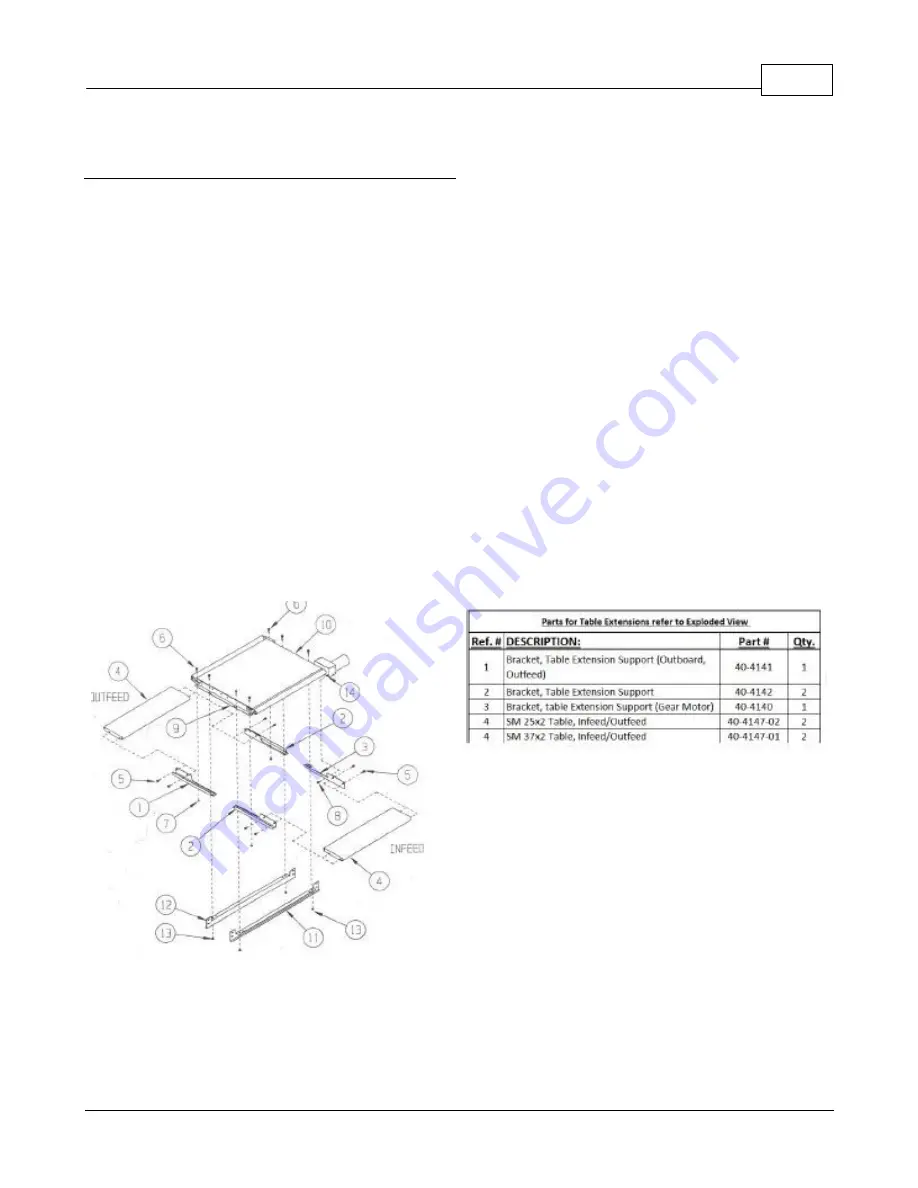
SUPERMAX Infeed/Outfeed ASSEMBLY Instructions:
To install the Infeed/Outfeed Tables for the 37x2, 25x2 Sander, remove parts form Packaging& check parts for any
damage. All refence numbers refer to included exploded view on Page 96.
A.)
Loosen 4-four nuts (#13) that hold the conveyor bed to the Table mount brackets (#11 & #12). Remove the nuts
(#13) from the Outfeed (back) side of sander.
B.)
On the board (right) side of sander, place the extension bracket (#2) under the conveyor bed and align with
same bolt that held the conveyor bed. Finger tighten the nut (#13). Install the new bolt (#6) through the outer edge
of the rail (#9) and side of the conveyor. Finger tighten the nut (#7). Follow the same procedure for the outboard side
of sander using table bracket (#1) and a new bolt & nut (#6 & #7).
C.)
Move to the Infeed (Front) side of the sander. Remove the nuts (#13) from the 2-two (infeed) bolts. Lift the
conveyor bed on the outboard (left) side & place the table bracket (#2) between the conveyor bed and the table
mount brackets (#11). Lift the inboard (right) side of the conveyor and place the other table support bracket (#3)
between the conveyor and cross rail, next to the gear motor assembly. Install bolt through side of table bracket (#)
into gear motor bracket & tighten.
D.)
To install the extension tables, align the table with the holes in the support brackets, finger tighten each of the
two bolts & washers on the left & right side of the table extensions.
E.)
To align the extension tables, place a straight edge on the exposed edge of the conveyor bed along the length of
the bed (not on the conveyor belt.). Then raise the extension table until it touches the straight edge. Tighten the two
bolts going into the extension table. This aligns the table slightly lower than the conveyor and helps prevent spillage
of stock on the conveyor. The extension tables should never be higher than the conveyor.
CAUTION:
if stock is bowed, twisted, or slips on the conveyor, then lower the table extensions, so the stock better
contacts the conveyor belt.
Содержание 37 x 2
Страница 2: ......
Страница 17: ...General Information 17 Castings...
Страница 18: ...Double Drum Sander 37 x 2 18 Supermax Specifications...
Страница 19: ...General Information 19 Supermax Accessory Supply Check List...
Страница 47: ...Mainteance 47...
Страница 54: ...Double Drum Sander 37 x 2 54...
Страница 56: ...Double Drum Sander 37 x 2 56 Drumhead Assembly Exploded View...
Страница 57: ...Drumhead Parts List 57 Drumhead Parts List...
Страница 58: ...Double Drum Sander 37 x 2 58...
Страница 59: ...Conveyor Exploded View 59 Conveyor Exploded View...
Страница 60: ...Double Drum Sander 37 x 2 60 Conveyor Parts List...
Страница 61: ...Conveyor Parts List 61...
Страница 62: ...Double Drum Sander 37 x 2 62 Exploded Diagrams...
Страница 63: ...Parts Lists 63 Parts Lists...
Страница 64: ...Double Drum Sander 37 x 2 64 Electrical Diagrams 1st Phase Electrical Diagram 3rd Phase Electrical Diagram...
Страница 77: ...Disassembly Procedure 77...
Страница 79: ...Warranties 79 Warranties Laguna Tools Warranty...
Страница 80: ...Double Drum Sander 37 x 2 80 Modifications RMA Policy Laguna Tools Packaging RMA Procedure...
Страница 81: ...Warranties 81...


