10
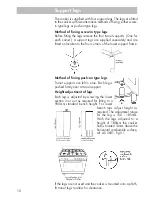
The cooker is suppllied with four support legs. The legs are fitted
to the cooker with two alternative methods of fixing, either screw-
in type legs or push-on type legs.
Method of fixing screw-in type legs
Before fitting the legs remove the four transit supports. (One for
each corner). 4 support legs are supplied separately and are
fitted on location to the four corners of the lower support frame.
Method of fixing push-on type legs
Transit supports are left in situe. Each leg is
pushed firmly over a transit support.
Height adjustment of legs
Each leg is adjusted by screwing the lower
section in or out as required for fitting to a
900mm standard bench height. For lower
bench tops adjust height as
required. The adjustment range
for the leg is 150 - 185mm.
With the legs adjusted to a
height of 180mm the cooker
hob is located 10mm above the
horizontal cumbustible surface,
ref. AS 5601, fig 5.1
If the legs are not used and the cooker is mounted onto a plinth,
fit transit legs to allow for clearance.
Support legs
27
Cleaning oven shelf supports
To remove the shelf supports remove the
knurled knobs either side, lift the wire
rack and swing forwards.
Cleaning oven glass door
The oven door may be removed for
cleaning. To remove the oven door follow
the steps below:
1. Open the door fully.
2. Lift the two levers forward as shown in figure below left.
3. Close the door as far as the first stop (created by the raised
levers).
4. Lift the door upwards and outwards to remove it from its
mounting as shown in figure below right.
5. To replace the door, fit the hinges on their mountings and
lower the levers.
6. Close the door.
❍
Use a window cleaner to clean the exterior glass panel.
Replacing the oven light
Type: E14, 25W, heat resistant to 300
°
C.
You may obtain this bulb from our service department as listed in
the rear of this booklet or from your LaGermania retailer.
1. Disconnect the appliance from the main electricity supply.
2. To prevent damage place a teacloth in the bottom of the oven.
3. Unscrew the glass cover of the light.
4. Unscrew the old lightbulb and replace it with a new one.
5. Replace cover.
6. Reconnect the power supply.
Содержание LUEP51-90-S
Страница 35: ...Part no W1885 Revision D 2006...


