background image


Device Settings 

50 


is prohibited. When you set your device to Airplane mode, it cannot send or receive any calls or 
access online information. 

To quickly turn Airplane mode on or off: 

►  Press and hold the 

Power

 button, and then touch 

Airplane mode

 under Phone options. 

While in Airplane mode, the status bar will display 

To turn Airplane mode on or off in Settings: 

1.  Press 

Home


  > 

Menu


, and touch 

System settings

 > 

More

 under 

WIRELESS & NETWORKS

2.  Touch the 

Airplane mode

 check box. While in Airplane Mode, the status bar will display 

Mobile Networks 

Mobile networks menu lets you enjoy the data connection. 

Enable Data 

Enable data access to enjoy the data connection. 

1.  Press 

Home


  > 

Menu


, and touch 

System settings

 > 

More

 under 

WIRELESS & NETWORKS

2.  Touch 

Mobile networks

 and confirm 

Data enabled

 is checked.   

DEVICE Settings 

The DEVICE settings menu lets you control 

your device‟s feature. 

Sound 

Display 

Storage 

Battery 

PC Connection 

Apps 

Sound 

Use the following settings for such features as silent mode, vibrate, and overall device volume.   

Содержание Boost Hydro

Страница 1: ... 2012 Kyocera Corporation All Rights Reserved BOOST and BOOSTMOBILE and Logo and the Logo are trademarks of Boost Other marks are the property of their respective owners KYOCERA is a registered trademark of Kyocera Corporation ...

Страница 2: ...ur Account 6 411 7 Operator Services 7 Device Basics 8 Your Device s Layout 9 Key Functions 9 Turn Your Device On and Off 10 Turn Your Device On 11 Turn Your Device Off 11 Turn Your Screen On and Off 11 Turn the Screen Off When Not in Use 11 Turn the Screen On and Unlock It 11 Touchscreen Navigation 12 Touch 12 Touch and Hold 12 Drag 12 Slide or Flick 12 Pinch and Spread 12 Rotate 13 Your Home Scr...

Страница 3: ...e Calls 30 Call Using the Phone Dialpad 30 Call From Recent Calls 31 Call From People 31 Call a Number in a Text Message 32 Call Emergency Numbers 32 Call Numbers with Pauses 33 Call Using Plus Code Dialing 33 Call Using the Internet Calling 33 Receive Phone Calls 34 Answer an Incoming Call 35 Mute the Ringtone 35 Reject an Incoming Call 35 Reject a Call and Send a Text Message 35 Visual Voicemail...

Страница 4: ...icemail Messages 41 Phone Call Options 41 Caller ID 42 Call Waiting 42 3 Way Calling 42 Call Forwarding 43 Other Call Settings 43 In Call Options 45 Call Log 46 View Recent Calls 46 Call Log Options 46 Clear Call Logs 47 Device Settings 48 WIRELESS NETWORKS Settings 48 Wi Fi 48 Bluetooth 48 Data Usage 48 Airplane Mode 49 Mobile Networks 50 DEVICE Settings 50 Sound 50 Display 53 Storage 54 Battery ...

Страница 5: ...New People Entry 67 Save a Phone Number 69 Edit a People Entry 69 Add or Edit Information for a People Entry 70 Assign a Stored Picture to a People Entry 70 Assign a New Picture to a People Entry 70 Assign a Ringtone to a People Entry 71 Assign a Vibration to a People Entry 71 Add an Entry to Favorites 71 Send an Entry s call to Voicemail 72 Delete a People Entry 72 Select People List 72 Customize...

Страница 6: ...gs 81 Delete an Email Account 83 Text Messaging and MMS 83 Compose Text Messages 83 Send a Multimedia Message MMS 84 Save and Resume a Draft Message 85 New Messages Notification 86 Managing Message Conversations 86 Text and MMS Options 88 Social Networking Accounts 89 YouTube 89 Google Talk 90 Signing In and Chatting 90 Managing Your Friends 92 Mobile Indicators 92 Signing Out 93 Google Talk Setti...

Страница 7: ...cking Up Your Downloaded Music Files 109 BoostZone 109 Web and Data 110 Wi Fi 110 Turn Wi Fi On and Connect to a Wireless Network 110 Check the Wireless Network Status 111 Connect to a Different Wi Fi Network 111 Data Services 112 Your User Name 112 Launch a Web Connection 112 Data Connection Status and Indicators 113 Browser 113 Learn to Navigate the Browser 114 Browser Menu 115 Select Text on a ...

Страница 8: ...n 122 Review Screen 124 Take a Picture 124 Close the Camera 125 Record Videos 125 Video Viewfinder Screen 125 Record a Video 126 Camera Video Settings 126 View Pictures and Videos Using Gallery 127 Open Gallery 127 View Photos and Videos 128 Zoom In or Out on a Photo 129 Watch a Video 129 Close Gallery 130 Working with Photos 130 Photo Options Menu 130 Edit a Photo 130 Rotate and Save a Photo 131 ...

Страница 9: ...larm 142 Opening Clock 142 Setting an Alarm 142 Changing Alarm Settings 144 Calculator 144 Voice Service 144 Automatic Speech Recognition ASR 145 Text to speech Settings 145 Voice Search 146 Eco Mode 146 Bluetooth 148 Turn Bluetooth On or Off 148 The Bluetooth Menu 148 Change the Device Name 149 Connect a Bluetooth Headset or Car Kit 149 Reconnect a Headset or Car Kit 150 Disconnect or Unpair From...

Страница 10: ...r Other Electronic Devices 159 Personal Implantable Medical Devices 159 Turning Off Your Phone Before Flying 159 Turning Off Your Phone in Dangerous Areas 159 Restricting Children s Access to Your Phone 160 Water Resistance 160 Using Your Phone With a Hearing Aid Device 160 Getting the Best Hearing Device Experience With Your Phone 162 Caring for the Battery 162 Protecting Your Battery 162 Chargin...

Страница 11: ...TOC x Notes 171 Copyrights 172 Index 173 ...

Страница 12: ...n gives you all the information you need to set up your device and the service the first time Your Device at a Glance Set Up Your Device Complete the Setup Application Set Up Visual Voicemail Mobile ID Getting Help Your Device at a Glance ...

Страница 13: ...e battery Turn the battery cover lock counter clockwise to the unlocked position Insert your thumb or fingernail into the slit and then pull out the battery cover Insert the battery contacts end first and gently press into place Replace the cover making sure all the locking tabs of the cover are seated and there are no gaps ...

Страница 14: ...have enough charge for the device to turn on and find a signal run the setup application set up voicemail and make a call You should fully charge the battery as soon as possible 3 Press and hold the Power button to turn your device on If your device is activated it will turn on and search for service If your device is not yet activated see the Activation section of your Get Started Guide for more ...

Страница 15: ...nt sign in information and passwords When you re finished adding accounts touch Done adding accounts 5 Touch OK to view a video tutorial or touch Skip to finish setup and go to the home screen Note You do not need to sign up for a Google account to use your device However to download applications from Google Play or to use Gmail you must link your device to a Google account Set Up Visual Voicemail...

Страница 16: ... Mobile ID Once your device is activated you will be prompted to install the Mobile ID pack ID Packs are bundles of applications ringtones wallpapers settings and more ID Packs are installed using an application called Mobile ID You can install as many as five ID Packs at any one time in addition to the default My ID Pack You can easily switch from one ID Pack to another without losing any applica...

Страница 17: ... Touch Get New ID Packs to install a new ID Pack and follow steps 3 6 of Installing Additional ID Pack Note Certain features of Mobile ID are subject to change For the most up to date information about using Mobile ID please visit boostmobile com Getting Help Managing Your Account You can go to My Account on boostmobile com to view your account information recharge your account or to make account ...

Страница 18: ...ormation per call and the operator can automatically connect your call at no additional charge Press Home and touch and then touch Operator Services Operator Services provides assistance when placing collect calls or when placing calls billed to a local telephone calling card or third party Press Home and touch and then touch ...

Страница 19: ...o stay connected to the people and information that are important to you The topics in this section will introduce the basic functions and features of your phone Your Device s Layout Turn Your Device On and Off Turn Your Screen On and Off Touchscreen Navigation Your Home Screens Status Bar Enter Text Google Account ...

Страница 20: ... It also flashes for incoming calls or pending notifications Back Key returns you to the previous screen or closes the dialog box Home Key returns you to the Home screen Recent App Key allows you to show the Recent App screen Menu Key lets you open the menus of the current screen or application Microphone allows other callers to hear you clearly when you are speaking to them ...

Страница 21: ...orrect jack may damage the device Speaker lets you hear the different ringtones and sounds It also lets you hear the caller s voice in speakerphone mode microSD Card Slot internal allows you to insert a microSD card to support external memory Note Your device comes with the microSD card preinstalled under the device s battery Internal Antennas facilitate reception and transmission To maximize perf...

Страница 22: ...se Turn the Screen On and Unlock It Turn the Screen Off When Not in Use To turn your screen off follow the step below To quickly turn the screen off press the Power button Pressing the Power button again will turn on your device screen and show the lock screen To save battery power the device automatically turns off the screen after a certain period of time when you leave it idle You will still be...

Страница 23: ...pen the available options for an item for example a link in a Web page simply touch and hold the item Drag Touch and hold your finger before you start to move it Do not release your finger until you have reached the target position Slide or Flick To slide quickly move your finger vertically or horizontally across the screen To flick move your finger in lighter quicker strokes than sliding This fin...

Страница 24: ... can customize your home screen by adding shortcuts widgets and more Your home screen extends beyond the initial screen Swipe the screen left or right to display additional screens Customize the Home Screens 1 Status Bar Displays the time notification and device status icons Slide down to display the Notifications panel 2 Shortcut Allows users to quickly launch applications 3 Application Launcher ...

Страница 25: ...blue frame means each of five home screens 5 Release your finger Move or Remove Items on the Home Screens Touch and hold the item you want to move or remove from the screen To move the item drag it to a new area and release it To remove the item touch and hold the item until you see X Remove at the top of the home screen and then drag the item until it turns red and then release your finger Change...

Страница 26: ...se folders You can combine several app icons in a folder Drop one app icon over another on a Home screen and the two icons will be combined 1 Drag one application icon over another icon 2 Release your finger You can see two icons piled within a folder a black circle 3 Tap a circle You can see application icons within the folder 4 Touch Unnamed Folder The keyboard opens and you can name this folder...

Страница 27: ...Airplane mode Alarm set Battery charging Battery full charge Battery discharged Notification Icons Icon Description Missed call New email New Gmail New SMS message New MMS message Event Music application is running background USB connection Alarm When animating GPS is active Downloading ...

Страница 28: ... touchscreen keyboard simply touch a text field where you want to enter text There are two ways of entering text on your device Swype and Android keyboard Note Swype is selected as a default keyboard To switch the touchscreen keyboard 1 Press Home Menu and touch System settings Language input 2 Touch Default under KEYBOARD INPUT METHODS 3 Choose Swype or Android keyboard Entering Text Using Swype ...

Страница 29: ...Device Basics 18 Swype Keyboard Overview Note Key appearance may vary depending on the selected application ...

Страница 30: ...ouch to delete a character Touch and hold to delete multiple characters Smiley Touch to insert a smiley Touch and hold to view and select other smileys Space Touch to insert a space Enter Touch to confirm your entry Shift Touch to toggle between the uppercase lowercase and caps lock text input ABC Mode In ABC mode you can enter letters from the onscreen keyboard by sliding your finger While in thi...

Страница 31: ...want to enter Touch and hold to enter the number or symbol located at the upper right corner of the key for example or Confirm the number or symbol you want to enter is displayed and release your finger Touch and long hold to bring up a list of all the characters available on that key Touch the character you want to enter from the list Tip Touch to show the keyboard with keys located at the upper ...

Страница 32: ...KEYBOARD INPUT METHODS and touch Tip You can open the Swype settings from the Swype keyboard Touch and hold on the keyboard 3 Choose from the following options Select Input Method Touch to select Swype or Android keyboard How to Swype Touch to learn Swype in quick steps Personal dictionary Touch to make your personal dictionary for Swype Preferences Touch to show the following settings menu for Sw...

Страница 33: ...delete all the words you have added to Swype s dictionary Version Displays the current Swype version Language Options Touch to select the language to use on Swype Entering Text Using the Android Keyboard When entering text you can choose to use the Android keyboard To select the Android keyboard 1 Press Home Menu and touch System settings Language input 2 Touch Default under KEYBOARD INPUT METHODS...

Страница 34: ...t text entry field Alternate Touch to toggle between the keyboardmore symbols Touch again to return to Number Symbol keyboard Go Touch to go to a Web address Space Touch to insert a space Touch and hold to select the input method ABC Mode In ABC mode you can enter letters from the onscreen keyboard While in this mode the text mode key displays 1 Select the ABC mode by touching You can switch the c...

Страница 35: ...uching 2 Touch the appropriate numeric key To enter symbols 1 Select the Number Symbol mode by touching 2 Touch the appropriate symbol key or Touch to select from additional symbol characters Tip Some keys have alternate characters Touch and hold a key to bring up a list of all the characters available on that key Touch the character you want to enter from the list Entering Text by Speaking Voice ...

Страница 36: ...d to edit it Touch to delete it Android Keyboard Settings 1 Press Home Menu and touch System settings Language input 2 Scroll to Android keyboard under KEYBOARD INPUT METHODS and touch 3 Choose from the following options Input languages Touch to select the input language The dictionary for the selected language will be enabled Auto capitalization Check to automatically set the first letter of a se...

Страница 37: ...h as Messaging use the copy and paste functions to copy and paste text from one application to another To copy and paste the text 1 Open the application or received message that you want to copy text from 2 Touch and hold the text body Selection tabs appear and currently selected words or characters are highlighted Drag tabs to expand or reduce the range of selected text Tip Touch or SELECT ALL to...

Страница 38: ... into 4 Touch and hold the text box where you want to paste the URL and touch PASTE Google Account You will need a Google account to access several device features such as Gmail Google Maps Google Talk and Google Play applications Before you can access Google applications you must enter your account information These applications sync between your device and your online Google account Create a Goo...

Страница 39: ...ecover your password if you ever lose it and then touch Next Note When setting up a new Google account either on your device or online you will be prompted to add a secondary email address Enter a second Gmail address or any other email address from which you currently send and receive email This address is used to authenticate your account should you ever encounter problems or forget your passwor...

Страница 40: ...email address or user address password domain name or other information For Corporate accounts contact your server administrator to determine what information you will need General Sync Settings Let applications synchronize data in the background whether or not you are actively working in them As default your Google accounts are automatically synced 1 Press Home Menu and touch System settings Acco...

Страница 41: ...nvenient ways to place calls from your device Call Using the Phone Dialpad Call From Recent Calls Call From People Call a Number in a Text Message Call Emergency Numbers Call Numbers with Pauses Call Using Plus Code Dialing Call Using the Internet Calling Call Using the Phone Dialpad The most traditional way to place a call is by using the phone s dialpad 1 Press Home and touch to display the phon...

Страница 42: ...r missed numbers 1 Press Home and touch to display the phone screen 2 Touch to display the Call log list 3 Touch the phone icon next to a number or a People entry to place a call 4 For additional options touch the name or number Call From People You can place phone calls directly from entries in your People list 1 Press Home and touch to display the phone screen ...

Страница 43: ... place calls to 911 even if the device s screen is locked or your account is restricted 1 Unlock the screen if necessary For more information see Turn Your Screen On and Off 2 Touch on the Home screen 3 Touch To call the 911 emergency number when the device s screen is locked with a pattern PIN or password 1 Touch Emergency call on the screen 2 Touch Enhanced 911 E911 Information This device featu...

Страница 44: ...nd touch Add 2 sec pause or Add wait 3 Enter additional numbers 4 Touch to dial the number Call Using Plus Code Dialing When placing international calls Plus Code Dialing automatically enters the international access code for your location for example 011 for international calls made from the U S 1 Press Home and touch to display the phone screen 2 Touch and hold until you see a on the display scr...

Страница 45: ...ling under INTERNET CALL SETTINGS 4 Select an option from the following For all calls when data network is available to use Internet calling for all calls when Wi Fi network is available Only for Internet calls to use Internet calling only for calls to Internet calling addresses Ask for each call to ask each time you make a call Receive Phone Calls The following information lets you know how to an...

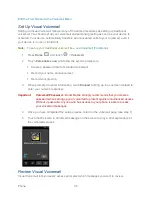
Страница 46: ... Text icon to ignore the call and send a message to the caller Visual Voicemail Visual Voicemail gives you a quick and easy way to access your voicemail Now you can find exactly the message you are looking for without having to listen to every voicemail message first This new feature periodically goes out to your voicemail and gathers the caller information from all of the current voicemails It th...

Страница 47: ...assword part of standard voicemail Record your name announcement Record your greeting 3 When prompted to enter information touch Dialpad to bring up the onscreen dialpad to enter your numeric responses Important Voicemail Password Boost Mobile strongly recommends that you create a password when setting up your voicemail to protect against unauthorized access Without a password anyone who has acces...

Страница 48: ...speakerphone on or off during playback If the speakerphone feature was enabled within the Voicemail Settings menu the speakerphone will always be automatically enabled during voicemail playback Delete to delete the current voicemail message Touch OK to confirm the deletion Listen to Multiple Voicemail Messages When you are done listening to a voicemail message you can easily access other voicemail...

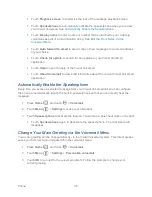
Страница 49: ...text message or your voice Forward to forward the voicemail to another recipient Add to contacts to add the sender s phone number to your People list Configure Visual Voicemail Settings The Visual Voicemail settings menu lets you access settings for notifications pictures greetings and more 1 Press Home and touch Voicemail 2 Touch Menu Settings From this menu you can Touch Voicemail to Text to ver...

Страница 50: ...ent Visual Voicemail application Automatically Enable the Speakerphone Every time you access a selected message from your Visual Voicemail list you can configure the phone to automatically launch the built in speakerphone so that you can clearly hear the message 1 Press Home and touch Voicemail 2 Touch Menu Settings to make your alterations 3 Touch Speakerphone to activate the feature You will see...

Страница 51: ...il You should set up your Voicemail and personal greeting as soon as your phone is activated Always use a password to protect against unauthorized access Your phone automatically transfers all unanswered calls to your voicemail even if your phone is in use or turned off 1 Press Home and touch 2 Touch and hold to dial your voicemail number 3 Follow the system prompts to Create your password Record ...

Страница 52: ...ur Messages 1 Press Home and touch 2 Touch and hold If prompted enter your voicemail password 3 Follow the voice prompts to listen to and manage your voicemail messages Use Visual Voicemail to Access Your Messages 1 Press Home and touch Voicemail 2 Touch an entry to listen to the message Note Depending on your plan you may be charged when you are accessing your voicemail from your wireless device ...

Страница 53: ...e s screen informs you that another call is coming in and displays the caller s phone number if it is available To respond to an incoming call while you re on a call Flick To switch back to the first caller Touch Switch calls Note For those calls where you don t want to be interrupted you can temporarily disable Call Waiting by pressing before placing your call Call Waiting is automatically reacti...

Страница 54: ...continue to make calls from your device when you have activated Call Forwarding Note You are charged a higher rate for calls you have forwarded To activate Call Forwarding 1 Press Home and touch 2 Touch 3 Enter the area code and phone number to which you want your calls forwarded 4 Touch You will hear a tone to confirm the activation of Call Forwarding To deactivate Call Forwarding 1 Press Home an...

Страница 55: ...lugs into your device s headset jack If this cable was not provided with your TTY device contact your TTY device manufacturer to purchase the connector cable To turn TTY mode on or off 1 Press Home and touch to display the phone screen 2 Press Menu and touch Settings 3 Touch TTY mode 4 Touch TTY Full TTY HCO or TTY VCO to turn TTY mode on or Touch TTY Off to turn TTY mode off Note When enabled TTY...

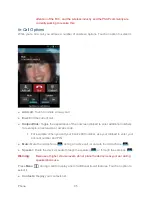
Страница 56: ...nter additional numbers for example an extension or access code For example When you call your bank s 800 number use your dialpad to enter your account number and PIN Mute Mute the microphone during an active call or unmute the microphone Speaker Route the device s audio through the speaker or through the earpiece Warning Because of higher volume levels do not place the device near your ear during...

Страница 57: ... list You can determine if an entry was an incoming outgoing or a missed call from the icons shown below Incoming Call Outgoing Call Missed Call Call Log Options To make a call from Call log see Call From Recent Calls For additional options 1 Press Home and touch to display the phone screen 2 Touch to display the Call log list 3 Touch the name to display the options list Touch to send a text messa...

Страница 58: ...Phone 47 Clear Call Logs Use the menu option to clear the Call log list 1 Press Home and touch to display the phone screen 2 Touch to display the Call log list 3 Press Menu and touch Clear call log OK ...

Страница 59: ... hotspots for high speed data access using available computer networks For details on your device s Wi Fi features and settings see Wi Fi Bluetooth Your device s Bluetooth capabilities let you use wireless headsets send and receive pictures and files and more For details on your device s Bluetooth settings see Bluetooth Data Usage Your device provides a new data usage chart feature which shows cur...

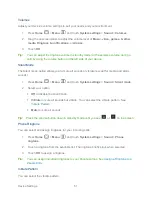
Страница 60: ...ettings Data usage 2 Touch to check Set mobile data limit Read the message and touch OK 3 Drag the right side of the red line at the top of the chart to set the limit you want When your data usage reaches the limit mobile data will be turned off automatically 4 Drag the right side of the orange line under the red line to set the level where you receive the warning When your data usage reaches the ...

Страница 61: ... under WIRELESS NETWORKS 2 Touch the Airplane mode check box While in Airplane Mode the status bar will display Mobile Networks Mobile networks menu lets you enjoy the data connection Enable Data Enable data access to enjoy the data connection 1 Press Home Menu and touch System settings More under WIRELESS NETWORKS 2 Touch Mobile networks and confirm Data enabled is checked DEVICE Settings The DEV...

Страница 62: ...and alarm sounds 1 Press Home Menu and touch System settings Sound Silent mode 2 Select your option Off to disable the silent mode Vibrate to mute all sounds but vibrate You can select the vibrate pattern See Vibrate Pattern Mute to mute all sounds Tip Press the volume button down in standby mode until you see or on the screen Phone Ringtone You can select and assign ringtones for your incoming ca...

Страница 63: ...brate simultaneously Persistent Alerts This menu lets you set alerts such as beep vibration or LED blinking for notification 1 Press Home Menu and touch System settings Sound Persistent alerts 2 Check the following Audible tone to beep when notification is on the notification bar Vibrate to vibrate when notification is on the notification bar Blink LED to blink the LED indicator when notification ...

Страница 64: ...ess to set the brightness automatically 3 Touch OK Wallpaper Select wallpaper using this menu 1 Press Home Menu and touch System settings Display Wallpaper 2 Select the wallpaper you want to display on the screen Auto rotate Screen Your device is capable of automatically changing the orientation of some onscreen content With this feature you can view the screen in either portrait or landscape orie...

Страница 65: ...ers your device s proximity sensor to work Note If you disable the proximity sensor it may cause accidental key presses during a call 1 Press Home Menu and touch System settings Display Screen proximity safety 2 Drag the slider left or right to adjust the distance from your face and touch OK Storage The Storage settings menu lets you see the available space of the internal storage and the SD card ...

Страница 66: ...ion set as default check Remember this choice Done on the selection screen Apps This menu lets you view applications on your device 1 Press Home Menu and touch System settings Apps 2 Touch one of the following tabs to select the applications to be displayed DOWNLOADED Select to display downloaded application You can also see the storage status on your device at the bottom of the screen ON SD CARD ...

Страница 67: ...System settings Location services 2 Touch Google s location service A check mark indicates this feature is enabled 3 Read the disclaimer and touch Agree GPS Satellites This service uses available GPS to pinpoint your location within certain applications such as Google Maps 1 Press Home Menu and touch System settings Location services 2 Touch GPS satellites A check mark indicates this feature is en...

Страница 68: ...ssword after five attempts you will have to wait for 30 seconds before you can try again Use a Pattern 1 Press Home Menu and touch System settings Security Screen lock 2 Touch Pattern 3 Read the information and study the example pattern on the screen and touch Next 4 Draw the screen unlock pattern by connecting at least four dots in a vertical horizontal or diagonal direction Lift your finger from...

Страница 69: ...n instantly lock to if you want the screen lock feature activate by pressing the power button Note Touch Owner info to enter your information to be displayed on the lock screen Change or Disable the Screen Lock 1 Press Home Menu and touch System settings Security Screen lock 2 Draw your unlock screen pattern or enter your PIN or password and touch Next 3 Touch None to disable the screen lock or ch...

Страница 70: ...SD card otherwise you will lose some or all of your data Warning If you interrupt the encryption process you will lose some or all of your data Passwords You can hide your password or PIN number as you type it 1 Press Home Menu and touch System settings Security 2 Clear the Make passwords visible check box Device Administration You can disable the authority to be a device administrator of certain ...

Страница 71: ... Press Home Menu and touch System settings Security Clear credentials 2 Touch OK Language Input Your device s Language input settings let you select a language for the devices screens and menus as well as manage a personal user dictionary The Keyboard settings let you select a preferred input method control keyboard settings and more For details see Enter Text This menu also provides the settings ...

Страница 72: ...email and social networking accounts System and application data and settings Downloaded applications To reset your device 1 Press Home Menu and touch System settings Backup reset Factory data reset Read the Factory data reset information 2 Touch Reset phone 3 Touch Erase everything Your device will power down and reset itself which may take up to 10 minutes Once the device has reset it will run t...

Страница 73: ...rmat to toggle between 12 hour or 24 hour format 8 Touch Select date format to select how the date information is displayed on your device Accessibility You can download and manage accessibility related applications or configure the accessibility setting of your device Note You can also enable your TTY teletypewriter also known as a TDD or Text Telephone settings See TTY mode within Other Call Set...

Страница 74: ...swords to let your device speak the password you enter Explore by touch to let your device speak or write the descriptions of what s under your finger when TalkBack is turned on Touch hold delay to set the delay time when the screen recognizes the touch and hold operation Install web scripts to install web scripts that make the web content more accessible Developer Options These menus are specific...

Страница 75: ...pdate Update profile 2 Follow the onscreen instructions Note If your data services or account syncing ever seems to go out unexpectedly use this feature to reconnect with the network Update Your Device Firmware This option allows you to update the Android Operating System OS and the device software on your device via an over the air connection Before Updating Your Firmware Updating your device fir...

Страница 76: ...oogle Application Your Google application purchases are reloaded remotely and can be re installed after the update is applied 1 Log into your Google account via the device 2 Press Home and touch Play Store 3 Press Menu and touch My Apps 4 Scroll through the list of previously downloaded Google applications and choose the one you wish to reinstall 5 Follow the onscreen instructions Update Kyocera S...

Страница 77: ... People Entry Save a Phone Number Edit a People Entry Select People List Synchronize People Entries Display Options Share a People Entry Get Started with People Before using People it s best to learn a few basics Access People Follow the steps below to access People Press Home and touch People There are four tabs on People Groups to display the Group of entries All to display all entries Favorite ...

Страница 78: ... the People list options Contacts to display Selects the People list to be displayed See Select People List Import export Imports exports entries from to the microSD card Accounts Opens the Accounts sync settings screen See Accounts Sync Settings Opens the Display options page You can select how your entries are displayed See Display Options Add a New People Entry Enter details such as name phone ...

Страница 79: ... See Assign a Stored Picture to a People Entry or Assign a New Picture to a People Entry Name Add organization PHONE EMAIL ADDRESS EVENTS GROUPS Add another field Touch to include additional information such as IM address Notes Nickname Website Internet call etc Note To select a type label for a phone number email address or postal address such as Mobile Home Work etc touch the type to the right o...

Страница 80: ...ew entry touch CREATE NEW CONTACT 4 For an existing entry select a number type for the new number and then touch OK 5 For a new entry enter the name and any additional information and then touch DONE See Add a New People Entry Edit a People Entry Once you ve added an entry you can add or edit any of the information in the entry assign a caller ID picture customize it with a unique ringtone and mor...

Страница 81: ...o a People Entry The Edit menu lets you assign a picture stored in your device s memory or SD card to an entry 1 Press Home and touch People 2 Touch an entry to display it and then press Menu and touch Edit 3 Touch the entry icon at the right of the name 4 Touch Choose photo from Gallery and select a location 5 Touch a picture to select it You may be prompted to size the picture for use with entri...

Страница 82: ...y 1 Press Home and touch People 2 Touch a contact to display it and then press Menu Set ringtone 3 Touch an available ringtone When you touch a ringtone you will hear a sample 4 Touch OK to assign the ringtone Assign a Vibration to a People Entry 1 Press Home and touch People 2 Touch an entry to display it and then press Menu Set vibrate 3 Touch an available vibration When you touch a vibration yo...

Страница 83: ... touch People 2 Press Menu Contacts to display 3 Select the account People entries saved in the account will be displayed If you select All contacts all the entries you save will be displayed Customize People List You can customize the People list of the account 1 Press Home and touch People 2 Press Menu Contacts to display 3 Touch Customize and touch the account 4 Check the types of entries to be...

Страница 84: ... list has not been updated repeat steps 2 and 3 Your People then reflects any updated entry information This update process works both ways For example any changes on the device are updated to your Gmail contacts list after sync Display Options Select how the People list to be displayed 1 Press Home and touch People 2 Press Menu Settings 3 Set the following options Sort list by to choose how your ...

Страница 85: ... email account Address the message add a subject and a message and then touch See Compose and Send Email for details on sending email Gmail to send the information as a Gmail attachment Address the message add a subject and a message and then touch See Send a Gmail Message for details ...

Страница 86: ...nd accounts Gmail Email Text Messaging and MMS Social Networking Accounts Google Talk Gmail Gmail is Google s web based email service You need to setup your Google Account in advance Access Gmail Send a Gmail Message Read and Reply to Gmail Messages Access Gmail Your device allows you to access read and reply to all your Gmail messages 1 Press Home and touch Gmail ...

Страница 87: ...h Inbox at the top of the screen and select the account you want to view its inbox Refresh the Inbox Touch Send a Gmail Message 1 Press Home and touch Gmail 2 Touch 3 Enter the message recipient s email address in the To field If you are sending the email message to several recipients separate the email addresses with a comma As you enter email addresses any matching addresses from your contacts l...

Страница 88: ... can also access new messages through the status bar When a new Gmail message arrives you ll see the icon in the status bar Slide the bar down to display notifications Touch a message to display it 3 To reply to or forward a message Touch to reply to the message Touch Reply all to reply to all recipients Touch Forward to forward the message 4 After composing your message touch Email Use the Email ...

Страница 89: ...powerful Exchange features 1 Press Home Menu and touch System settings Accounts sync 2 Touch ADD ACCOUNT and then touch Corporate 3 Enter your Email address and Password information and then touch Next Consult your network administrator for further details Email address your corporate email address Password typically your network access password case sensitive 4 Enter a Domain Username Password an...

Страница 90: ...other Email Account While you are viewing one email account you can access the tool to create another email account 1 Press Home and touch Email 2 Press Menu and touch Settings 3 Touch ADD ACCOUNT 4 Enter the Email address and Password for the email account and then touch Next 5 Confirm the Email settings and touch Next 6 Touch Next The inbox of the account is displayed Compose and Send Email Comp...

Страница 91: ... To open a draft email in the email account Inbox touch Inbox top of the Email screen and then touch Drafts View and Reply to Email Reading and replying to email on your device is as simple as it is on your computer 1 Press Home and touch Email 2 On the email account Inbox touch the message you want to view 3 Touch or Reply all to reply to the message Manage Your Email Inbox View Your Email Inbox ...

Страница 92: ...tings You can edit the general settings of your email 1 Press Home and touch Email 2 Press Menu Settings General Auto advance Choose which screen to show after you delete a message Message text size Select the message text size Reply all Check if you want to display Reply all option as default Ask to show pictures Touch if you want to be asked before pictures in messages to be displayed Email Acco...

Страница 93: ...acts corporate account only Sync calendar Check to synchronize your calendar corporate account only Download attachments Check if you want to automatically download attachments via Wi Fi Email notifications Activates the email notification icon to appear within the Notifications area of the status bar when a new mail is received Choose ringtone Plays a selected ringtone once a new email message is...

Страница 94: ...ws See your service plan for applicable charges for messaging Compose Text Messages Send a Multimedia Message MMS Save and Resume a Draft Message New Messages Notification Managing Message Conversations Text and MMS Options Compose Text Messages Quickly compose and send text messages on your device 1 Press Home and touch Messaging 2 On the Messaging screen touch The compose screen opens 3 Fill in ...

Страница 95: ...reen touch The compose screen opens 3 Fill in one or more recipients Enter phone numbers or email addresses in the To field If you re sending the message to several recipients separate the phone numbers or email addresses with commas As you enter information any matching phone numbers or addresses from your contacts list are displayed Touch a match to enter that number or address 4 Touch Type mess...

Страница 96: ...he following Touch Add slide to create a new slide This is a placeholder for new images to be added similar to a playlist Touch the created slide example Slide 1 touch Add picture and then select the picture you want to add to the slide Touch the text field below the image to enter a caption for the picture Touch Preview to preview the slide Replace picture to delete the currently selected picture...

Страница 97: ...o and received from a contact or a number are grouped into conversations or message threads in the Messaging screen Threaded text or multimedia messages let you see exchanged messages similar to a chat program with a contact on the screen To read a text message Do one of the following On the Messaging screen touch the text message or message thread to open and read it If you have a new message not...

Страница 98: ...e Messaging screen touch a text or multimedia message thread to open it 3 Touch the text box at the bottom of the screen enter your reply message attach files and then touch To delete a message thread 1 Press Home and touch Messaging 2 On the Messaging screen touch the message thread that you want to delete 3 Press Menu and then touch Delete thread 4 When prompted to confirm touch Delete To delete...

Страница 99: ...ut not selectable and cannot be excluded Imminent Threat Extreme Select this option if you want to receive emergency alerts in an extreme emergency situation an extraordinary threat to life or property Imminent Threat Severe Select this option if you want to receive emergency alerts in a severe emergency situation a significant threat to life or property Amber Select this option if you want to rec...

Страница 100: ...nt including movie clips TV clips and music videos as well as video content such as video blogging informational shorts and other original videos Opening YouTube Press Home and touch YouTube The library screen appears Note If Terms of Service appears touch Accept if you agree to the Terms of Service Watching YouTube Videos 1 On the YouTube screen touch a video 2 Touch the screen to show the progre...

Страница 101: ... on your device Signing In and Chatting Managing Your Friends Mobile Indicators Signing Out Google Talk Settings Signing In and Chatting You need to sign in the Google Talk before starting chatting Press Home and touch Talk to open Google Talk Adding New Friends You can add only people who have a Google account 1 On the friends list screen touch 2 Enter the Google Talk ID or the Gmail address of t...

Страница 102: ...f the list 2 Touch the status and select the status you want from the menu 3 Touch the text box below the online status and then type your status message 4 Press Back Starting a Chat 1 Touch a friend on the friends list 2 Touch the text box and then type your message 3 Touch Switching Between Active Chats You can conduct multiple chats at the same time and switch between active chats On the friend...

Страница 103: ... screen touch the name of the friend you want to block 2 Press Menu Friend info Block That friend is removed from your friends list and is added to the blocked friends list Unblocking Friends 1 On the friends list screen press Menu Settings and touch your account 2 Touch Blocked friends 3 On the blocked friends list touch the name of the friend you want to unblock 4 Touch OK to confirm Mobile Indi...

Страница 104: ...Select to show your status as away when the screen is turned off Invitation notifications Select to show a notification in the status bar when someone invites you to become a friend IM notifications Select to show a new instant message icon on the status bar when a new instant message is received Notification ringtone Select if you want the device to ring when a new instant message is received On ...

Страница 105: ...rives Vibrate Select if you want the device to vibrate when a new video chat notification arrives Blocked friends Select to show your blocked friends list Clear search history Select to delete the Google Talk search history Manage account Select to open the Accounts sync settings menu Terms privacy Select to show the Google legal information ...

Страница 106: ...n in to your Google account See Web and Data and Sign In to Your Google Account for details Important Boost Mobile s policies often do not apply to third party applications Third party applications may access your personal information or require Boost Mobile to disclose your customer information to the third party application provider To find out how a third party application will collect access u...

Страница 107: ... your device Your Google Play application will update automatically when available 4 Touch an app to read a description about the app and user reviews 5 Touch Download for free applications or the price icon for paid applications Note You need a Google Wallet account to purchase items on Google Play See Create a Google Wallet Account to set up a Google Wallet account if you do not have one 6 The s...

Страница 108: ...ext time For this reason you should secure your device to prevent others from using it without your permission For more information see Security Request a Refund for a Paid Application If you are not satisfied with an application you must ask for a refund within 15 minutes of purchase unless otherwise stated by the app developer Your credit card is not charged and the application is uninstalled fr...

Страница 109: ...se the reason for removing the application and then touch OK or 1 Press Home Menu and touch System settings Apps 2 Touch the DOWNLOADED tab and touch the application you want to uninstall and then touch Uninstall 3 When prompted touch OK to remove the application on your device 4 Touch OK Get Help with Google Play If you ever need help or have questions about Google Play press Menu and then touch ...

Страница 110: ...ote Don t forget to set your location sources On the Google Maps screen touch A blinking blue arrow indicates your current location on the map This feature is available when Google s location service or GPS satellites is enabled See Location Searching Maps 1 On the Google Maps screen touch 2 Type the place that you want to search You can enter an address a city or type of establishment Tip Touch t...

Страница 111: ... share yours with them You may sign in with your Google account to use this feature My Maps Adds this layer to display the Google My Maps on the Google Maps of your device Bicycling Adds this layer to provide the road map suitable for bicycling Wikipedia Adds this layer to provide a list of Wikipedia articles that are geo referenced An extract of the Wikipedia article can be accessed by clicking o...

Страница 112: ... and touch TeleNav GPS Navigator 2 Select an option and follow the onscreen instructions to get directions or view maps Drive To lets you enter an address by speaking it or by using the keypad or select from categories such as My Favorites Recent Places Address Contacts Places or Airport to search for turn by turn directions Places provides a categorized list of locations such as Gas Stations Groc...

Страница 113: ...ntry Google Latitude Google Latitude user location service lets you and your friends share locations and status messages with each other It also lets you send instant messages and emails make phone calls and get directions to your friends locations Your location is not shared automatically You must join Latitude and then invite your friends to view your location or accept their invitations Opening...

Страница 114: ...they receive an email request and a notification on Latitude If they have not yet joined Latitude they receive an email request that tells them to sign in to Latitude with their Google account Accepting an Invitation When you get a sharing request from a friend you see new sharing requests message Touch it and you can Accept and share back You can see your friends locations and they can see yours ...

Страница 115: ...ile screen you can communicate with your friend and set privacy options Map Find a friend s location on the map Directions Get directions to the friend s location Ping for check in Send this friend a notification asking them to check in Manage sharing Select from the following Share best available location Share your precise location information Share only city level location Share only the city y...

Страница 116: ...laces View and modify your automatic check ins and muted places Music Player Play Music plays digital audio files saved on the storage card You need to copy music files to your storage card first to use the Music application See Use the Device s microSD Card as a USB Drive for more details on copying files Note If you have signed up for Google Music the first time you open the Music application yo...

Страница 117: ...of your songs in alphabetical order PLAYLISTS to select a customized playlist you ve created GENRES to show your music library sorted by genre 2 Touch a song in your library to play it The Now playing screen opens or Touch the triangular menu button next to an item and touch Play 3 Touch to show options The following options are available for the control ...

Страница 118: ...off Displaying Additional Options While using the Music application you can touch the triangular menu button next to any song album artist or playlist to view additional options Play to play the song Add to playlist to add the song to the playlist More by artist to show another album of the selected artist Shop for artist to open the Play Store and find items related to the artist Search to conduc...

Страница 119: ...dd to the playlist 2 Touch next to the song you want to add and touch Add to playlist 3 On the Add to playlist window touch New playlist 4 Type the name of your new playlist and touch OK After you save the playlist it s added to the Playlists library Adding Song to Existing Playlists 1 Open the Music library and browse for the song that you want to add to the playlist 2 Touch next to the song you ...

Страница 120: ...s Music folder 3 Select and copy the music files to a folder on your computer s hard drive BoostZone Important Privacy Message Boost Mobile s policies often do not apply to third party applications Third party applications may access your personal information or require Boost Mobile to disclose your customer information to the third party application provider To find out how a third party applicat...

Страница 121: ...he Wi Fi signal depends on a number of factors including infrastructure and other objects through which the signal passes Turn Wi Fi On and Connect to a Wireless Network Check the Wireless Network Status Connect to a Different Wi Fi Network Turn Wi Fi On and Connect to a Wireless Network 1 Press Home Menu and touch System settings 2 If is displayed at the right of Wi Fi Touch it to turn Wi Fi on i...

Страница 122: ...red for your device to connect to a Wi Fi network It may be necessary to provide a user name and password for certain closed wireless networks Check the Wireless Network Status 1 Press Home Menu and touch System settings Wi Fi 2 Touch the wireless network that the device is currently connected to You will see a message box showing the Wi Fi network name status speed signal strength and other detai...

Страница 123: ...llowed by myboostmobile sprintpcs com For example the third John Smith to sign up for Boost Mobile data services might have jsmith003 myboostmobile sprintpcs com as his user name When you use data services your user name is submitted to identify you to the Network Your user name is automatically programmed into your device You don t have to enter it Update Your User Name If you choose to change yo...

Страница 124: ...cted to the network but is not currently transferring data for example when you are viewing a Web page that is completely open In any state you can receive incoming calls If you do not see an indicator your phone does not have a current data connection To launch a connection see Launch a Web Connection Browser Your device s Web browser gives you full access to both mobile and traditional websites ...

Страница 125: ...ingle motion touch and drag across or up and down a page Selecting To select onscreen items or links Drag across a page and then touch or touch an onscreen link to select the link Links which are displayed as underlined text allow you to jump to Web pages select special functions or even place phone calls Go Back To go back one page Press Back on your device Repeat this process to keep going back ...

Страница 126: ...the browser menu Options available within the browser menu include Stop Stops loading the current Web page Refresh Reloads the current Web page Forward Returns you to a previously viewed page Bookmarks Allows you to access and manage your bookmarks Save to bookmarks Adds the currently viewed page as a bookmark Share page Allows you to send a URL via Gmail SMS Email or Bluetooth Find on page Search...

Страница 127: ... selected text will appear highlighted Tip Touch SELECT ALL to select all the text on the Web page 3 Touch and select the following options Copy to copy the selected text Share to share the selected text via Bluetooth Gmail or messaging etc Find to find the selected text on the Web page Web Search to search the selected text on Internet Adjust Browser Settings You can change the settings for your ...

Страница 128: ... Allows sites that require cookies to save and read cookies from your device Clear all cookie data Clears all current browser cookie files Touch OK to complete the process Remember form data Allows the device to store data from any previously filled out forms Clear the check mark to disable this function Clear form data Deletes any stored data from previously filled out forms Touch OK to complete ...

Страница 129: ...e and touch Browser 2 Press Menu and touch Settings Advanced 3 Select from one of the following browser advanced settings Set search engine Sets the search engine See Set Search Engine Open in background New pages are launched in a separate page and displayed behind the current one Clear the check mark to disable this function Enable JavaScript Enables javascript for the current Web page Without t...

Страница 130: ...owser to preload high confidence search results in the background Load images Displays images on Web pages Adjust Browser Labs Settings You can adjust your browser s labs settings 1 Press Home and touch Browser 2 Press Menu and touch Settings Labs 3 Select from one of the following browser labs settings Quick controls Opens the Quick controls and hide application and URL bars Fullscreen Enables th...

Страница 131: ...r Web experience by setting your browser s home page 1 Press Home and touch Browser 2 Press Menu and touch Settings General Set homepage 3 Select the page you want to set as a home page Touch Current page to select the current page as the home page Read Web Page Offline You can save web pages for offline reading 1 Press Home and touch Browser 2 Press Menu and touch Save for offline reading The Web...

Страница 132: ...of websites you saved for offline reading Touch an entry to launch the selected page Create Bookmarks 1 Press Home and touch Browser 2 Open the Web page you want to bookmark 3 Press Menu and touch Save to bookmarks 4 Enter a descriptive name for the new bookmark 5 Select an account you want to add the bookmark 6 Select where to save the bookmark and touch OK Create Bookmarks From History Tab 1 Pre...

Страница 133: ...s installed before you use the camera or camcorder All pictures or videos that you capture using your device are stored on the microSD card For more information on how to install a microSD card on your device see Install a microSD Card Open the Camera Camera Viewfinder Screen Review Screen Take a Picture Close the Camera Open the Camera Follow the instructions below to open the camera in photo mod...

Страница 134: ...u can also change the zoom settings by pressing the volume button up or down 4 Settings button Reveals the additional camera mode buttons 8 12 5 Thumbnail Thumbnail of the latest picture Touch to view and manage 6 Shutter button Touch to take a picture 7 Switch button Touch to select camera or camcorder 8 Close button Touch to close the camera mode buttons 9 12 and return to the zoom slider 9 Flas...

Страница 135: ...mbnail and the review screen is displayed You can instantly share your photos or videos See Share Photos and Videos Touch the Gallery icon to edit your photos or vides See View Pictures and Videos Using Gallery 1 Gallery Opens the Gallery application to edit your photos or videos 2 Share Displays the available applications to share your photos or videos Take a Picture You can take high resolution ...

Страница 136: ...reen for details Close the Camera On the camera screen press Home or Back Record Videos Record high quality videos up to 480p resolution using your device s video camera Video Viewfinder Screen Record a Video Video Viewfinder Screen You ll find the following controls on the video viewfinder screen ...

Страница 137: ...ately by adjusting to your current lighting 9 Video quality button Touch to select a video quality 10 Video settings button Touch this button to change the video settings For more information see Camera Video Settings Record a Video 1 Press Home and touch Camera 2 Touch and then touch to activate camcorder mode 3 Select MMS or Long video MMS Select this option to attach the captured video to your ...

Страница 138: ...Frame average Center weighted or Spot metering Restore defaults Restores all of the camera video settings to their default values View Pictures and Videos Using Gallery Using the Gallery application you can view photos and watch videos that you ve taken with your device s camera downloaded or copied onto your microSD card For photos that are on your microSD card you can do editing You can also eas...

Страница 139: ...ny photos and videos these will be placed in the download album When viewing pictures in Gallery scroll left or right the screen to view more albums Simply touch an album to view the photos or videos in that album Note Depending on the number of pictures stored on the microSD card it may take some time for Gallery to load all your photos on the screen View Photos and Videos After selecting an albu...

Страница 140: ... pictures Zoom In or Out on a Photo There are two ways you can zoom in or out of a photo Touch the screen twice quickly to zoom in then touch the screen twice quickly again to zoom out or Pinch the screen using your thumb and forefinger to zoom out or spread the screen to zoom in Watch a Video Use the onscreen controls to play pause or stop the video Touch to play the video ...

Страница 141: ...show of the pictures stored Edit Edits the picture See Edit a Photo Rotate left Rotate right Rotates the picture Crop Crops the picture See Crop a Photo Details Shows the details of the picture Set picture as Sets the picture as the contact photo or wallpaper Show on map Shows the location where you took the picture in Google Maps if Store location is set to ON See Camera Video Settings Edit a Pho...

Страница 142: ...t to add additional effect to undo the action to redo the action 5 When finished touch SAVE Rotate and Save a Photo 1 Press Home and touch Gallery 2 Touch an album and then touch a picture 3 Press Menu and touch Rotate left or Rotate right Crop a Photo 1 Press Home and touch Gallery 2 Touch an album and then touch a picture 3 Press Menu and touch Crop A crop box then appears on the photo ...

Страница 143: ...ture is saved on the storage card as a copy The original picture remains unedited Share Photos and Videos The Gallery application lets you send photos and videos using email or multimedia messages You can share photos on your social networks such as Picasa and share videos on YouTube You can also send them to another phone or your computer using Bluetooth Send Photos or Videos by Email Gmail Send ...

Страница 144: ...lthough you can send several photos or videos in a multimedia message it may be better to just send one at a time especially if the files are large in size 1 Press Home and touch Gallery 2 Touch the album that contains the photos or videos you want to share 3 Press the photo or video until you see a blue frame on it Touch multiple photos and videos to select them 4 Touch Messaging If you cannot fi...

Страница 145: ...o a Google account to upload pictures to the Picasa photo organizing service 1 Press Home and touch Gallery 2 Touch the album that contains the photos or videos you want to share 3 Press the photo or video until you see a blue frame on it Touch multiple photos and videos to select them 4 Touch Picasa 5 Select the online album where you want to upload the pictures or touch to create a new album 6 T...

Страница 146: ...Camera and Video 135 5 Enter the prompted information such as description and tags and select a privacy option 6 Touch Upload ...

Страница 147: ...n the Web or the corporate calendar Add an Event to the Calendar Invite Guests to Your Event Event Alerts View Events Erase Events Show or Hide Calendars Synchronize Calendars with Your Device Add an Event to the Calendar Add events to your calendar directly from the Calendar application 1 Press Home and touch Calendar 2 On any Calendar view press Menu and touch New event 3 If you have more than o...

Страница 148: ...Guests to Your Event 9 If the event occurs on a regular basis touch the REPETITION box and then choose how often the event occurs 10 Set the event reminder time and select how you are notified Note You can add another reminder time in a Google Calendar event Touch Add reminder to add another reminder 11 Select your status to be displayed on your calendar 12 Set the privacy status of this event 13 ...

Страница 149: ...een Event Reminders If you have set at least one reminder for an event the upcoming event icon will appear in the notifications area of the status bar to remind you of the upcoming event To view dismiss or postpone the reminder 1 Slide the status bar down to open the Notifications panel 2 Touch the upcoming event name to display the event Note If you have other pending event reminders these events...

Страница 150: ...the events indicate the type of calendar that includes the event To find out what each color represents press Menu and then touch Calendars to display Day View and Agenda View Day view displays a list of the events of one day Agenda view shows a list of all your events in chronological order When in Day view slide left or right across the screen to view earlier or later days Week View Week view di...

Страница 151: ...k view You can touch and hold on a time slot to create an event Touch an event to view its details Slide left or right across the screen to view earlier or later weeks Month View In Month view you ll see markers on days that have events ...

Страница 152: ...elect Only this event This and future events or All events and touch OK Show or Hide Calendars In any Calendar view press Menu touch Calendars to display and then touch a calendar to check to display or uncheck to hide it Synchronize Calendars with Your Device You can choose which Google Calendars to keep synchronized on your phone or which ones to stop synchronizing Synchronizing a Google Calenda...

Страница 153: ...dar if you chose to synchronize with the Exchange ActiveSync Server Clock Alarm The Clock application functions as a desk clock that shows the date and time You can also use it to turn your device into an alarm clock Opening Clock Setting an Alarm Changing Alarm Settings Opening Clock The instructions below show how to open the Clock application Press Home and touch Clock Setting an Alarm 1 Press ...

Страница 154: ...select a repeat status for the alarm 6 Touch Ringtone to select a ringtone that will play as an alarm 7 Touch Vibrate to add a vibration feature to the alarm 8 Touch Label to enter a name for the alarm 9 Touch Turn alarm on to set the alarm on 10 When you re finished touch OK Alarms that are set are checked in blue Touch the checkmark next to an alarm to turn it on or off To delete an Alarm 1 Pres...

Страница 155: ...larm sounds Volume button behavior Selects the behavior of the volume button when pressed while the alarm sounds Choose from None Silence Snooze or Dismiss Set default ringtone Select to set the ringtone for the alarm Calculator Your device comes with a built in calculator 1 Press Home and touch Calculator 2 Enter numbers by touching the onscreen keys 3 Touch DELETE to clear a number Touch and hol...

Страница 156: ... quiet environment so it can accurately recognize your commands Making a Voice Call with the Voice Dialer 1 Press Home and touch Voice Dialer 2 When prompted to speak say Call contact or Dial number 3 For example say Call John Smith on mobile to call John Smith s mobile phone Your device dials the number stored for the contact John Smith with the label Mobile Opening an Application with the Voice ...

Страница 157: ...he device s microphone If an error occurs touch Speak again 3 Touch a matching item from the onscreen list Voice Search Settings You can configure the settings of the voice search feature 1 Press Home Menu and touch System settings Language input 2 Touch Voice Search under SPEECH Language to set the language used when entering text by speaking SafeSearch to filter explicit text and images from the...

Страница 158: ...to select the Eco level 4 Touch the leaf of the following items to select Sleep to set the screen timeout to 15 seconds Display brightness to decrease the display brightness Wallpaper to select the Eco wallpaper Auto sync to disable automatic synchronization with applications Haptic feedback to turn off Haptic feedback feature Auto rotate screen to disable the Auto rotate screen feature 5 Touch Cl...

Страница 159: ...Home Menu and touch System settings 2 If is displayed at the right of Bluetooth touch it to turn Bluetooth on is displayed and the device will scan for available Bluetooth devices Note Turn off Bluetooth when not in use to conserve battery power or in places where using a wireless device is prohibited such as aboard an aircraft and in hospitals Touch and confirm is displayed The Bluetooth Menu You...

Страница 160: ...Home Menu and touch System settings Bluetooth 2 If the Bluetooth is not turned on touch to turn Bluetooth on 3 Make sure that the headset is discoverable so that your device can find the headset Refer to the instructions that came with the headset to find out how to set it to discoverable mode 4 Touch SEARCH FOR DEVICES Your device will start to scan for Bluetooth devices within range 5 When you s...

Страница 161: ...luetooth devices section 5 If prompted to enter a passcode try 0000 or 1234 or consult the headset or car kit documentation to find the passcode 6 If you still cannot reconnect to the headset or car kit follow the instructions in Disconnect or Unpair From a Bluetooth Device and then follow the instructions in Connect a Bluetooth Headset or Car Kit Disconnect or Unpair From a Bluetooth Device You c...

Страница 162: ...le mode You may also need to set it to Receive Beams or Receive Files Refer to the device s documentation for instructions on receiving information over Bluetooth 2 On the device open the application that contains the information or file you want to send For example if you want to send a photo press Home and touch Gallery 3 Follow the steps for the type of item you want to send Photo or video in C...

Страница 163: ...tooth including photos videos or contacts To receive files from another device you need to have a microSD card installed in your device 1 Press Home Menu and touch System settings Bluetooth 2 If the Bluetooth is not turned on touch to turn Bluetooth on 3 Touch your device name to set it visible from other devices 4 Press Menu Visibility timeout 5 Select the time duration your device is visible to ...

Страница 164: ...pen a received file what happens next depends on the file type For a vCard contact file if there are multiple vCard files on your storage card you can choose to import one several or all of those contacts to your contacts list ...

Страница 165: ...ard as a USB Drive Use the Device s microSD Card as a Media Device Remove the microSD Card Remove the battery cover and battery to remove a compatible microSD card into your device 1 Remove the battery cover See Set Up Your Device 2 Grasp the white pull tab extending from the battery pack and pull the battery out of its compartment WARNING Do not handle a damaged or leaking Li Ion battery as you c...

Страница 166: ...icroSD card Note Make sure your battery is fully charged before using the microSD card Your data may become damaged or unusable if the battery runs out while using the microSD card Install a microSD Card Remove the battery cover and battery to insert a compatible microSD card into your device 1 Remove the battery cover and battery 2 Slide the card holder in the direction of arrow to unlock it 3 Ra...

Страница 167: ...permanently removes all files stored on the card 1 Press Home Menu and touch System settings Storage 2 Scroll down the screen touch Erase SD card Erase SD card Erase everything Note The formatting procedure erases all the data on the microSD card after which the files CANNOT be retrieved To prevent the loss of important data please check the contents before you format the card Use the Device s mic...

Страница 168: ... required by your computer s operating system to safely remove your device and disconnect the device from the computer Note The device will not recognize the microSD card when it is connected to a computer as a disk drive You will not be able to use some of the device s applications such as the Camera or Play Music Use the Device s microSD Card as a Media Device You can connect your device as a me...

Страница 169: ...id dropping hitting bending or sitting on it Any changes or modifications to your phone not expressly approved in this document could void your warranty for this equipment and void your authority to operate this equipment Authorized personnel should service your phone and accessories Failure to do so may be dangerous and void your warranty Maintaining Safe Use of and Access to Your Phone Do Not Re...

Страница 170: ...lways request permission before using the phone in healthcare facilities or near medical equipment Turning Off Your Phone Before Flying To prevent possible interference with aircraft systems the U S Federal Aviation Administration FAA regulations require you to have permission from a crew member to use your phone while the plane is on the ground To help prevent the risk of interference regulations...

Страница 171: ...ids other than water such as detergent beverages or chlorinated or treated water Dry your phone as quickly as possible when wet Charging Dry your phone with a clean cloth before charging Do not touch the charger charging cable or charger accessory jack with wet hands Doing so may cause electric shock injury or product failure Do not charge your phone in a wet or damp place such as in a bathroom or...

Страница 172: ...phones T4 is the better higher of the two ratings Note that not all hearing devices have telecoils in them Note New Technologies Including Wi Fi This phone has been tested and rated for use with hearing aids for some of the wireless technologies that it uses However there may be newer wireless technologies including Wi Fi used in this phone that have not been tested for use with hearing aids Heari...

Страница 173: ... problems with Boost phones resulting from the proper use of batteries and accessories approved by the manufacturer of your phone Use only manufacturer approved batteries and accessories through your phone s manufacturer Buying the right batteries and accessories is the best way to ensure they re genuine and safe Do not disassemble or open crush bend or deform puncture or shred the battery Do not ...

Страница 174: ... as you can be burned For safe disposal options of your Li Ion batteries contact your nearest Boost authorized service center Special Note Be sure to dispose of your battery properly In some areas the disposal of batteries in household or business trash may be prohibited Radio Frequency RF Energy Understanding How Your Phone Operates Your phone is basically a radio transmitter and receiver When it...

Страница 175: ...out RF exposure visit the FCC website at http www fcc gov Specific Absorption Rates SAR for Wireless Phones The SAR is a value that corresponds to the relative amount of RF energy absorbed in the head of a user of a wireless handset The SAR value of a phone is the result of an extensive testing measuring and calculation process It does not represent how much RF the phone emits All phone models are...

Страница 176: ...nd can radiate radio frequency energy and if not installed and used in accordance with the instructions may cause harmful interference to radio communications However there is no guarantee that interference will not occur in a particular installation If this equipment does cause harmful interference to radio or television reception which can be determined by turning the equipment off and on the us...

Страница 177: ...of a bill of sale or warranty repair document that includes the date of purchase Product serial number and the authorized dealer s name and address must be presented to obtain warranty service This limited warranty is not transferable to any third party including but not limited to any subsequent purchaser or owner of the Product Transfer or resale of a Product will automatically terminate warrant...

Страница 178: ...ry or personal information from the Product KCI is not responsible for damage to or loss of any software applications data or removable storage media This warranty is valid only in the United States REPAIR OR REPLACEMENT AS HEREIN ABOVE PROVIDED IS YOUR SOLE AND EXCLUSIVE REMEDY FOR BREACH OF THE LIMITED WARRANTY KCI SHALL HAVE NO LIABILITY FOR ANY INCIDENTAL OR CONSEQUENTIAL DAMAGES INCLUDING BUT...

Страница 179: ...yocera grants you a limited non exclusive license to use Kyocera and third party proprietary software and services found in your Kyocera device and or packaged with your Kyocera device including any updates to such material by whatever means provided and any related documentation Software You may use the Software only as expressly authorized by this Agreement Limitations This Software is licensed ...

Страница 180: ...ights in the applicable Open Source License shall take precedence over the rights and restrictions granted in this Agreement but solely with respect to such Open Source Software Disclaimer of Warranty and Liability THE SOFTWARE IS PROVIDED AS IS WITHOUT WARRANTY OF ANY KIND KYOCERA FURTHER DISCLAIMS ALL WARRANTIES INCLUDING WITHOUT LIMITATION ANY IMPLIED WARRANTIES OF MERCHANTABILITY FITNESS FOR A...

Страница 181: ...Kyocera reserves the right to modify the terms of this Agreement at its sole discretion Any such modification will be effective upon Kyocera or a Kyocera affiliate or agent sending notice to you by email text message other electronic communication or postal mail Your continued use of the Software after such notice will constitute your binding acceptance of the Agreement as revised Additionally som...

Страница 182: ...not be activated by Boost Mobile and or Boost Mobile s network settings may limit the feature s functionality Always contact Boost Mobile about feature availability and functionality All features functionality and other specifications as well as the information contained in this user guide are based upon the latest available information and are believed to be accurate at the time of printing Kyoce...

Страница 183: ...Maps Gmail and Google Talk are trademarks of Google Inc The Bluetooth word mark and logos are registered trademarks owned by Bluetooth SIG Inc and any use of such marks by Kyocera Corporation is under license Other trademarks and trade names are those of their respective owners microSD and microSDHC Logos are trademarks of SD 3C LLC Swype and the Swype logos are registered trademarks or trademarks...

Страница 184: ... Input 24 Answer a Call 35 Applications 95 Auto rotate Screen 53 Back Key 9 Battery Charge 3 Install 2 Bluetooth 148 Car kit 149 Device Name 149 Disconnect 150 Headset 149 Menu 148 Receiving 152 Reconnect 150 Sending 151 Sharing 133 134 Turning on off 148 Unpair 150 BoostZone 109 Brightness 53 Browser 113 Accessibility Settings 117 Advanced Settings 118 Bandwidth Management Settings 119 Bookmarks ...

Страница 185: ...Calculator 144 Calendar 136 Adding Event 136 Erasing Event 141 Event Alert 138 Event Reminders 138 Hiding 141 Inviting Guest 137 Synchronizing 141 Viewing Event 139 Call Forwarding 43 Call Log 46 Clear 47 Call Waiting 42 Caller ID 42 Camcorder 125 Recording 126 Viewfinder 125 Camera 122 Closing 125 Lens 10 Opening 122 Review Screen 124 Settings 126 Viewfinder 122 Zoom 129 Charge Battery 3 Charger ...

Страница 186: ...Call 32 Enhanced 911 E911 32 Enter Text 17 Entertainment 95 Factory Data Reset 61 Favorites tray 15 Folder 15 Gallery 127 Closing 130 Opening 127 Viewing 128 Gestures 12 Google Account 27 Add 29 Create 27 Settings 29 Sign In 28 Google Talk 90 Home Key 9 Home Screen 13 Add Items 14 Customize 14 Move or remove items 14 In Call Options 45 Incoming Calls Answer 35 Reject 35 Internet Call 33 Keyboard A...

Страница 187: ... Backing up files 109 Playlist 108 Searching 108 Mute Ringtone 35 My Location 56 Notification Icons 16 Notifications 15 16 Operator Service 7 Paste 26 People 66 Phone 30 Phone Call From People 31 From Recent Calls 31 From text message 32 Make calls 30 Plus Code Dialing 33 Receive 34 Use Internet Call 33 Using phone dialpad 30 With Pause 33 Picasa 134 Pictures Crop 131 Editing 130 Options Menu 130 ...

Страница 188: ...Unlock PIN 58 Set up Your device 2 Settings 48 Androoid Keyboard 25 Swype 21 Setup Application 3 Sharing Photos and Videos 132 Silent Mode 51 Slide or Flick 12 Speaker 10 Speakerphone Visual Voicemail 39 Status Bar 15 Status Icons 15 Storage Settings 54 Swype Settings 21 User Dictionary 20 Voice Input 20 Text Entry 17 Text Message Make call from 32 Text to speech 145 Tools 136 Touch 12 Touch and H...

Страница 189: ...ching 129 Visual Voicemail 35 Configure options 37 Enable Speakerphone 39 Listen to multiple messages 37 Review 36 Set up 4 36 Settings 38 Voice Dial 145 Voice Input Android Keyboard 24 Swype 20 Voice Search 146 Voicemail 4 36 40 Retrieve messages 41 Set up 40 Volume 51 Button 10 Wallpaper 14 Web 110 Wi Fi 110 Checking Status 111 Connecting 110 111 Settings 48 YouTube 89 134 ...

Отзывы: