background image

 OPERATION 

4

37

POWERFLEX 2200 C/F/S/D

www.krohne.com

07/2016 - 4005318901 - QS POWERFLEX 2200 R01 en

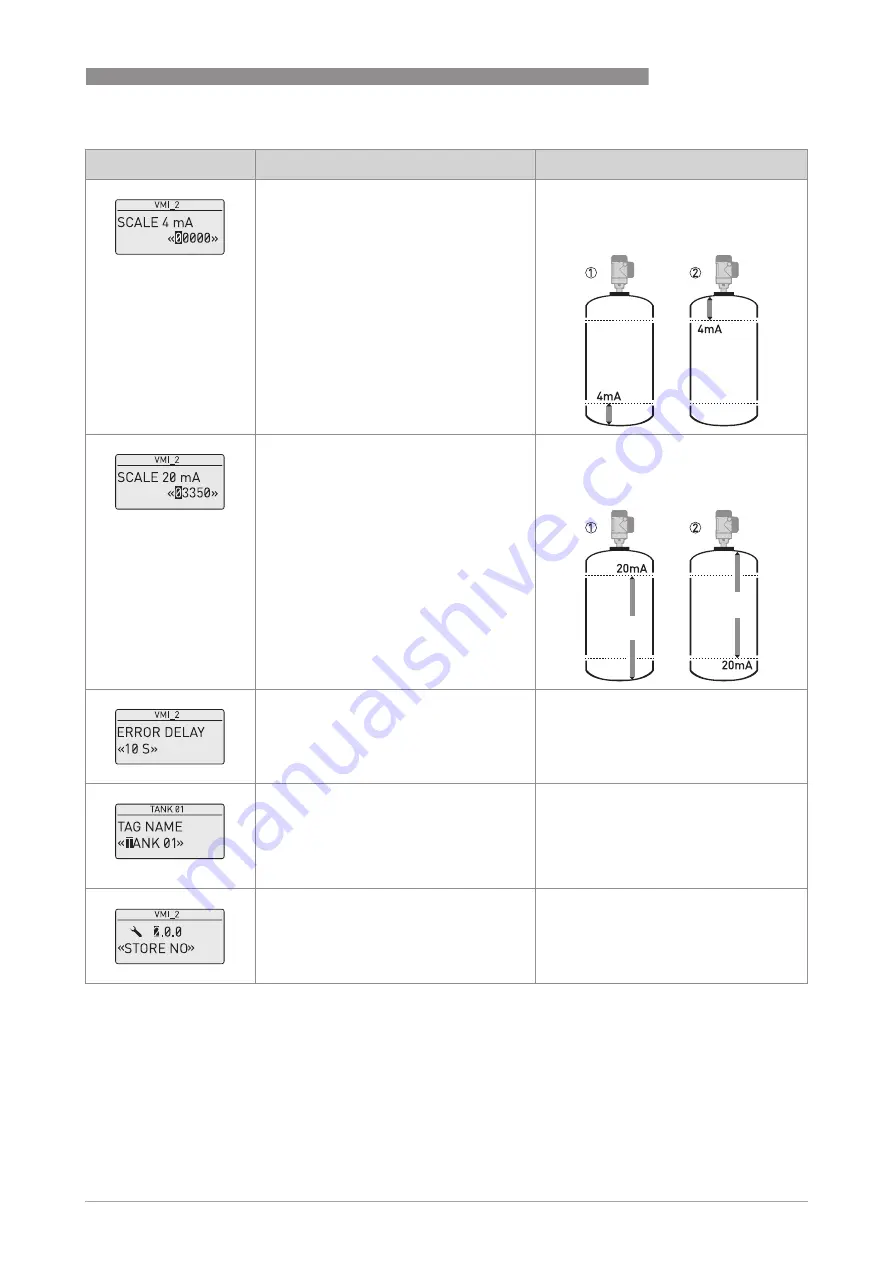
[>>>>] to change Scale 4 mA.

[>>>>] to change the position of the cursor.

[

] to decrease the value or [

] to 

increase the value.

[

^

^

^

^

] to confirm.

Use this step to give the 4 mA output 

setting (0% limit) in the tank. Refer to the 

illustrations that follow. Illustration 

1


shows the settings for level. Illustration 

2


shows the settings for distance.

[>>>>] to change Scale 20 mA.

[>>>>] to change the position of the cursor.

[

] to decrease the value or [

] to 

increase the value.

[

^

^

^

^

] to confirm.

Use this step to give the 20 mA output 

setting (100% limit) in the tank. Refer to the 

illustrations that follow. Illustration 

1


shows the settings for level. Illustration 

2


shows the settings for distance.

[

] or [

] for the selection of the error 

delay (0 s, 10 s, 20 s, 30 s, 1 mn, 2 mn, 
5 mn  or  15 mn).

[

^

^

^

^

] to confirm.

The time after which the current output 

changes to an error value. The error value 

shows that there is a measurement error.

[>>>>] to change the tag name.

[>>>>] to change the position of the cursor.

[

] to decrease the alphanumeric value 

(A, B, etc. / 1, 2, etc.) or [

] to increase the 

alphanumeric value.

[

^

^

^

^

] to confirm.

3 ×  [

^

^

^

^

] to confirm.

[

] or [

] for the selection of the save 

option (STORE NO or STORE YES).

[

^

^

^

^

] to confirm.

Set to STORE YES to save and use the data. 

Set to STORE NO to cancel the changes to 

the device settings.

Screen

Steps

Description

Содержание POWERFLEX 2200 C

Страница 1: ...ransmitter for the nuclear industry POWERFLEX 2200 C F S D POWERFLEX 2200 C F S D POWERFLEX 2200 C F S D POWERFLEX 2200 C F S D Quick Start Quick Start Quick Start Quick Start KROHNE 07 2016 4005318901 QS POWERFLEX 2200 R01 en ...

Страница 2: ... connection 18 2 9 2 How to install a device with a threaded connection 19 2 9 3 How to install a cable probe in the tank 20 2 9 4 How to turn or remove the signal converter 21 2 9 5 Recommendations for pits and tanks made of non conductive materials 22 2 9 6 How to attach the weather protection to the device 23 2 9 7 How to open the weather protection 26 2 10 Electromagnetic compatibility 27 3 El...

Страница 3: ...CONTENTS 3 www krohne com 07 2016 4005318901 QS POWERFLEX 2200 R01 en POWERFLEX 2200 C F S D 4 4 Probe length calculation 38 4 5 Snapshot 40 5 Notes 42 ...

Страница 4: ... the operator s plant INFORMATION These instructions contain important information for the handling of the device CAUTION Installation assembly start up and maintenance may only be performed by appropriately trained personnel The regional occupational health and safety directives must always be observed LEGAL NOTICE The responsibility as to the suitability and intended use of this device rests sol...

Страница 5: ...r use in the nuclear industry and can be installed in spent fuel pools CAUTION Responsibility for the use of the measuring devices with regard to suitability intended use and corrosion resistance of the used materials against the measured fluid lies solely with the operator INFORMATION The manufacturer is not liable for any damage resulting from improper use or use for other than the intended purp...

Страница 6: ... packing list to make sure that you have all the elements given in the order POWERFLEX 2200 C Compact version Figure 2 1 Scope of delivery POWERFLEX 2200 C Compact version 1 Device compact version signal converter and probe 2 Quick Start 3 DVD ROM This contains the handbook the quick start the technical data sheet and related software 4 Strap wrench ...

Страница 7: ...n with sensor extension 1 Signal converter 2 Sensor extension Coaxial cable and support with one attached length of flexible stainless steel jacket 3 Sensor extension Wall bracket and lock nut 4 Sensor extension One length of flexible stainless steel jacket 5 Process connection and probe 6 Quick Start 7 DVD ROM This contains the handbook the quick start the technical data sheet and related softwar...

Страница 8: ...ignal converter 2 Quick Start 3 DVD ROM This contains the handbook the quick start the technical data sheet and related software 4 Strap wrench 5 RS 485 cable A signal cable connects the signal converter to the probe housing This signal cable is supplied on re quest For more data about the signal cable refer to Electrical connections in the handbook 6 Probe housing process connection and probe ...

Страница 9: ...technical data sheet and related software 4 Strap wrench 5 RS 485 cable A signal cable connects the signal converter to the probe housing This signal cable is supplied on re quest For more data about the signal cable refer to Electrical connections in the handbook 6 Sensor extension One length of flexible stainless steel jacket 7 Process connection and probe 8 Sensor extension Coaxial cable and su...

Страница 10: ... 5 Visual check 1 Device nameplate for more data refer to the handbook 2 Process connection data size and pressure rating material reference and heat number 3 Gasket material data refer to the illustration that follows Figure 2 6 Symbol for the supplied gasket material on the side of the process connection 1 EPDM INFORMATION Look at the device nameplate to ensure that the device is delivered accor...

Страница 11: ...brations Figure 2 7 How to hold the device general data Figure 2 8 How to hold the device cable data 1 Do not wind the cable probes less than 400 mm 16 in diameter 2 Do not hold the probe when you lift the device 3 Remote versions F or D Do not wind the RS 485 electrical cable less than 330 mm 13 in diameter 4 Do not bend the flexible jacket less than 500 mm 20 in diameter WARNING If you do not li...

Страница 12: ...ess the de vice is a High Temperature version Refer to the table Permitted temperature ranges for gaskets that follows and to Technical data in the handbook 2 Ambient temperature for operation of the display 20 60 C 4 140 F If the ambient temperature is not between these limits the display screen switches off automatically 3 Ambient temperature 40 80 C 40 176 F Process connection and probe of devi...

Страница 13: ...ure flange temperature flange and threaded connection in C Ambient temperature flange temperature flange and threaded connection in F Figure 2 11 Ambient temperature flange temperature flange and threaded connection in F 1 Maximum ambient temperature C 2 Maximum flange temperature C 3 Maximum ambient temperature F 4 Maximum flange temperature F 5 All probes INFORMATION Min ambient temperature 40 C...

Страница 14: ... the tank touches the probe the device will measure incorrectly Figure 2 12 Do not put the device near to a product inlet 1 The device is in the correct position 2 The device is too near to the product inlet 3 If it is not possible to put the device in the recommended position install a deflector pipe Figure 2 13 How to prevent build up of product around the process connection 1 If product particl...

Страница 15: ... is the height of the tank nozzle and d is the diameter of the tank nozzle 2 The end of the nozzle must not have an extension into the tank Do not install the device on a high nozzle CAUTION If the device is installed on a high nozzle make sure that the probe does not touch the side of the nozzle attach the probe end etc Figure 2 15 Sockets for threaded process connections 1 Recommended installati...

Страница 16: ...ckness t of the concrete is greater than the diameter d of the hole install the device in a recess Figure 2 18 Installation recommendations for liquids 1 The electromagnetic EM field generated by the device It has a radius of Rmin Make sure that the EM field is clear of objects and product flow Refer to the table that follows 2 If there are too many objects in the pool install a stilling well 3 Ke...

Страница 17: ...ng a liquid in a tank with a floating roof For more data refer to the Handbook Probe type Empty space radius Rmin around the probe mm inches Coaxial 0 0 Double rod cable 100 4 Single rod cable 300 12 Figure 2 19 Installation recommendations for standpipes stilling wells and bypass chambers 1 Stilling well 2 Bypass chamber 3 Vent 4 Level of the liquid INFORMATION Stilling wells are not necessary fo...

Страница 18: ...d Make sure that the flange on the nozzle is level Make sure that you use the applicable gasket for the flange and the process Align the gasket correctly on the flange facing of the nozzle Lower the probe carefully into the tank i For more data on cable probes refer to How to install a cable probe in the tank on page 20 Tighten the flange bolts i Refer to local rules and regulations for the correc...

Страница 19: ...refer to Recommendations for pits and tanks made of non conductive materials on page 22 Lower the probe carefully into the tank i For more data on cable probes refer to How to install a cable probe in the tank on page 20 Use 50 mm 2 wrench to attach the process connection to the tank Tighten the nut i Refer to local rules and regulations for the correct torque to apply to the connection Figure 2 2...

Страница 20: ...d the probe above the process connection Hold the device 1 m 3 ft above the tank Unwind the probe carefully into the tank Figure 2 22 Wind cable probes carefully 1 Do not wind cable probes less than 400 mm 16 in diameter WARNING If you bend the probe too much you will damage the device and it will not measure accurately Figure 2 23 Installation of devices with cable probes 1 1 m 3 ft ...

Страница 21: ...conditions Figure 2 24 How to turn or remove the signal converter 1 Tool 5 mm Allen wrench not supplied for the lock screw on the signal converter 2 Cover for the coaxial hole on top of the process connection assembly not supplied CAUTION If you remove the housing put a cover on the coaxial hole on top of the process connection assembly When the housing is attached to the process connection assemb...

Страница 22: ...ocess connection i It must have a diameter greater than 200 mm 8 Make sure that the metal sheet is in contact with the thread stop on the device We recommend that you use DN 200 8 for flange connections If you have a device with a double rod double cable or coaxial probe you can ignore these instructions Figure 2 25 Installation in a non metallic tank or pit with a thread connection 1 Non metallic...

Страница 23: ... protection option are supplied disassembled in the same box The weather protection can also be supplied as an accessory You must attach the weather protection when you install the device Figure 2 26 Equipment needed 1 Weather protection cover with an R clip to hold the cover on the clamp 2 Device 3 Weather protection clamp 2 parts 4 10 mm socket wrench not supplied 5 2 locking nuts ...

Страница 24: ...eads on the weather protection clamp Tighten the lock ing nuts with a 10 mm socket wrench 3 Lower the weather protection cover onto weather protection clamp until the hole for the lock is in the slot at the front of the cover 4 Put the R clip into the hole at the front of the weather protection cover i End of the procedure Figure 2 27 Installation of the weather protection on a vertical signal con...

Страница 25: ... protection clamp Tighten the lock ing nuts with a 10 mm socket wrench 3 Lower the weather protection cover onto weather protection clamp until the hole for the lock is in the slot at the front of the cover 4 Put the R clip into the hole at the front of the weather protection cover i End of the procedure The overall dimensions of the weather protection are in Dimensions and weights in the handbook...

Страница 26: ... 4005318901 QS POWERFLEX 2200 R01 en 2 9 7 How to open the weather protection 1 Remove the R clip from the hole at the front of the weather protection cover 2 Remove the weather protection cover i End of the procedure Figure 2 29 How to open the weather protection ...

Страница 27: ...ot made of metal Refer also to the note that follows CAUTION If you install a device with a rod or cable probe in a non metallic tank or open air pit a strong electromagnetic field near to the device can have an unwanted effect on the accuracy Use a device with a coaxial probe for this type of installation INFORMATION Device operation agrees with residential class class B and industrial class clas...

Страница 28: ...ounding terminal in the housing if the electrical cable is shielded 2 Current output 3 Current output 4 Location of the external grounding terminal at the bottom of the converter INFORMATION Electrical power to the output terminal energizes the device The output terminal is also used for HART communication CAUTION Use the applicable electrical cables with the cable glands Make sure that the curren...

Страница 29: ...partment cover adjacent to the housing 2 Remove the connector from the circuit board 3 Connect the electrical wires to the connector Attach the connector to the circuit board Tight en the cable entry glands 1 Put the cover on the housing and push it down 2 Turn the cover clockwise until it is fully engaged 3 Tighten the lock screw Figure 3 3 Procedure for electrical installation Close the terminal...

Страница 30: ...ectrical power to the output terminal energizes the device The output terminal is also used for HART communication CAUTION Use the applicable electrical cables with the cable glands Make sure that the current is not more than 5 A or that there is 5 A rated fuse in the electrical circuit that energizes the device Connections between the remote converter and the probe housing Figure 3 6 Connections ...

Страница 31: ...m power supply voltage Use this graph to find the minimum power supply voltage for a given current output load Figure 3 7 Electrical connections 1 Power supply 2 Optional junction box ref SJB 200W for on site readings of loop current 3 Optional connection to the grounding terminal 4 Output 11 5 30 VDC for an output of 22 mA at the terminal 5 Device Figure 3 8 Minimum power supply voltage for an ou...

Страница 32: ...gs 3 Refer to the table that follows for the diameter of the outer sheath of the electrical cable Min Max diameter of the electrical cable INFORMATION The device fulfils all requirements per protection category IP66 IP67 It also fulfils all requirements per NEMA type 4X housing and type 6P probe DANGER Make sure that the cable gland is watertight Figure 3 9 How to make the installation agree with ...

Страница 33: ...ling address of 1 to 63 in a multi drop network The device output is factory set to communicate point to point To change the communication mode from point to point point to point point to point point to point to multi drop multi drop multi drop multi drop refer to Network configuration in the handbook 3 5 2 Point to point networks Figure 3 10 Point to point connection 1 Address of the device 0 for...

Страница 34: ...1 QS POWERFLEX 2200 R01 en 3 5 3 Multi drop networks Figure 3 11 Multi drop network 1 Address of the device n 1 for multidrop networks 2 Address of the device 1 for multidrop networks 3 4 mA HART 4 Resistor for HART communication 5 Power supply 6 HART modem 7 HART communication device ...

Страница 35: ...ion that follows Keypad button Function Right Normal mode Normal mode Normal mode Normal mode Enter menu Enter Configuration mode Configuration mode Configuration mode Configuration mode Configuration mode Move cursor to the right Return Escape Normal mode Normal mode Normal mode Normal mode Change units m cm mm in ft Configuration mode Configuration mode Configuration mode Configuration mode Exit...

Страница 36: ...fault screen Enter configuration mode 2 0 0 SUPERVISOR and Enter the password the default password is shown If it is necessary to change the password refer to the handbook and Push this button 2 times to start the commissioning procedure to change the tank height H to change the position of the cursor to decrease the value or to increase the value to confirm or for the selection of the measurement...

Страница 37: ...A output setting 100 limit in the tank Refer to the illustrations that follow Illustration 1 shows the settings for level Illustration 2 shows the settings for distance or for the selection of the error delay 0 s 10 s 20 s 30 s 1 mn 2 mn 5 mn or 15 mn to confirm The time after which the current output changes to an error value The error value shows that there is a measurement error to change the t...

Страница 38: ...probe length cannot be less than 600 mm 23 6 for coaxial probes and 1000 mm 39 4 for other probe types Shorter probe lengths can be delivered on request Make sure that the tank is empty Make sure that there are no objects adjacent to the probe For more data about empty space refer to General requirements on page 16 WARNING If the probe material is pickled and passivated do not decrease the probe l...

Страница 39: ...more data about menu items refer to the handbook The device measures the new probe length If the display screen shows the error message Failure Pulse Lost then speak to the supplier for the selection of YES or for the selection of NO The device shows the new probe length Set to YES to save the data Set to NO to erase the data 3 to confirm or for the selection of the save option STORE NO or STORE Y...

Страница 40: ...e device on the tank For more data about how to install the device refer to the handbook Values and parameters that can be changed are shown between the marks in the illustrations that follow Push the keypad buttons in the correct sequence Procedure INFORMATION Dynamic Parasite Rejection Dynamic Parasite Rejection Dynamic Parasite Rejection Dynamic Parasite Rejection DPR is a function that automat...

Страница 41: ...subsequent steps for the selection of YES or for the selection of NO The device shows the distance to the surface of the tank contents Set to YES if the distance is correct The scan will start immediately Set to NO if the distance is incorrect The scan will start immediately but the device will ignore the reflection found at this distance from the device The device does a scan for objects that do ...

Страница 42: ...5 NOTES 42 POWERFLEX 2200 C F S D www krohne com 07 2016 4005318901 QS POWERFLEX 2200 R01 en ...

Страница 43: ...NOTES 5 43 POWERFLEX 2200 C F S D www krohne com 07 2016 4005318901 QS POWERFLEX 2200 R01 en ...

Страница 44: ...ervices Head Office KROHNE Messtechnik GmbH Ludwig Krohne Str 5 47058 Duisburg Germany Tel 49 203 301 0 Fax 49 203 301 10389 info krohne com KROHNE 07 2016 4005318901 QS POWERFLEX 2200 R01 en Subject to change without notice The current list of all KROHNE contacts and addresses can be found at www krohne com ...

Отзывы: