4
Manual
www.kraun.com
2. HArdWAre deSCrIPTIon And QuICk
InSTAllATIon/uSAge
The IP CAM is designed to be very easy to install and use. First, let’s see the major components of the IP
CAM products.
2.1. Major hardware components.
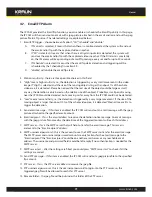
The major components of the IP CAM products are listed below :
1. Lens – the focus of the lens is fixed, you do not need to spend time to adjust the focus, the effective
focus range is from 30cm to infinity.
2. IR LEDs – there are totally 36 IR LEDs that can provide approximately 30m distance night vision.
3. Light detector – this light detector can detect when the light is becoming dark and turn on the IR
LEDs automatically.
4. Power jack – this is the place to plug in the power adaptor. The power needed for this IP CAM is
12V/1.0A, please make sure you are using the correct power adaptor.
5. Ethernet jack – this is the place to plug in the RJ45 Ethernet cable.
6. Reset button – this is the button to reset the IP CAM to default factory settings. You need to press
the reset button for more than 4 seconds to enable the reset function. Usually when you forgot the
administrator account, you will probably need to do this reset action to reset to the default factory
settings. Please refer to section 3.16 for more details.
7. Digital input terminal block – this is for alarm detection, an open circuit is off, a close circuit is on.
8. Status indication LED (red) – this LED is to indicate the Internet connection status. When the Internet
connection is connected, the LED will be constant red light. If there is any Internet connection
problem, the LED will be blinking red light.
9. Ethernet indication LED (blue) – this LED is to indicate if the Ethernet link is ok and packet traffic is
sending/receiving. When the Ethernet cable is connected, the LED is constant blue light. When there
is packet sending/receiving, the LED is blinking blue light.
Figure 2-1: Major components of the IP camera


