background image

KRAMER:  SIMPLE CREATIVE TECHNOLOGY


Controlling the VP-438 


12 

7.2.1 

The MAIN MENU 

Table 3

 defines the MAIN MENU features and functions. 

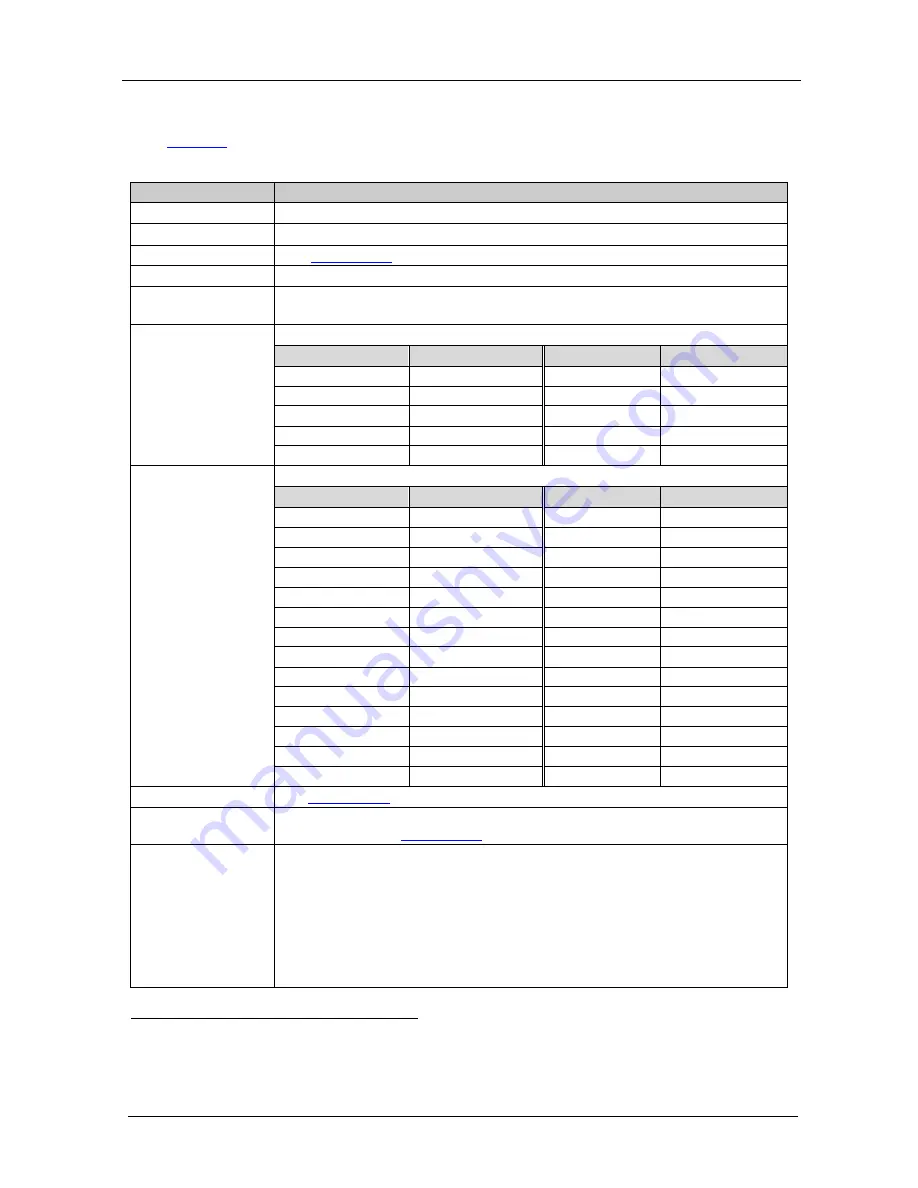
Table 3: The MAIN MENU Features 

Mode 

Function 

CONTRAST 

Set the contrast

1

BRIGHTNESS 


Set the brightness

1


FINETUNE 

(see 

Section  7.2.2

COLOR 

Set the red, green and blue shades 

SIZE

2

Select the size of the display: FULL, OVERSCAN, UNDER1, UNDER2, LETTER 

BOX, PANSCAN, BEST FIT (default, FULL) 


SOURCE 

Select the source: (default VGA) 


Appears as: 

Source input  

Appears as: 

Source input  


CV1 

CV 1 

PC2 

VGA 2 


CV2 

CV 2 

HDMI1 

HDMI 1 


YPBPR1 

COMP 1 

HDMI2 

HDMI 2 


YPBPR2 

COMP 2 

HDMI3 

HDMI 3 


PC1 

VGA 1 

HDMI4 

HDMI 4 

OUTPUT 

Select the output resolution from the menu (default NATIVE):  


Appears as: 

Output resolution: 

Appears as: 

Output resolution: 


480I 

480i 

1080P59 

[email protected] 


480P 

480p 

NATIVE

3


720P60 

720p @50Hz 

VGA 

640x480 


1080I60 

1080i @60Hz 

SVGA 

800x600 


1080P60 

1080p @60Hz 

XGA 

1024x768 


576I 

576i 

SXGA 

1280x1024 


576P 

576p 

UXGA 

1600x1200 


720P50 

720p @50Hz 

WXGA 

1366x768 


1080I50 

1080i @50Hz 

WSXGA 

1680x1050 


1080P50 

1080p @50Hz 

WUXGA 

1920x1200 


480I59 

[email protected] 

1280x800 

1280x800 


480P59 

[email protected] Hz 

WXGA+ 

1440x900 


720P59 

[email protected] 

SXGA+ 

1400x1050 


1080I59 

[email protected] 

1600x900 

1600x900 

AUDIO 

See 

OSD 

Section  7.2.3


Set the OSD parameters: H POSITION, V POSITION, TIMER, BACKGROUND 

and DISPLAY (see 

Section  7.2.4

HDCP ON INPUT 

Select the HDCP option for the HDMI input: either ON (the default) or OFF. 

Setting HDCP support to enabled (ON) on the HDMI input allows the source to 

transmit a non-HDCP signal if required (for example, when working with a Mac 

computer) 


1 The range and default values vary according to the input signal 
2 UNDER1 refers to an underscan of 6% and UNDER2 refers to an underscan of 9% 
3 Select “NATIVE” to select the output resolution from the EDID of the connected HDMI monitor 

Содержание VP-438

Страница 1: ...Kramer Electronics Ltd USER MANUAL Model VP 438 Presentation Switcher Scaler...

Страница 2: ...te Control Transmitter 15 8 Technical Specifications 16 9 RS 232 Communication Protocol 18 Figures Figure 1 VP 438 Presentation Switcher Scaler 5 Figure 2 Connecting the VP 438 Presentation Switcher S...

Страница 3: ...r Scaler Power cord and rack ears Infrared remote control transmitter This user manual2 2 Getting Started We recommend that you Unpack the equipment carefully and save the original box and packaging m...

Страница 4: ...KRAMER SIMPLE CREATIVE TECHNOLOGY Getting Started 2...

Страница 5: ...uts which include volume control and digital S PDIF and analog stereo audio outputs Automatically detects and selects the audio source for the HDMI input Default selection is HDMI if this is not prese...

Страница 6: ...Recycling Kramer Products The Waste Electrical and Electronic Equipment WEEE Directive 2002 96 EC aims to reduce the amount of WEEE sent for disposal to landfill or incineration by requiring it to be...

Страница 7: ...Your VP 438 Presentation Switcher Scaler 5 Figure 1 VP 438 Presentation Switcher Scaler...

Страница 8: ...eeze unfreeze the output video image1 9 MENU Button Displays the OSD menu see Section 7 2 10 ENTER Button Press to accept changes and change the SETUP parameters2 11 Button Press to decrease numerical...

Страница 9: ...V Connect to the analog audio composite video source from 1 to 2 COMP Connect to the analog audio component video source from 1 to 2 24 VIDEO OUTPUTS H BNC Connector 25 V BNC Connector 26 R BNC Connec...

Страница 10: ...KRAMER SIMPLE CREATIVE TECHNOLOGY Installing the VP 438 in a Rack 8 5 Installing the VP 438 in a Rack This section provides instructions for rack mounting the unit...

Страница 11: ...acceptor for example an RGBHV display 7 Connect the HDMI VIDEO OUTPUT connector to an HDMI acceptor for example a plasma display 8 Connect the VGA VIDEO OUTPUT 15 pin HD connector to a VGA acceptor f...

Страница 12: ...KRAMER SIMPLE CREATIVE TECHNOLOGY Connecting the VP 438 Presentation Switcher Scaler 10 Figure 2 Connecting the VP 438 Presentation Switcher Scaler...

Страница 13: ...selector buttons for selecting the required input CV 1 and 2 COMPONENT 1 and 2 PC 1 and 2 or HDMI 1 to 4 BLANK MUTE and FREEZE buttons MENU ENTER and arrow1 RESET TO XGA 720p and PANEL LOCK buttons bu...

Страница 14: ...720P60 720p 50Hz VGA 640x480 1080I60 1080i 60Hz SVGA 800x600 1080P60 1080p 60Hz XGA 1024x768 576I 576i SXGA 1280x1024 576P 576p UXGA 1600x1200 720P50 720p 50Hz WXGA 1366x768 1080I50 1080i 50Hz WSXGA 1...

Страница 15: ...u Table 4 defines the FINETUNE menu Table 4 The FINETUNE Menu Features Input Signal Parameter Function CV COMPONENT HUE Set the color hue SATURATION Set the color saturation SHARPNESS Set the sharpnes...

Страница 16: ...s shown permanently OFF the information is not shown INFO the information is shown for a few seconds 7 3 Connecting to VP 438 via RS 232 You can connect to the VP 438 via an RS 232 connection using fo...

Страница 17: ...e UXGA 2 input HDMI1 Select the HDMI 1 input HDMI2 Select the HDMI 2 input HDMI3 Select the HDMI 3 input HDMI4 Select the HDMI 4 input XGA Reset Reset the resolution to XGA 720p Reset Reset the resolu...

Страница 18: ...oad XGA OUT LEVEL 1 2Vpp max 75 load S PDIF OUT LEVEL 0 55Vpp constant OUTPUT RESOLUTIONS 480i 480p 720p 50Hz 1080i 60Hz 1080p 60Hz 576i 576p 720p 50Hz 1080i 50Hz 1080p 50Hz 480i 59 94Hz 480p 59 94 Hz...

Страница 19: ...RGB No Yes 1080P 60 50 RGB Yes Yes 1080P 24 25 30 RGB No Yes VGA 60 67 72 75 85 Yes Yes SVGA 56 60 72 75 Yes Yes XGA 60 70 75 Yes Yes SXGA 60 75 Yes Yes 1280X960 Yes Yes 1600X900 60 Yes Yes UXGA 60 1...

Страница 20: ...Symbol Meaning Space CR Carriage Return ASCII code 0x0D LF Line Feed ASCII code 0x0A Set Command Type in Y Control_Type Function Param CR 1 Reply Z Control_Type Function Param CR LF Get Command Type...

Страница 21: ...15 N A UP button on remote control 0 16 N A NATIVE button on remote control 0 17 N A LEFT button on remote control 0 18 N A OK button on remote control 0 19 N A RIGHT button on remote control 0 20 N...

Страница 22: ...H Position 1 Set 2 Get 42 0 100 OSD Setting V Position 1 Set 2 Get 43 0 100 OSD Timeout 1 Set 2 Get 44 0 8 OSD Background 1 Set 2 Get 50 0 3 NR Noise Reduction 0 Off 1 Low 2 Mid 3 High 1 Set 2 Get 51...

Страница 23: ...p 8 720p60 9 1080i60 10 1080p60 11 576i 12 576p 13 720p50 14 1080i50 15 1080p50 16 WXGA 17 WSXGA 18 WUXGA 19 1280x800 20 WXGA 1440X900 21 SXGA 1400X1050 22 1600x900 F W 1 32 23 480i59 24 480p59 25 720...

Страница 24: ...1440X900 21 SXGA 1400X1050 22 1600X900 23 2048X1080 50 24 2048X1080 60 6 Set 7 Get 0 0 2 Power 0 Power Down 1 Power On 2 Reboot 6 Set 7 Get 1 0 1 Freeze 0 Off 1 On 6 Set 7 Get 2 0 1 Blank 0 Off 1 On...

Страница 25: ...23...

Страница 26: ...st information on our products and a list of Kramer distributors visit our Web site www kramerelectronics com where updates to this user manual may be found We welcome your questions comments and feed...

Отзывы: