


60
Style Record mode
Style Record procedure
•
To
insert
a
rest,
just
press
the
REST
button.
Its
length
will
match
the
step
value.
•
To
tie
the
note
to
be
inserted
to
the
previous
one,
press
the
TIE
button.
A
note
will
be
inserted,
tied
to
the
previous
one,
with
exactly
the
same
name.
You
don’t
need
to
play
it
on
the
keyboard
again.
•
To
insert
a
chord
or
a
second
voice,
see
below.
8.
After
inserting
a
new
event,
you
may
go
back
by
pressing
the
<
button.
This
will
delete
the
previ
‐
ously
inserted
event,
and
set
the
step
in
edit
again.
9.
When
the
end
of
the
pattern
is
reached,
the
“End
Loop”
(End
of
Loop)
event
is
shown
in
the
first
two
lines
of
the
display
(a),
and
the
recording
restarts
from
the
“M001.01.000”
position.
Any
note
exceeding
the
pattern
length,
inserted
at
its
end,
will
be
reduced
to
fit
the
total
length
of
the
pattern.
At
this
point,
you
may
go
on,
inserting
new
events
in
overdub
mode
(the
previously
inserted
events
will
not
be
deleted).
This
is
very
useful
when
recording
a
drum
or
percussion
track,
where
you
may
want
to
record
the
bass
drum
on
a
first
cycle,
the
snare
drum
on
the
second
cycle,
and
the
hi
‐
hat
and
cymbals
during
the
following
cycles.
10. When
finished
recording,
press
START/STOP
to
turn
off
its
LED.
The
Main
page
of
the
Style
Record
mode
appears.
When
exiting,
the
“RT”
recording
mode
is
auto
‐
matically
selected.
You
may
press
START/STOP
to
listen
to
the
Style.
Press
START/STOP
again
to
stop
the
playback.
To
enter
the
Step
Record
mode
again,
select
the
“Stp”
recording
mode,
and
press
START/STOP.
11. From
the
Main
page
of
the
Style
Record
mode,
press
RECORD
to
exit
the
Record
mode.
You
will
be
prompted
to
assign
a
new
name
to
the
Style,
and
select
a
memory
location
where
to
save
it.
See
for
information
on
how
to
save
a
Style.
Chords and second voices in Step Record mode
With
microARRANGER,
you
are
not
obliged
to
insert
single
notes
in
a
track.
There
are
several
ways
to
insert
chords
and
double
voices.
Lets
look
at
some.
Inserting
a
chord.
When
the
“key?”
prompt
appears
in
the
display,
play
a
chord
instead
of
a
single
note.
The
event’s
name
will
be
the
first
note
of
the
chord
you
pressed,
followed
by
the
“…”
marking.
Inserting
a
chord
with
notes
with
different
velocity
values.
You
can
make
the
upper
or
lower
note
of
a
chord,
for
example,
louder
than
the
remaining
ones,
to
make
the
most
important
note
emerge
from
the
chord.
Here
is
how
to
insert
a
three
‐
note
chord:
1.
Edit
the
Velocity
value
of
the
first
note.
2.
Press
the
first
note
and
keep
it
pressed.
3.
Edit
the
Velocity
value
of
the
second
note.
4.
Press
the
second
note
and
keep
it
pressed.
5.
Edit
the
Velocity
value
of
the
third
note.
4.
Press
the
third
note,
then
release
all
notes.
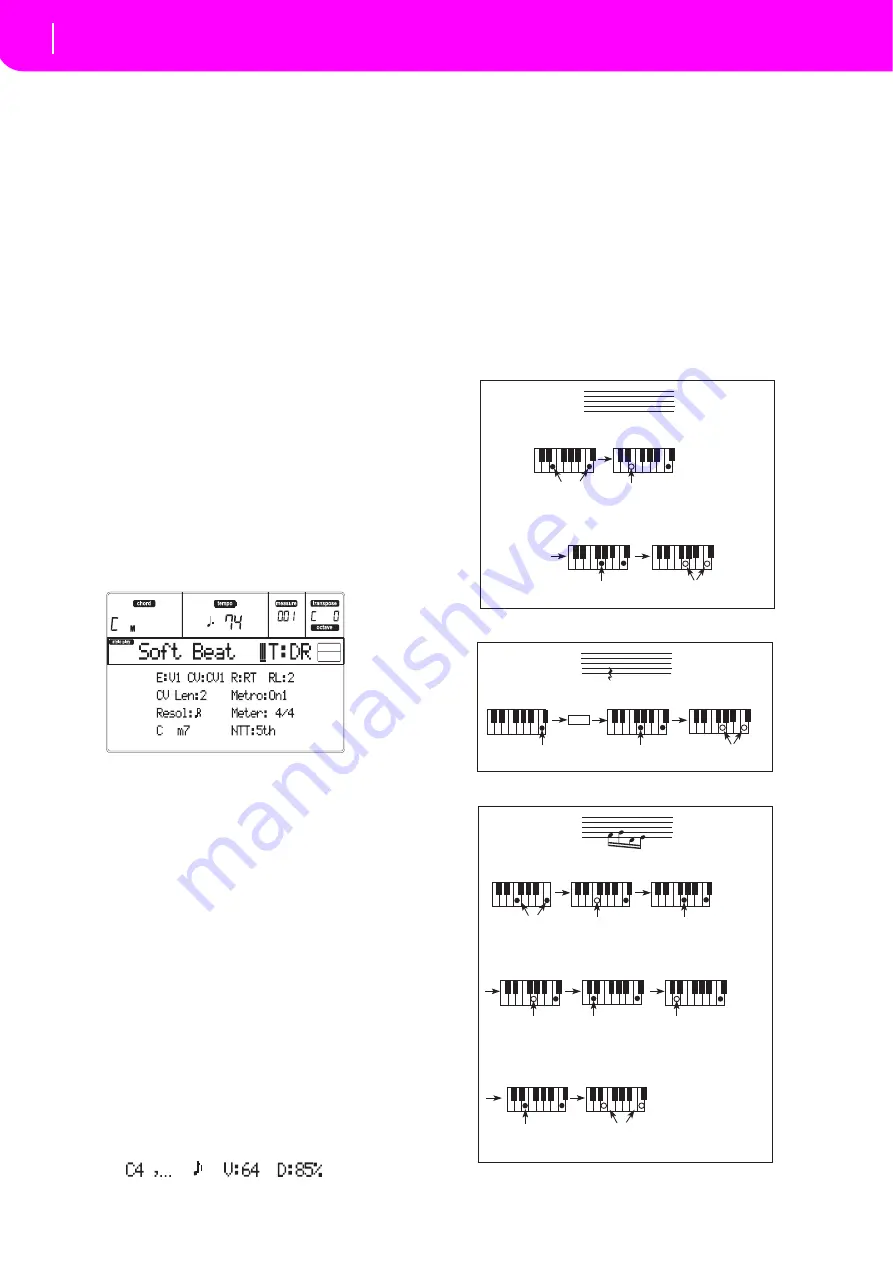
Inserting
a
second
voice.
You
can
insert
passages
where
one
note
is
kept
pressed,
and
another
voice
moves
freely.
Ex.
1:
Ex.2:
Ex.3:
Step Time =
Step Time =
On
Press E and C
On
Press G
Off
Off
Release G and C
Release E (continue holding C)
Step Time =
Step Time =
On
Press C
On
Press G (continue holding C)
Off
Release G and C
Tie
Step Time =
Step Time =
Step Time =
Press F and C
Press G
(continue holding C)
Off
On
On
Release F
(continue holding C)
Step Time =
Step Time =
Press E
(continue holding C)
Off
On
Release E and C
Step Time =
Step Time =
Press D
(continue holding C)
Off
On
Release G
(continue holding C)
Step Time =
Off
Release D
(continue holding C)
Содержание microARRANGER
Страница 1: ...Owner s Manual E 1...
Страница 9: ...INTRODUCTION...
Страница 25: ...BASIC GUIDE...
Страница 41: ...REFERENCE GUIDE...
Страница 145: ...APPENDIX...
Страница 244: ...2011 KORG INC 4015 2 Yanokuchi Inagi city Tokyo 206 0812 Japan...


