background image

Installation 

90 

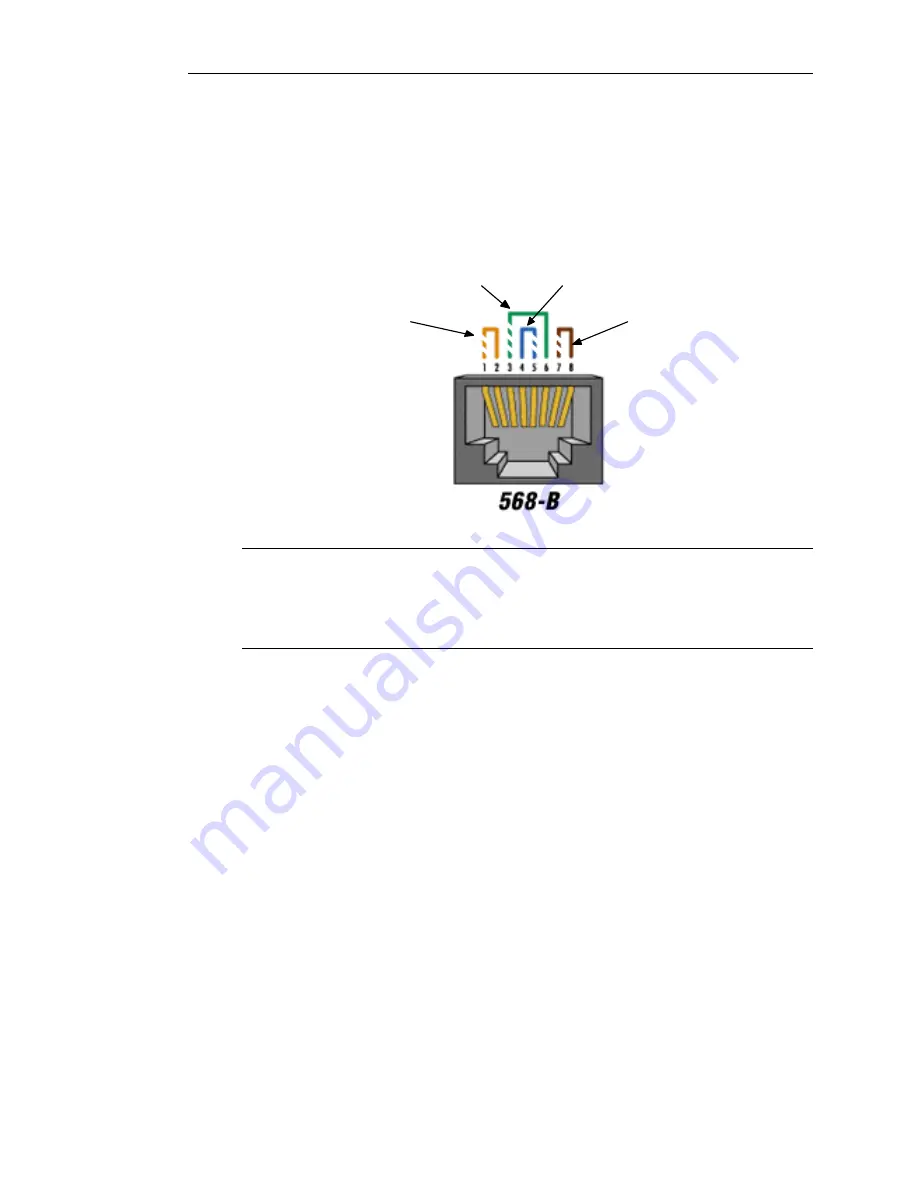
Crimping Your Own Cables 

When crimping your own cable for installation, the cable must not be pinned like a standard 
telephone cable (pin 1 to pin 8).   The cable must be crimped with pin 1 matching pin 1 at the 
opposite end, pin 2 matching pin 2 at the opposite end, etc. in order for the 

GEC 

and 

SCI’s

 to 

function properly. 


Yellow

Green

Blue

Brown


Note:  

If the cables are not crimped properly, permanent damage may be caused to the 

GEC3

 and/or 

the 

SI’s

.  If you have questions regarding crimping procedures or you do not feel confident in 

completing the cabling process, contact your local Korg Educational Dealer or Korg U.S.A. 
Technical Support. 

Troubleshooting 

If your GEC3 system does not work correctly, check instrument volume levels, the 

SI

 and 

GEC3

 volume levels, audio connections, and communications connections (crimping of RJ45 

connectors).  If problems cannot be resolved, contact your 

Korg-Authorized Educational 

Dealer

 or Korg U.S.A. Technical Support at (516) 333 -USER.


Содержание GEC3

Страница 1: ...GEC3 User Manual...

Страница 2: ......

Страница 3: ...GEC3 User Manual...

Страница 4: ...ection against harmful interference in a residential installation This equipment generates uses and can radiate radio frequency energy and if not installed and used in accordance with the instructions...

Страница 5: ...nt 17 Back 18 QUICK START 19 BASIC HOOK UP 19 Audio Cables for the GEC3 20 Audio Cables for the SI Boxes 21 GEC Installation Hardware 22 Replacement Hardware 22 OUT OF BOX OPERATION 22 TOP 10 HOW TO S...

Страница 6: ...Group Screen 56 Configuration Screen Play tab 57 SETUP TAB 59 Configuration Screen Setup tab 59 Group Setup Screen 60 Fields 61 Group Setup Procedures How to 61 SHARED TABS VOLUME GLOBAL DISC 63 VOLUM...

Страница 7: ...ng Estimates and Requirements 86 Sizing Cables 87 THE INSTALLATION STAGE 87 Positioning Equipment 87 Mounting the SI s 88 Positioning the GEC3 88 Connect Cabling 88 GEC3 Connections 88 More on the Com...

Страница 8: ......

Страница 9: ...up class and teacher preferences and class setup It gives you the basics for setting up the GEC3 It is recommended that you set up preferences and classes before you start using the GEC3 in a classroo...

Страница 10: ...een and a How to section that gives step by step instructions for performing tasks on that screen The Global Tab section of this chapter also includes some examples due to the comple xity of functions...

Страница 11: ...and class setups including individual teacher preferences and class set ups displaying student names Split function that allows two students toindependently work on the same MIDI keyboard with keyboar...

Страница 12: ...n instrument You have the option of eavesdropping on students and you can initiate 2 way communication with the students Group Mode This mode is similar to Practice Mode but should be used if the stud...

Страница 13: ...ptions menus and to set up and access class lists All functions of the GEC3 with the exception of powering on the unit and selecting modes are served from the screen On the first level of screens the...

Страница 14: ...ested or the 17 32 not present message appears If you experience problems during the Startup procedure review the Installation process to make sure you installed the system properly or contact your sy...

Страница 15: ...g cable to instrument providing input AUX IN L R Dual RCA stereo jacks for connecting cables to auxiliary input Routes from auxiliary source into GEC3 Store the name of this device in the Aux1 device...

Страница 16: ...nt keyboard to MIDI IN of 2nd student keyboard etc When All Call is NOT enabled the MIDI connection is broken between teacher and student keyboards MIDI OUT 5 pin DIN Sockets for connecting cables to...

Страница 17: ...ating that they want to communicate with the teacher HEADESET1 Socket for connecting the first headset SPLIT SPLIT The student presses if they need to use the Split Feature two students using the same...

Страница 18: ...y input 2 Routes from auxiliary source into SI MIC OUT 1 8 mono jack for connecting cables to mic GEC Female RJ45 jack for connection to ethernet category 5 cable to GEC3 unit Note SI Boxes student un...

Страница 19: ...to 32 SI boxes can be hooked up to the system The cable used to connect SI boxes to the GEC3 Teacher unit is conventional category 3 or category 5 recommended Ethernet cable Both ends of the cables t...

Страница 20: ...SI box 1 SI box 2 SI box 3 SI box 4 SI box 5 SI box 6 etc GEC3 Audio Cables for the GEC3 All GEC3 audio connections connections at the teacher controller are configured as stereo RCA inputs and output...

Страница 21: ...I THRU port of the first student keyboard the second student keyboard can be included in the MIDI system as well This can be repeated to include all student keyboards in the lab The MIDI OUT port can...

Страница 22: ...allows many teachers to set their own preferences for how the GEC3 operates Teachers can also label their own classes and even input the names and locations of students in each class so that students...

Страница 23: ...the back panel of your GEC3 AUX IN for Aux 1 device and AUX IN 2 for Aux 2 device 2 Press the Lecture mode button 3 Press the Volume tab from the row of tabs at the bottom of the screen 4 Determine th...

Страница 24: ...ing outside of the rest of the class An X will appear on the Play and Setup tabs in the group box to indicate that this student or group box is omitted from the lecture How to let students practice in...

Страница 25: ...he main group tab see Group Screen in the Group Mode chapter 1 Press the Groupmode button 2 Press the Play tab from the row of tabs at the bottom of the screen 3 Press the dropdown arrow on the top ri...

Страница 26: ...of tabs at the bottom of the screen 2 Press the Room On button It routes signal in teacher headset to external speakers set up in the classroom This feature is useful if you want to have student s re...

Страница 27: ...preferences This section also gives an overview of the various types of selection buttons that appear in the GEC3 QWERTY Keypad A number of the menus take you to the keypad this is where you can type...

Страница 28: ...ear your mic or instrument This is ideal if one or multiple students are working outside separate from the rest of the class If you are in split function and you select this checkbox both students in...

Страница 29: ...volume and slide down to lower it You can also press anywhere on the black bar and the white bar will jump to that point raising or lowering the volume as selected The actual volume number displayed...

Страница 30: ......

Страница 31: ...each teacher You need to setup these features in order to set up classes It is possible to use the GEC3 and SI Units without first setting up teacher and class preferences however you will then not be...

Страница 32: ...n the arrow next to the Teacher field on the Global tab The following screen displays listing all undefined teacher names Figure 3 3 Press the Enext to an Undef teacher field to add a new teacher The...

Страница 33: ...the Disc tab 9 Press Save Global Setupto save changes Adding Class Names Class information can be set up for up to 128 classes on the GEC3 All the other class setup and features for a class must be as...

Страница 34: ...QWERTY Keypad to enter a class name in this field See the section QWERTY Keypad in Basics for instructions on how to use the keypad 6 Enter the desired name using the QWERTY Keypad 7 Press Back to ret...

Страница 35: ...ss on the student s name to enable their mic Split display Split function allows two students to share one keyboard If student keyboards are set up to accommodate split function pressing this option t...

Страница 36: ...d set of seats they are numbered in the same pattern numbers 17 thru 32 Circular View View determines how the SI keyboard group units are numbered in Play Setup and other screens Select this field to...

Страница 37: ...the class you would like to set preferences for 4 Make the selections that you want to be associated with the class name in the Class Preferences box from the fields described below OR If you want to...

Страница 38: ...ee Teacher Name above the classes corresponding to that teacher display A total of 128 class periods can be stored in the GEC3 memory Class names are added and names and preferences are edited using E...

Страница 39: ...usic related class is being taught in a lab equipped with GEC3 equipment and you don t want students to play with equipment 5 Press Disk to open the Disk tab 6 Press Save Global Setupto save changes S...

Страница 40: ...ature you can use the whole Student Name field to enter the student s name When you are using the Split Feature the vertical line indicates where Student A ends and Student B begins Make sure to use o...

Страница 41: ...The Global Class Teacher Setup Global tab is used to set class and teacher preferences edit class and teacher information Disk The Disk tab is used to backup information in the GEC3 and to initiate sy...

Страница 42: ...Open a Class All student names are associated with a class Use the following procedure to open a class that has already been set up on your GEC3 1 Open the Global tab by pressing Global from the row o...

Страница 43: ...from a different set of 16 17 32 33 48 can be accessed by scrolling to that screen to access the student s name Bring a Student Who Called from their SI into the Lecture 1 If Call Enabled is selected...

Страница 44: ...r be able to hear theirs Play Your Instrument to the Class To play your instrument to the class make sure your instrument is plugged in to the INSTRUMENT IN connection on the back panel of the GEC3 an...

Страница 45: ...sing the Edit Teacher Information screen described in the Global chapter 3 Select a class name from the Class field View or Edit a Student s Name 1 Press a student s keyboard group in Setup tab to bri...

Страница 46: ...Lecture Mode 46 Volume Global Disc Tabs See the section Shared Tabs Volume Global Disc for more information on any of these tabs in Lecture mode...

Страница 47: ...GEC3 You can edit a student s name from the Setup tab regardless of what mode you are in This tab functions the same way in this mode as it does in Lecture mode For a description of how the tab works...

Страница 48: ...their Student Interface SI to send an audible beep to your headset indicating that they want to communicate with you To open the Play tab from Practice mode select Play from the row of tabs at the bo...

Страница 49: ...be highlighted on your GEC3 unit to indicate that you are eavesdropping on that student 2 If you have an expanded GEC3 which can accommodate up to 32 workstations students from a different set of 16 1...

Страница 50: ...ab from that screen flashes signaling you to scroll to that screen to access the student s name 3 See how to Establish two way communication with a student above to communicate with that student Note...

Страница 51: ...wish to view or modify using the following procedure 1 Open the Global tab by pressing Global from the row of tabs at the bottom of the screen 2 From the Teacher field select the teacher name that is...

Страница 52: ...ou are entering Note When not in spit function you can use the whole Student Name field to enter the student s name When you are in split function the vertical line indicates where Student A ends and...

Страница 53: ...ions differently In Group mode the Play tab is used to select groups on which to eavesdrop or with which to communicate and to temporarily assign students to groups Setup The Setup tab looks like Play...

Страница 54: ...o select groups with which to communicate and to setup short term groups In Group mode the Play tab looks like this Figure 11 If student s names have not already been assigned to workstations in the s...

Страница 55: ...h a group 1 Press on a student s name twice to establish 2 way communication with each member of the group that student belongs to Not only will you be able to hear the students but they will also be...

Страница 56: ...r of the screen The name of the active configuration appears next to the arrow for example Duet Config 1 or the name of a custom configured group How to load group info 1 Press the dropdown arrow on t...

Страница 57: ...rom the Play tab in Group mode via the text button on the top right corner of each student group box When no group is assigned the text reads OFF If the student has been assigned to a group the name o...

Страница 58: ...each unit of 16 students works independently you cannot group students from one set of 16 with students from another set of 16 For example you cannot group a student in keyboard group 5 with a student...

Страница 59: ...ow Configuration Screen Setup tab The Configuration screen can be accessed from the Setup tab in Group mode via the text button on the top right corner of each student group box When no group is assig...

Страница 60: ...he section Play Tab in this chapter The Configuration screen looks like this Figure 15 Group Setup Screen The Load Group screen can be accessed from the Setup tab in Group mode via the small dropdown...

Страница 61: ...a configuration You might want to use this option if student groups use assigned names EG colors composers instruments etc for group names as opposed to group numbers Back Press to return to the Setup...

Страница 62: ...oup Setup screen displays 2 Select the Configuration EG Config 1 you want to load 3 Press the button LOAD CONFIG 4 Press BACKto close the screen Rename a group configuration 1 From the Setup screen pr...

Страница 63: ...al regardless of what mode you are in Lecture Practice or Group Volume Tab The Volume tab is used to set volumes for auxiliary audio devices teacher headphones and room speakers You can change these v...

Страница 64: ...play onlyif this button is selected and Aux 1 enable is checked Aux 1 Cue Routes output of Auxiliary source only to your headset This is a convenient feature if you want to cue up music from a source...

Страница 65: ...cs chapter of this manual Headphone Volume controls Volume adjustment controls for your teacher s headphone For instructions on how to use the volume controls see the Volume Controls section in the Ba...

Страница 66: ...Controls corresponding with Aux 1 See the Volume Controls section in the Basics chapter of this manual for more information on the volume controls 6 When music is cued up press Aux 1 Route Signal in y...

Страница 67: ...the class This allows you to establish settings that you use in most of your classes to your name but if you have one class that requires different settings you can establish those accordingly Becaus...

Страница 68: ...Teacher Setup Use teacher preferences is selected looks like this Figure 19 Fields Field Description Teacher Sixteen teacher names can be stored in the GEC3 Teacher names are added and names and prefe...

Страница 69: ...Unit Mics to be functional If the Student Mics Enabled field is not checked there will be no communication through mics between you and students This option is convenient for use in practice only clas...

Страница 70: ...have a second set of seats they are numbered in the same pattern numbers 17 thru 32 Class Classes are linked to teachers If you select a teacher name see Teacher Name above the classes corresponding t...

Страница 71: ...he class you want to apply preferences to using the Class dropdown menu OR If desired class name is not in list add the class using Edit Class Info screen described below 2 Once teacher settings have...

Страница 72: ...e associated settings and in the Class field lists associated Classes To change the settings associated with a teacher select that teacher s name Use teacher preferences Teacher preferences are set us...

Страница 73: ...ard group units are numbered in Play Setup and other screens Select this field to number seats in a 2 by 8 pattern as shown 7 8 15 16 5 6 13 14 3 4 11 12 1 2 9 10 If you are using the ex pansion unit...

Страница 74: ...accommodate split function pressing this places an A or B in front of student names as a convenience for using the Split Feature Student Mics en This field must be checked for SI Unit Mics to be funct...

Страница 75: ...two General Music classes each of which have 24 students one Advanced Piano class with six students and a Study Hall Obviously he has different needs for the different classes He might set his teache...

Страница 76: ...lasses four seats in each vertical rows and four seats in each horizontal row he wanted to number them left to right because there were so few students For his study hall Mr Johnson 1 Selected his nam...

Страница 77: ...obal tab The following screen displays listing all the teacher names already entered Figure 21 2 Press the Enext to a teacher s name to edit information for that teacher or the Enext to an Undef teach...

Страница 78: ...the screen 3 Press Disk to open the Disk tab 4 Press Save Global Setupto save changes Class Selection and Edit Screen The Class Selection and Edit Screen can be accessed from the Global tab Class info...

Страница 79: ...class that is being edited This field is blank if you are adding a new class Press the T to access the QWERTY Keypad to enter a class name or to edit an existing entry See the section QWERTY Keypad i...

Страница 80: ...ngs and information in the GEC3 can be stored in a Smart Media card The GEC3 contains several system exclusive keyboard profiles that configure popular lab keyboards for use with the Split Feature The...

Страница 81: ...n GEC3 MIDI contents cannot be loaded when All Call is active Turn off All Call before loading MIDI Sys Exclusive Commands Group Box Default MIDI Selected keyboard makes and models are listed here Pre...

Страница 82: ...ompeted then continue GEC3 use Save Global Setup 1 Make sure the system is set as you would like it to be backed up 2 Press Save Global Setup The Saving Loading screen displays It looks like this Wait...

Страница 83: ...he left side of the stereo field and the other side of the keyboard is panned all the way to the right side of the stereo field These custom splits have already been defined for popular Korg keyboards...

Страница 84: ......

Страница 85: ...or future expansion if possible leave sufficient room for additional equipment and cabling When planning teacher and student workstations don t forget that some instruments are freestanding and others...

Страница 86: ...le routings for the audio accessories such as tape decks CD players burners stereo amplifiers etc Cabling Estimates and Requirements Here are the different kinds of cable that will be essential to the...

Страница 87: ...the USB port of the GEC3 you will need a USB accessory cable Sizing Cables The placement of the equipment in your music laboratory will determine the lengths of cabling required In order to select the...

Страница 88: ...in place you are ready to lay down the wiring that will connect all lab equipment Start with the AC cabling Next connect the fixed audio modular and speaker cabling that is cabling for devices such a...

Страница 89: ...ng cable runs across walkways and aisles More on the Communication Cables In configuring a GEC3 learning System the only non standard cables integral to installation are the Communications Cables Thes...

Страница 90: ...ped properly permanent damage may be caused to the GEC3 and or the SI s If you have questions regarding crimping procedures or you do not feel confident in completing the cabling process contact your...

Страница 91: ...l Enabled option 35 69 Checkbox Definition 29 Class preferences 31 Assigning 37 Class Selection and Edit screen Global tab 33 78 Screen and fields 78 Class setup 71 Field descriptions 37 72 Communicat...

Страница 92: ...olume 66 Apply teacher preferences 71 Assign a group 57 Bring a student into a lecture 43 Bring a student who called from their SI into a lecture 43 Communicate with a group 55 Communicate with a stud...

Страница 93: ...ss 44 Positioning equipment 87 Positioning the GEC3 88 Power on 14 Practice mode 47 Communicating with a student who called from their SI 50 Definition 12 Eavesdropping on a student 49 Establishing tw...

Страница 94: ...Field descriptions 17 Students Number supported 11 Teacher preferences 31 Assigning 35 Teacher Selection and Edit Screen Global tab 31 76 Screen and fields 77 Teacher setup 68 Field descriptions 35 6...

Отзывы: