background image

50

8.Appendices

○ ○ ○ ○ ○ ○ ○ ○ ○ ○ ○ ○ ○ ○ ○ ○ ○ ○ ○ ○ ○ ○ ○ ○ ○ ○ ○ ○ ○ ○ ○ ○ ○ ○ ○ ○ ○ ○ ○ ○ ○ ○ ○

Pattern Name List

* Patterns and initial data for the demo song are assigned to bank D.
* The first pattern of each style is assigned to step keys 1...16 of the Pattern Set function.

A Bank

No. Pattern Name

Style

Tempo

A01 Electro Live

Electro

135

A02 Analog Perc

Electro

130

A03 Old Skewl

Electro

129

A04 Fun with Knobs

Electro

135

A05 Come Inside

Electro

130

A06 Downsize

Electro

135

A07 Fantasy Girl

Electro

134

A08 Zoop 1

Electro

128

A09 Planet

Electro

125

A10 Whiney

Electro

121

A11 Big Beat Electro

Electro

120

A12 8 bit groove

Electro

130

A13 IDM

Electro

130

A14 Renegade

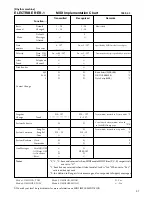
Electro

125

A15 Pitch Motion

Electro

103

A16 Bells

Electro

120

A17 Electric Eel

Electro

127

A18 Electroflux

Electro

125

A19 Slither 1

Electro

120

A20 Flubbery

Electro

125

A21 This Goes Out...

Electro

120

A22 Electribe Vibe

Electro

125

A23 Chem Beat

Electro

130

A24 Minimal 1

Techno

137

A25 Crazy Cymbal

Techno

145

A26 Dorian Gray

Techno

125

A27 Hard

Techno

140

A28 Hard fill

Techno

140

A29 Zoop 2

Techno

120

A30 Detroit

Techno

140

A31 Aceeeed

Techno

140

A32 Prog Trance

Techno

140

A33 Quagmire

Techno

150

A34 Minimal 2

Techno

138

A35 Weirdo Beat

Techno

122

A36 Minimal 3

Techno

125

A37 I need a Voice 1

Techno

132

A38 Stereo Minimal

Techno

130

A39 Light Tek

Techno

120

A40 Zoop 3

Techno

114

A41 Face

Techno

100

A42 Ultra Sound

Techno

120

A43 Kid March

Techno

120

A44 Industrial Techno

Techno

120

A45 Driving Forward

Techno

112

A46 Flashback

Techno

100

A47 Old Skins

Techno

100

A48 Commander E

Techno

106

A49 Zapper

Techno

120

A50 BoomBat

Techno

125

A51 Industry

Techno

140

A52 Zoop 4

Techno

138

A53 Satellite

Techno

143

A54 Cutting Edge 1

Techno

149

A55 Cutting Edge 2

Techno

149

A56 Electric Frog

House

134

A57 Gimme the Beat

House

140

A58 Module House

House

130

A59 In the Park

House

134

A60 Ping Pong

House

134

A61 Happy House

House

140

A62 Handbag

House

135

A63 Dub Side

House

125

A64 Deep House

House

130

B Bank

No. Pattern Name

Style

Tempo

B01 Can’t Stop

House

150

B02 Step it Out

House

135

B03 Hard House 1

House

134

B04 Housy Cows

House

138

B05 Hard House 2

House

138

B06 Hard House 3

House

138

B07 Bangin’ Garage

Garage

134

B08 Garumba

Garage

130

B09 Face In The Place

Garage

134

B10 Speed Garage 1

Garage

134

B11 Speed Garage 2

Garage

134

B12 Speed Garage 3

Garage

134

B13 DNB Garage

Garage

130

B14 Hip House

Garage

134

B15 Garage House 1

Garage

126

B16 Garage House 2

Garage

126

B17 Garage House 3

Garage

126

B18 Pork Scratchin’

Garage

130

B19 Da Boss

Garage

134

B20 T-Step

Garage

140

B21 Two Step Garage 1

Garage

130

B22 Two Step Garage 2

Garage

130

B23 You’ve got a Groove

Hip Hop

96

B24 Acid Jazz

Hip Hop

88

B25 Funk Loops

Hip Hop

96

B26 Roots of Africa

Hip Hop

96

B27 What’s da’ Frequency? Hip Hop

90

B28 For the Jeeps

Hip Hop

90

B29 Daytime RnB

Hip Hop

90

B30 Smoove

Hip Hop

90

B31 Clap your Hands

Hip Hop

99

B32 Simple Groove

Hip Hop

90

B33 Zappin’ Hop

Hip Hop

92

B34 Gang Rap

Hip Hop

90

B35 Oakland Grooves 1

Hip Hop

96

B36 Oakland Grooves 2

Hip Hop

96

B37 White Bread

Hip Hop

95

B38 Boppers

Hip Hop

100

B39 Electro NJS

Hip Hop

100

B40 Dazz

Hip Hop

100

B41 Carnival

Hip Hop

112

B42 Electric Funk

Hip Hop

109

B43 T-roys Groove 1

Hip Hop

110

B44 T-roys Groove 2

Hip Hop

110

B45 T-roys Groove 3

Hip Hop

110

B46 Rapid Beat

Hip Hop

114

B47 Check it out

Hip Hop

118

B48 Big Beat 1

Big Beat

122

B49 So what?

Big Beat

115

B50 Big Beat 2

Big Beat

129

B51 Motown Beat

Big Beat

122

B52 Pip Pop

Big Beat

115

B53 8Beat Soul

Big Beat

120

B54 Manchester Rock

Big Beat

122

B55 80’s Ballad

Big Beat

120

B56 Robot Bomb 1

Big Beat

115

B57 Robot Bomb 2

Big Beat

115

B58 Breath Beat

Big Beat

124

B59 Bridge

Big Beat

126

B60 Spiral Kit

Big Beat

120

B61 Break Beats

Big Beat

114

B62 Digital Rock Beat

Big Beat

128

B63 Electro Rock

Big Beat

133

B64 Hard Core DNB 1

Big Beat

172

C Bank

No.

Pattern Name

Style

Tempo

C01 Hard Core DNB 2

Big Beat

185

C02 Gabber

Big Beat

200

C03 Drum ‘n’ Bass 1

Drum’n’Bass 170

C04 Drum ‘n’ Bass 2

Drum’n’Bass 170

C05 Dime Droppin’

Drum’n’Bass 155

C06 Drum ‘n’ Bass 3

Drum’n’Bass 175

C07 Drum ‘n’ Bass 4

Drum’n’Bass 175

C08 Air Shot Bass 1

Drum’n’Bass 166

C09 Air Shot Bass 2

Drum’n’Bass 166

C10 Drum ‘n’ Bass 5

Drum’n’Bass 185

C11 Drum ‘n’ Bass 6

Drum’n’Bass 175

C12 Simple ‘n’ Bass

Drum’n’Bass 175

C13 Electro Step

Drum’n’Bass 170

C14 Jungle 1

Drum’n’Bass 165

C15 Jungle 2

Drum’n’Bass 180

C16 Bass Motion

Drum’n’Bass 160

C17 Jump Up 1

Drum’n’Bass 170

C18 Jump Up 2

Drum’n’Bass 170

C19 The Tribe is Electric

Drum’n’Bass 185

C20 Slither 2

Drum’n’Bass 185

C21 Tech Step 1

Drum’n’Bass 185

C22 Tech Step 2

Drum’n’Bass 175

C23 Big Bristol

Trip Hop

80

C24 Get Creative!

Trip Hop

91

C25 Slowmotion

Trip Hop

72

C26 Chill Out

Trip Hop

80

C27 What’cha Gonna Do Trip Hop

92

C28 Slow Trip 1

Trip Hop

67

C29 Slow Trip 2

Trip Hop

72

C30 Thinking Time

Trip  Hop

85

C31 Tense Atomosphere

Trip  Hop

96

C32 Trip Hip Hop

Trip Hop

80

C33 Dub Trip

Trip Hop

85

C34 After Hours

Trip Hop

78

C35 Binary Samba

Other

120

C36 Technova

Other

78

C37 Arablip

Other

100

C38 No Problem

Other

95

C39 Ragga Soul

Other

102

C40 Marching Reggae

Other

136

C41 Lounge 1

Other

90

C42 Lounge 2

Other

130

C43 Triplet Beat

Other

72

C44 VintageBox (Disco)

Vintage

120

C45 VintageBox (16Beat) Vintage

120

C46 VintageBox (Rock1)

Vintage

112

C47 VintageBox (Rock2)

Vintage

130

C48 VintageBox (Pop)

Vintage

120

C49 VintageBox (Bossa1) Vintage

70

C50 VintageBox (Bossa2) Vintage

70

C51 VintageBox (Swing)

Vintage

76

C52 Miami Bass

Vintage

175

C53 Try Again? 1

S.E.

120

C54 Try Again? 2

S.E.

120

C55 Insert 25 Cents

S.E.

120

C56 Network Operator

S.E.

132

C57 Faust

S.E.

145

C58 Modulation

S.E.

142

C59 On A Trip

S.E.

70

C60 Very Wet

S.E.

128

C61 Bleep Bloop

S.E.

125

C62 Digital Storm

S.E.

101

C63 I need a Voice 2

S.E.

132

C64 Warp

S.E.

115

Song Name List

S01: Electribe Remix Part1
S02: Electribe Remix Part2
S03: STATION X Troyster Mix

S04: Bass Burn
S05: Macrocaustic

S08...S16

:

 Blank

All Patterns and All Songs - ©1999 KORG Inc. All rights reserved.

S06: Elect-Rave
S07: Dugan's Midnight X-press

Содержание Electribe R ER-1

Страница 1: ...Thank you purchasing the Korg ELECTRIBE R ER 1 In order to enjoy long and trouble free use please read this manual carefully and use the instrument correctly E 2 ...

Страница 2: ...ent has been tested and found to comply with the limits for a Class B digital device pursuant to Part 15 of the FCC Rules These limits are designed to provide reasonable protection against harmful interference in a residential installation This equipment generates uses and can radiate radio frequency energy and if not installed and used in accordance with the instruc tions may cause harmful interf...

Страница 3: ...Tap Tempo key to change the tempo 13 Striking keys to play Parts 14 Modifying editing the sound 14 Striking the part keys along with a song or pattern 15 Modify edit the sound along with a song or pattern 15 Modifying editing a rhythm pattern 16 Using the step keys to edit the rhythm Step Recording 16 Using the part keys to edit the rhythm Realtime Recording 17 Saving a pattern that you create 17 ...

Страница 4: ...ying a delay motion sequence 28 Recording a delay motion sequence 28 Checking motion data 28 Convenient functions for editing patterns 29 Erasing rhythm pattern data from a part 29 Erasing data during playback or recording Erase 29 Erasing all data from a part Clear Part 29 Moving data within a part Move Data 29 Copying a part Copy Part 30 Data Copy within a pattern 30 Erasing part or delay motion...

Страница 5: ...f the Audio In 38 Synchronizing the ER 1 with external MIDI devices MIDI Clock 38 Synchronizing the ER 1 to a master external MIDI device Ext 38 Synchronizing an external MIDI device to the ER 1 as master int 39 Protect settings Memory Protect 39 Saving the settings you modify in Global mode Write 39 7 MIDI mode 40 MIDI channel settings MIDI ch 40 Setting the MIDI note number for each part Note No...

Страница 6: ...ealtime You can quickly modify sounds or rhythm patterns to change your performance while you play Sounds you create and up to 256 original rhythm patterns each up to 64 steps long can be stored in memory Up to sixteen songs can be created by combining multiple patterns and adding knob movements etc event data and stored in memory Delay and low boost effects are provided Pattern Set Play lets you ...

Страница 7: ... L MONO R and connect the other end to your mixer or powered monitor speakers amplified speakers etc If you will be listening in mono use the L MONO jack To take full advantage of the ER 1 s sound quality we recommend that you listen in stereo 3 If you will be using headphones connect them to the headphone jack The output from the line out jacks will not be switched off even if headphones are plug...

Страница 8: ... original saved sound of the pattern 3 Motion Seq motion sequence This allows you to record knob movements Each time you press this key the setting will alternate between Off dark Smooth and Trig Hold 4 AMP Here you can control the volume and panning Decay Specify the decay speed For an audio part this sets the gate time Pan Specify the stereo location of the sound Level Adjust the level For the a...

Страница 9: ...nd 7 ACCENT accent part key This key selects the accent part Common section 1 MASTER VOLUME This knob adjusts the volume that is output from the line out jacks and the headphone jacks 2 AUDIO IN THRU This key allows the external audio input to be out put directly from the line out jacks and the head phone jack When this key is on settings of the audio input part other than pan and level will be ig...

Страница 10: ...to mute the specified part 5 Solo key During playback you can hold down this key and press one or more Part keys to play back the specified part s Step Key section 1 2 3 4 5 1 Select key By pressing these keys to turn the Select LEDs on or off you can use the sixteen step keys as up to 64 step keys In Song mode these keys function as rewind and fast forward keys When the Pattern Set function is on...

Страница 11: ...ff Each time you press it the power will alternate on or off 2 DC 9V Connect the included AC adapter here 3 Adapter cable holder Hook the adapter cable around this so that it will not be disconnected accidentally 4 MIDI connectors IN MIDI data is received at this connector to control the ER 1 from an external MIDI device or to receive a data dump OUT MIDI data is transmitted from this connector to...

Страница 12: ...nce Delay Part Structure of Song Listening to a Song 1 Press the Song Mode key to enter Song mode the key will light 2 Use the cursor keys to make the parameter select LED indicate Song the top LED 3 Rotate the dial to select the desired song S01 S16 4 Press the Play Pause key to playback the song the key will light When the song ends playback will stop automatically the key will go dark To pause ...

Страница 13: ...hange will actually occur at the end of each pattern Refer to p 22 The timing at which patterns will change What is a Pattern Apattern is a unit of musical data consisting of sounds arranged in a rhythm On the ER 1 you can create and save 256 patterns Each pattern consists of eleven parts refer to p 14 In addition to the sounds of each part you can also record rhythms and knob movements refer to p...

Страница 14: ...he hi hat Crash Cymbal part A rhythm pattern for the crash cymbal Handclap pattern A rhythm pattern for the handclap Accent part pattern A rhythm pattern for the points of emphasis accents for the overall pattern You are free to modify the sound of each part and rhythm patterns and motion sequences can be stored independently for each part refer to p 24 Editing the sound of a part Modifying editin...

Страница 15: ...e key will light to select the part that you wish to edit 3 Use the knobs and keys of the Synthesizer section to modify the sound The sound of the part that is playing will be modi fied as you move the knobs or keys You can press other part keys to edit other parts To save the pattern sounds that you modify here use the Write operation refer to p 17 Saving a pattern that you create If you re selec...

Страница 16: ...icate the rhythm of the selected part You can press the step keys to modify the rhythm pat tern Each time you press a key it will alternate between on lit and off dark You can also playback the pattern while you select different parts and press the step keys to turn each step on or off In the case of a pattern with a length of 2 or greater you can use the Select keys to move the select LED in the ...

Страница 17: ...ssing the key but by the Decay value p 19 Connecting vari ous sources to the audio inputs Erase If you accidentally input a wrong note you can hold down the Shift key and Rec key while the pattern con tinues playing to erase the rhythm pattern for the cur rently selected part i e the part whose part key is lit Saving a pattern that you create With the factory settings memory protect will be on and...

Страница 18: ...key to enter record ready mode the Rec key will light and the Play Pause key will blink 5 Press the Play Pause key to start the pattern the Rec key and Play Pause key will light 6 Move the Pitch knob to create various changes while the pattern makes one cycle 16 steps x length or 12 steps x length 7 After the pattern has completed one cycle after you began moving the knob the Rec key will automati...

Страница 19: ...nd press the Play Pause key to begin playback 4 Press the Mode key to enter Global mode 5 Use the cursor keys to set the parameter select LED to Input Gain 1 6 Rotate the dial to adjust the input volume to create a balance with the volume of the other parts Adjust Input Gain 2 in the same way The input sound will be heard while you press the Audio In part key The Audio In parts that are recorded i...

Страница 20: ...is hold condition press the Pattern Set key once again You can register new pattern sets Refer to p 31 Registering a pattern for Pattern Set If you switch patterns during playback the change will occur when each pattern finishes playing Refer to p 22 The timing at which patterns will changed Using the ER 1 as a tone generator module Read this section when you wish to use the ER 1 with other connec...

Страница 21: ...6 Set the ER 1 to int and the EA 1 to Ext Refer to p 38 Synchronizing the ER 1 with external MIDI de vice 7 Press the Play Pause key of the ER 1 to start a pattern or song The Play Pause key will light The EA 1 will play the pattern or tempo in synchronization with the tempo of the ER 1 If you want the ER 1 and EA 1 to play the iden tically numbered pattern in synchronization make the following se...

Страница 22: ... 17 Step 18 Step 19 Step 20 Step 21 Step 22 Step 23 Step 24 Step 25 Step 26 Step 27 Step 28 Step 29 Step 30 Step 31 Step 32 Selecting a pattern Pattern A01 d64 Use the cursor keys to make the parameter select LEDs indicate Pattern Rotate the dial to select one of the 256 patterns A01 A64 b01 b64 C01 C64 and d01 d64 By holding down the Shift key as you rotate the dial you can change the pattern num...

Страница 23: ...key Tap key while you press a part key you can mute temporarily silence that part While you hold down the Part Mute key Tap key the mute status of each part will be displayed The part key of unmuted parts will light and muted part keys will be dark You can also mute two or more parts To cancel part muting press the corresponding part key Display when no parts are muted Mute Synth part 2 and Handcl...

Страница 24: ...be edited independently but cannot be sounded simultaneously If both are triggered in the same step the Handclap part will sound OSCILLATOR This specifies the oscillator waveform and pitch Pitch Pitch Mod Depth Mod Speed Part select key On Example Mod Type Time Wave sine wave triangle wave Select the basic waveform Each time you press the key the waveform will alternate A sine wave produces a mild...

Страница 25: ...increase the level of the delay sound and will also increase the amount of feed back The further left or right the Pan of each part is set the more the sound will be spread to left and right Raising the Depth excessively may cause the sound to distort clip Time delay time 5 msec 2 sec for tempo delay 1 4 8 Specify the delay time Rotating the knob toward the right will lengthen the delay time Rotat...

Страница 26: ...step key 1 4 Shift step key 1 Maximum number of steps 1 2 3 4 5 6 7 8 9 10 11 12 13 14 15 16 1 2 3 4 5 6 7 8 9 10 11 12 13 14 15 16 1 2 3 4 5 6 7 8 9 10 11 12 Swing settings By adjusting the Swing settings you can offset the note timing of the steps For example you can change a straight 16 beat by adding a slight bounce or shuffle The Swing value can be adjusted from 50 to 75 and will affect the n...

Страница 27: ...uick Start Adding accents to the rhythm pattern Accent You can apply accents changes in volume to the rhythm pat tern When Accent is on the specified notes steps of the entire pattern will be accented 1 Press theAccent part key and the accent pattern will be shown by the step keys 2 Each time you press a step key it will alternate on off allow ing you to specify the desired accent pattern You can ...

Страница 28: ...two knobs Delay Depth and Delay Time can be re corded simultaneously The playback method is the same as for Smooth playback of a part motion sequence There will be no effect if the delay type Motion Seq LED is dark Recording a delay motion sequence You can record the movements of two knobs Delay Depth and Delay Time 1 Select the pattern that you wish to edit 2 Press the Type key to select Motion S...

Страница 29: ...A number will blink in the display Rotate the dial to select the number of steps and the direction positive or negative in which the data will be moved 5 Press the blinking step key 9 to execute the Move Data opera tion To cancel without executing press the Stop Cancel key The Move Data operation applied to all steps of the selected part Data that is moved beyond the last step of the pattern will ...

Страница 30: ...convenient way to create a pat tern that uses similar phrases repeatedly 1 Create a pattern with a length of 1 and Write it into memory Refer to p 32 Saving a pattern 2 At this point the same data as in length 1 will automatically be copied to the steps of lengths 2 4 3 Change the pattern length to the desired length Refer to p 26 Length Scale Beat settings 4 The steps of lengths 2 4 will contain ...

Страница 31: ...9 Example Step key Select LED Pattern set 1 Pattern set 3 Hold down the Shift key and press the Pattern Set key to hold the function In Pattern Set Play the timing at which patterns will change tempo adjustment and functions such as Reset Play etc are the same as for Pattern Play Pattern Set cannot be used during recording When you enter recording ready mode Pattern Set will be can celled Register...

Страница 32: ...ss the Stop Cancel key to stop playback Use the cursor keys to make the parameter select LEDs indicate Pattern 2 Press the Write key once the key will blink The pattern num ber will blink in the display 3 Rotate the dial to select the writing destination pattern num ber 4 Press the Write key once again to write the data To cancel press the Stop Cancel key 3 2 4 If the Global mode Memory Protect se...

Страница 33: ... perform the Write opera tion refer to p 37 Saving a song Playing a song Song Play Press the Play Pause key to begin playing the song The song will begin playing from the pattern of the currently selected position When the song ends playback will automatically stop It is not possible to save edited sounds in a song Please use Pattern mode to edit sounds What is Position Position refers to the play...

Страница 34: ...vance to the next position The display will indicate End 5 Rotate the dial to select the pattern The pattern you select here will be the pattern for position 002 6 When you select a pattern for the End position the End will move to the next position Repeat steps 4 and 5 to assign as many patterns as you wish To playback the completed song from the beginning press the Play Pause key once and then p...

Страница 35: ...p key 13 once again and a pattern will be inserted in front of that position To cancel press the Stop Cancel key The pattern that is inserted will be the pattern which had previ ously been at that position Now you can specify the desired pattern for the position that was inserted Data following the inserted pattern will be moved backward 2 4 2 3 Deleting a pattern from a specified position Delete ...

Страница 36: ...ing always rewrites the previous data replace recording and when you record your performance any event recording data previously in that area will be erased It is not possible to layer event recording over the same area 1 Select the song on which you wish to record events 2 Use the cursor keys to make the parameter select LEDs indi cate Position 3 Use the dial or the Select keys to move to the pos...

Страница 37: ...ave a song that you create you must perform this Write operation If you decide not to save the song data you create simply switch songs without performing the Write operation 1 If the song is playing press the Stop Cancel key to stop play back Use the cursor keys to make the parameter select LEDs indicate Song 2 Press the Write key once the key will blink The song num ber will blink in the display...

Страница 38: ...o inputs in section 3 Basic Operation Quick Start Synchronizing the ER 1 with external MIDI devices MIDI Clock Clock int Ext The Global mode Clock setting allows the tempo of the ER 1 to be synchronized with the tempo of an external MIDI device that is able to send or receive MIDI Clock messages For details on synchronization settings of your external MIDI device refer to the owner s manual for yo...

Страница 39: ...cursor keys to make the parameter select LEDs indi cate Protect 3 Rotate the dial to turn Protect on or oFF If you wish to save the Protect setting perform the Global mode Write operation This setting applies to Pattern mode and Song mode In Global mode and MIDI mode it is always possible to Write data regardless of the Protect setting With the factory settings this will be on 2 3 Saving the setti...

Страница 40: ...lobal mode settings can be transmitted from the ER 1 to an external MIDI data filer or computer connected to the MIDI OUT connector 1 Connect the MIDI OUT connector of the ER 1 to the MIDI IN connector of an external MIDI device that is able to re ceive MIDI data dumps another ER 1 or a computer that is running a MIDI data filer program or editing program etc 2 Set the MIDI channel of the external...

Страница 41: ... received Only P will be transmitted received All will be transmitted received Displayed alternately Factory settings Saving the settings you modify in MIDI mode Write When you perform the Write operation in either MIDI mode or Global mode the modified settings of both modes will be saved Here s how to save the MIDI mode settings If you wish to save the settings you modify you must perform this Wr...

Страница 42: ...synchronized system one synthesizer the master will transmit these messages and the other sequencer s the slave s will receive these messages The slave devices will playback according to the tempo specified by the Timing Clock messages transmitted by the master Twenty four Timing Clock messages are transmitted for each quarter note When the ER 1 s Global mode parameter Clock is set to INT it will ...

Страница 43: ...ssage is re ceived 10 Editing sounds etc By sending MIDI exclusive data dumps you can rewrite all patterns or individual programs By using NRPN messages in Pattern mode you can edit the knobs that are active for each part Troubleshooting The display does not light up when I press the Power switch Is the AC adapter connected Is the AC adapter plugged into an AC outlet No sound Is your amp mixer or ...

Страница 44: ... Solo key and the Write key turn on the power 2 The display will indicate PLd and the Play Pause key will blink 3 To load the factory preloaded data press the blinking Play Pause key This will require apporoximately 30 seconds To cancel press the Stop Cancel key When loading is complete the ER 1 will return to its initial state After several seconds the display will indicate pattern number A01 and...

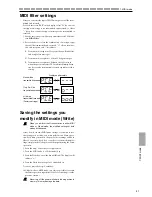
Страница 45: ...45 8 Appendices 8 Appendices Example sounds Analog Kick 1 Analog Snare 1 Electric Tom Zap Analog Kick 2 Analog Snare 2 Analog Cowbell Noise Shot ...

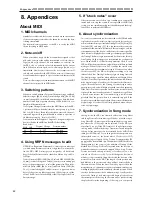
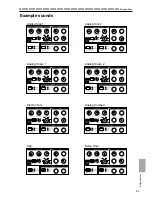
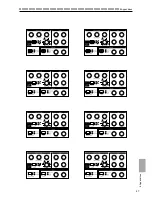
Страница 46: ...46 8 Appendices Blank chart When you have created a sound that you like you can store the knob and key locations in this page ...

Страница 47: ...47 8 Appendices 8 Appendices ...

Страница 48: ...14 HI HAT 9 14 HI HAT part 9 14 I Input Gain 19 38 Insert Pattern 35 L Length 16 26 Level 8 25 Low Boost 8 25 M MASTER VOLUME 9 Metronome 38 MIDI 8 11 40 MIDI Channel ch 40 42 Clock 38 Dunp 40 Filter 41 Mode 40 Note number 40 NRPN 42 Reception 40 Transmission 40 Mode Global 38 MIDI 40 Pattern 22 Song 33 Key 10 Modulation Mod Depth 8 24 Ring 9 25 Speed 8 24 Type 8 24 Motion Sequence 8 28 30 DELAY 2...

Страница 49: ...hythm Pattern 16 27 Ring modulation 9 25 S SCALE BEAT 16 26 Select 10 Shift 8 11 Smooth 28 Solo 10 23 SONG 9 12 33 Song Clear 34 Event 36 Fast forward 33 Mode 33 Play 33 Protect 39 Reset Play 33 Rewind 33 Tempo 13 33 Write 37 Specifications 44 Step Recording 16 27 Swing 26 Synchronized playback 21 Synchronizing 38 Synthesizer 8 14 System Exclusive 42 T TAP 10 13 22 33 Tempo DELAY 25 Pattern 13 22 ...

Страница 50: ... Hop Hip Hop 92 B34 Gang Rap Hip Hop 90 B35 Oakland Grooves 1 Hip Hop 96 B36 Oakland Grooves 2 Hip Hop 96 B37 White Bread Hip Hop 95 B38 Boppers Hip Hop 100 B39 Electro NJS Hip Hop 100 B40 Dazz Hip Hop 100 B41 Carnival Hip Hop 112 B42 Electric Funk Hip Hop 109 B43 T roys Groove 1 Hip Hop 110 B44 T roys Groove 2 Hip Hop 110 B45 T roys Groove 3 Hip Hop 110 B46 Rapid Beat Hip Hop 114 B47 Check it out...

Страница 51: ... C 8 O O Data Entry MSB C Control Change Program O 0 127 O 0 127 Transmitted received in Pattern mode P Change True 0 127 System Exclusive O O Can always be transmitted received in the MIDI Dump page 2 E Song Pos O O Transmitted received in Song mode 1 System Common Song Sel O 0 15 O 0 15 P Tune System Realtime Clock O O 1 Commands O O 1 Aux Messages Local ON OFF O All Notes OFF O123 127 Active Se...

Страница 52: ...ach country Any KORG product not sold with a warranty card or carrying a serial number disqualifies the product sold from the manufacturer s distributor s warranty and liability This requirement is for your own protection and safety KORG INC 15 12 Shimotakaido 1 chome Suginami ku Tokyo Japan 1999 KORG INC 1104 ETH Printed in Japan E 2 ELECTRIBE R ER 1 Owner s Manual ...

Отзывы: