54
● Setting Procedure
1.
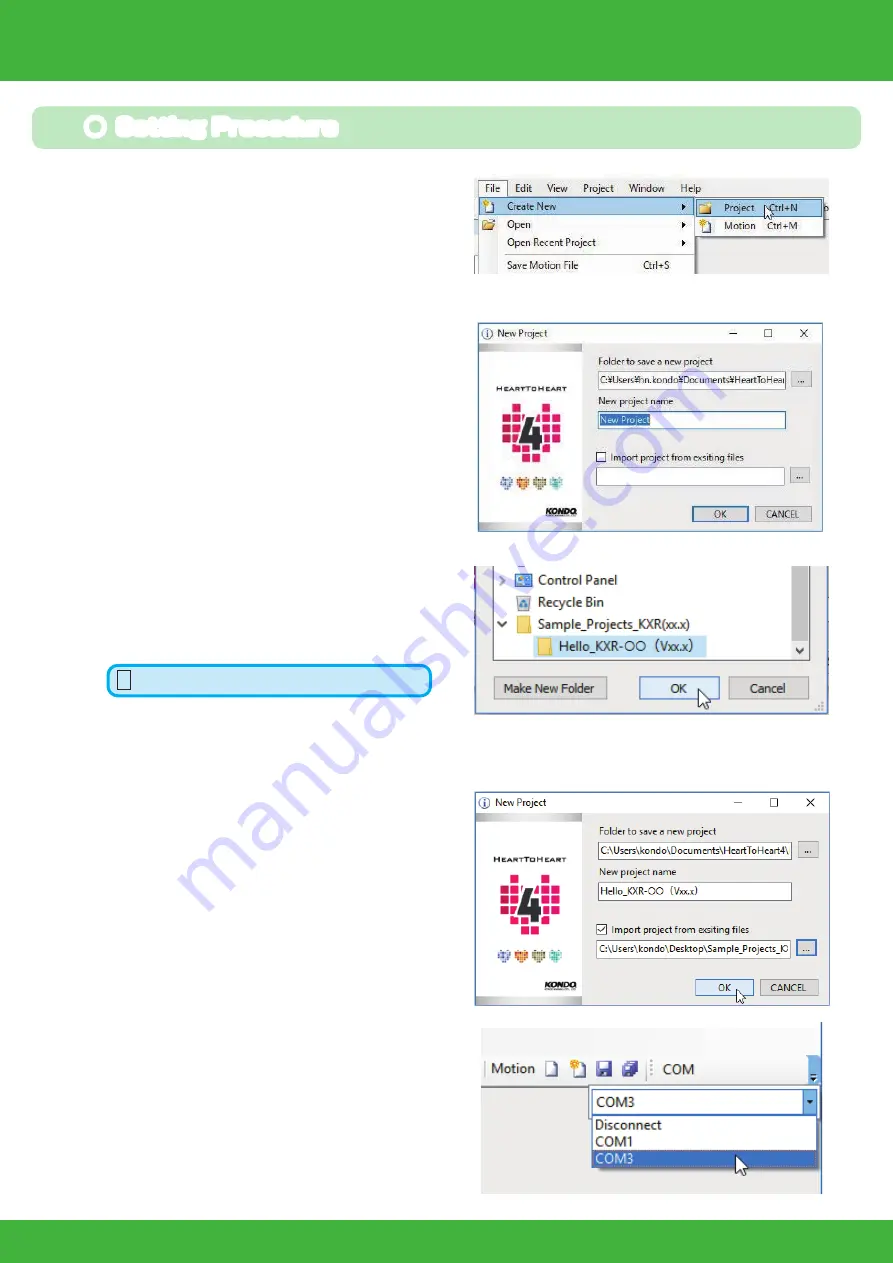
Click “File” -> “New” -> “Project” .
2.
Click on the Project Import button.
3.
Select the “Hello_KXR(Vxx.x)" project in the
Sample_projects (Vxx.x) folder that was
copied onto the computer above.
4.
When the project is imported, the new proj-
ect name in the New Project window be-
comes the same as the name of the folder
that was imported.
If no change is made, press "OK".
5.
Assign the Communication Port (COM)
number to be used.
This will typically be
the COM number used for the KO Driver.
In the initial state, there is a pull-down switch next
to the COM button. When the button layout or
window size is changed, the pull-down design will
also change.
Hello̲KXR-L4D(Vxx.x)
7. Set the COM communication rate and
ICS communication rate to 115200 .
Read the cautions on the next page before
pressing the RAM button.
This applies when you run the robot for the first
time. When the servos are shipped from the factory,
there is no data loaded into them, thus the "RAM"
button needs to be clicked multiple times for initiali-
sation. Once initialised, pressing "RAM" once will be
enough to get robot moving.
8. Keep clicking on "RAM" button, al-
lowing 2 to 3 seconds between
each click until the robot slowly
moves to trim position.
6.
Press the “Project Setting Window" but-
ton.The Project Setting window opens when
selected.
Trim Adjustment 2
Содержание KXR-L4D
Страница 32: ...32 Leg Assembly M2 6 M2 6 10 2 6 4 Leg B 120mm Assemble 4 sets Bottom arm 3300 38 Cable guide X KXR L4D...
Страница 38: ...38 Head Assembly 1 Gripper M2 6 10 Joint frame 3300A Joint frame 3300A Gripper M2 6 10 KXR L4D...
Страница 40: ...40 Head Assembly 2 Join M2 6 10 M2 6 x4 Botom arm 3300 38 Cable guide X 2 6 4 Head 200mm KXR L4D...
Страница 48: ...48 Complete Assembly completed The following will explain how to mount the battery and run motions KXR L4D...
Страница 71: ......


