29
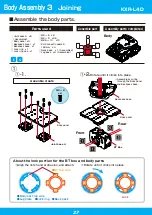
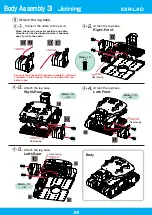
Body Assembly 3
Joining
M2.6 ー 10
x2
160mm
Rear-facing
Rear-facing
Rear-facing
Rear-facing
160mm
160mm
160mm
160mm
160mm
When the servo connector position and cable
direction is like the diagram below, it becomes
easy to route the cable.
Right-Front
*Connect the unused ZH connection cable 2 (160 mm)
prepared in this process. There is no cable from the
battery box.
Body
④
Attach the leg base.
④-2.
Attach the leg base.
Left-Front
④-4.
Attach the leg base.
Right-Rear
④-3.
Attach the leg base.
Leftt-Rear
④-3.
Attach the leg base.
④-1.
Connect the cable to the servo.
M2.6 ー 10
x2
M2.6 ー 10
x2
M2.6 ー 10
x2
KXR-L4D
Содержание KXR-L4D
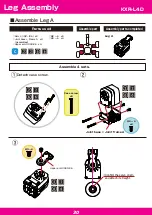
Страница 32: ...32 Leg Assembly M2 6 M2 6 10 2 6 4 Leg B 120mm Assemble 4 sets Bottom arm 3300 38 Cable guide X KXR L4D...
Страница 38: ...38 Head Assembly 1 Gripper M2 6 10 Joint frame 3300A Joint frame 3300A Gripper M2 6 10 KXR L4D...
Страница 40: ...40 Head Assembly 2 Join M2 6 10 M2 6 x4 Botom arm 3300 38 Cable guide X 2 6 4 Head 200mm KXR L4D...
Страница 48: ...48 Complete Assembly completed The following will explain how to mount the battery and run motions KXR L4D...
Страница 71: ......


