background image

10

kobalttools.com

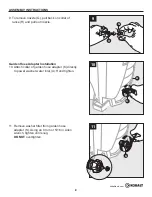
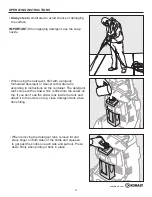
12. Replace washer filter into garden hose 


adapter (K) and attach garden hose to the blue 

collar of garden hose adapter (K).

You have now completed assembly and are ready 

to begin using your electric power washer. Read 

and observe all safety instructions.

OPERATING INSTRUCTIONS

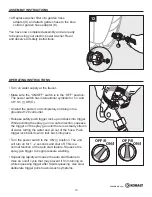
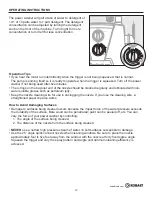
• Turn on water supply at the faucet.

•  Make sure the “ON/OFF” switch is in the “OFF” position. 


The power switch has international symbols for ‘on’ and 

‘off’: On (|) Off (O).

•  Unwind the power cord completely and plug into a 

grounded 120 volt outlet.

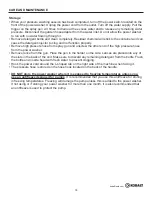
•   Release safety push trigger lock up and back into trigger. 

While pointing the spray gun in a safe direction, squeeze 

the trigger on the spray gun until there is a steady stream 

of water, letting the water and air out of the hose. Push 

trigger lock back down to lock back into place. 

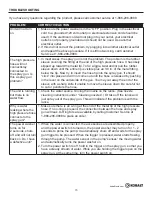
•  Turn the power switch to the ‘ON’ (|) position. The unit 

will turn on for 1 - 2 seconds and shut off. This is a 

normal function of the auto start feature. Squeeze the 

spray gun trigger to begin pressure washing.

•  Squeezing rapidly will cause the auto start feature to 

miss an on/off cycle that may prevent it from turning on 

while squeezing trigger after rapid squeezing. Use slow 

deliberate trigger pulls to avoid such symptoms.

OFF/0

ON/I

OFF/0

ON/I

2

12

1

K

ASSEMBLY INSTRUCTIONS

Содержание 0571087

Страница 1: ...trademarks of LF LLC All Rights Reserved Questions problems missing parts Before returning to your retailer call our customer service department at 1 866 206 0888 8 a m 4 30 p m EST Monday Friday 2000 PSI AB1501B Français p 18 MODEL KPW 2000 ITEM 0571087 ELECTRIC PRESSURE WASHER kobalttools com ...

Страница 2: ...Safety Information 4 Assembly Instructions 6 Operating Instructions 10 Care and Maintenance 13 Troubleshooting 15 One Year Limited Warranty 16 Replacement Parts List 18 kobalttools com SPECIFICATIONS Model Max PSI lbs sq in Max GPM Gal per min Max Temp Volts Amps Weight lbs KPW 2000 2 800 1 4 122 F 120 14 34 ...

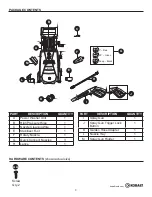
Страница 3: ...dapter 1 L Nozzle Tray 1 M Spray Gun Holder 1 PART DESCRIPTION QUANTITY A Power Washer Unit 1 B High Pressure Hose 1 C Nozzle Cleaning Wire 1 E Stabilizer Foot 1 F Rotary Nozzle 1 G Quick Connect Nozzles 3 H Lance 1 0 Red 25 Green Soap Black 2000 PSI H I C G F A J B E M L K HARDWARE CONTENTS shown actual size AA Screw Qty 2 ...

Страница 4: ... bleed off the pressure from all parts of your power washer and how to turn off the power washer This power washer conforms to CSA and other safety and consumer standards Do not modify or rebuild any part of your power washer DO NOT use your power washer when you are under the influence of alcohol or drugs Use this power tool carefully and only when you are alert Watch your balance and footing whi...

Страница 5: ...it from expanding under freezing conditions When the water freezes and expands your power washer will be damaged and become inoperable Or if storing outdoors it is recommended you use an antifreeze not included to protect pumps NEVER use hot water with your power washer It will overheat and damage the high pressure pump NEVER leave the power washer unattended while it is powered on ALWAYS turn the...

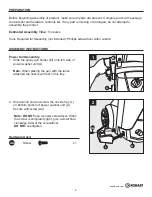
Страница 6: ...ewdriver Allen wrench ASSEMBLY INSTRUCTIONS 2 Slip tab into slot and screw the nozzle tray L on bottom portion of power washer unit A Secure with screw AA Note DO NOT use a power screwdriver When the screw is completely tight give a small final clockwise twist of the screwdriver DO NOT overtighten Power Unit Assembly 1 Slide the spray gun holder M onto left side of power washer unit A Note When pl...

Страница 7: ...ose is now securely attached to the spray gun Note High pressure hose B is fitted to the hose reel and ready to use It only needs to be at tached to the spray gun I 5 To release the hose B from spray gun I turn black collar counterclockwise Remove gun 4 B I 3 Slip tab of stabilizer foot E into slot on bottom portion of power unit A Secure with screw AA 3 E AA A 5 B I Hardware Used Screw x 1 AA AA ...

Страница 8: ...d push trigger lever down and wedge between trigger and the handle Always leave in locked position when not in use This ensures the gun is in safe mode until it is ready for use To unlock push trigger lock up and press into trigger 2 1 7 H I 6 I I Lock Unlock 8 Attach nozzles G into end of lance H by pressing selected nozzle into place It will make a click sound when firmly in place Note Always pu...

Страница 9: ...d pull out nozzle Garden Hose Adapter Installation 10 Attach collar of garden hose adapter K directly to power washer water inlet A Hand tighten 11 Remove washer filter from garden hose adapter K Using an 8 mm or 5 16 in Allen wrench tighten until snug DO NOT overtighten 9 H G 1 2 10 K A 2 11 1 K ...

Страница 10: ...y push trigger lock up and back into trigger While pointing the spray gun in a safe direction squeeze the trigger on the spray gun until there is a steady stream of water letting the water and air out of the hose Push trigger lock back down to lock back into place Turn the power switch to the ON position The unit will turn on for 1 2 seconds and shut off This is a normal function of the auto start...

Страница 11: ...water ratio according to instructions on the container The detergent tank comes with a straw which is fitted into the screw on top If you don t see the straw look inside the tank and attach it to the screw on top close detergent tank when done filling When removing the detergent tank remove lid and place finger on both sides of the bottle and squeeze to get past the knobs on each side and pull out...

Страница 12: ...uch as petroleum jelly Keep the nozzle cleaning wire for use in unclogging the nozzle If you lose the cleaning wire a straightened paper clip also works How to Avoid Damaging Surfaces Damage to surfaces being cleaned occurs because the impact force of the water pressure exceeds the durability of the surface Bare wood can be penetrated paint can be peeled off etc You can vary the force of your powe...

Страница 13: ... On vertical surfaces being cleaned apply detergent to lower surfaces and work your way up to prevent detergent from causing streaks in the dirt and grime Rinse detergent by pressure washing from bottom up for same reason If a stain is particularly tough it may be necessary to reapply the detergent and use a bristled brush to scrub the stain Subsequent power washing after brushing should successfu...

Страница 14: ...r end of the high pressure hose from the power washer Remove lance from the gun Place the gun in the holder on the side Lances are placed into any of the slots in the back of the unit Make sure to discard any remaining detergent from the bottle Flush the bottle and nozzle head with fresh water to prevent clogging Hook the power cord around the L shaped tab on the right side of the machine when fac...

Страница 15: ... down Be careful not to cut or puncture the hose The unit is running but there is no water flow 1 Check the water source Unclog the nozzle on the lance See nozzle cleaning instructions under Cleaning nozzles Or take off the lance and just spray out of the spray gun This will indicate if the problem is with the lance Why is water leaking where the high pressure hose connects to the spray gun 1 Make...

Страница 16: ...ollow these instructions will void this warranty Warranty Process Keep your original receipt of purchase in case of warranty claim If your power washer develops a problem contact Customer Service Call our toll free number at 1 866 206 0888 Customer Service is available Monday Friday 8 00 a m to 4 30 p m Eastern Standard Time EST The Customer Service person will work with you to fix the problem If ...

Страница 17: ... a m 4 30 p m EST Monday Friday PART DESCRIPTION PART A Detergent Tank PW3440710 B Hose PW4220760 C Rotary Nozzle PW4220680 D Quick Connect Nozzle 0 Red PW4220700 E Quick Connect Nozzle 25 Green PW4220710 F Quick Connect Nozzle Soap Black PW4220690 PART DESCRIPTION PART G Garden Hose Adapter PW3084210 H Spray Gun PW3400811 I Lance PW3400960 J O Ring Kit not shown PW909104K 0 Red 25 Green Soap Blac...

Страница 18: ...sont des marques de commerce déposées de LF LLC Tous droits réservés Des questions des problèmes des pièces manquantes Avant de retourner l article au détaillant appelez notre service à la clientèle au 1 866 206 0888 entre 8 h et 16 h 30 HNE du lundi au vendredi JOINDRE VOTRE REÇU ICI Numéro de série Date d achat ...

Страница 19: ...s de sécurité 21 Instructions d assemblage 23 Instructions d utilisation 27 Soin et entretien 30 Dépannage 32 Garantie limitée d un an 33 Liste des pièces de rechange 34 CARACTÉRISTIQUES DU PRODUIT CARACTÉRISTIQUES Modèle PSI Max lb po GPM Max Gal par min Temp Max Volts Ampères Poids lbs KPW 2000 2 800 1 4 50 C 120 14 34 15 4 kg ...

Страница 20: ...e 1 L Plateau à buse 1 M Support de pistolet de pulvérisation 1 PIÈCE DESCRIPTION QUANTITÉ A Laveuse à pression 1 B Tuyau à haute pression 1 C Fil de nettoyage de buse 1 E Pied stabilisateur 1 F Buse rotative 1 G Buse de raccord rapide 3 H Lance 1 0 Rouge 25 Vert Détergent Noir 2000 PSI H I C G F A J B E M L K AA Screw Qty 2 QUINCAILLERIE INCLUSE illustré en taille réalle Vis Qté 2 ...

Страница 21: ...nforme à la norme CSA et à d autres normes en matière de protection de la sécurité du consommateur Ne pas modifier ou reconstruire toute partie de votre laveuse à pression NE PAS utiliser votre laveuse à pression lorsque vous êtes sous l influence de l alcool ou de la drogue Utilisez cet outil à pression avec précaution et seulement quand vous êtes alerte Surveillez votre équilibre et votre appui ...

Страница 22: ...r afin d empêcher l eau contenue dans l appareil de prendre de l expansion Lorsque l eau gèle et se dilate votre laveuse à pression sera endommagée et deviendra inutilisable NE JAMAIS utiliser d eau chaude avec votre laveuse à pression Celle ci va surchauffer et endommager la pompe à haute pression NE JAMAIS laisser la laveuse à pression sans surveillance ou lorsque le commutateur est en position ...

Страница 23: ... INSTRUCTIONS D ASSEMBLAGE 2 Faites glisser la languette dans la fente et vissez le plateau de buse L sur la partie inférieure de la laveuse à pression A Fixez à l aide de la vis AA Remarque NE PAS utiliser de tournevis électrique Lorsque la vis est complètement serrée tournez légèrement dans le sens horaire avec le tournevis NE PAS trop serrer Assemblage de l appareil à pression 1 Faites glisser ...

Страница 24: ...idement fixé au pistolet Remarque Le tuyau haute pression B est monté sur le dévidoir enrouleur et prêt à être utilisé Il doit seulement être attaché au pistolet de pulvérisation I 5 Pour libérer le tuyau B du pistolet I tournez le collet noir dans le sens antihoraire Retirez le pistolet 4 B I 3 Faites glisser la languette du pied stabilisateur E dans la fente située sur la partie inférieure de la...

Страница 25: ...entre la gâchette et la poignée Toujours maintenir le bouton du verrou en position de verrouillage lorsque l appareil n est pas utilisé Cela garantit que le pistolet est en mode sécuritaire jusqu à ce qu il soit prêt à être utilisé Pour le déverrouiller poussez le verrou de la gâchette vers le haut et appuyez su la gâchette 2 1 7 H I 6 I I Déverrouiller Verrouiller 8 Rattachez les buses G dans l e...

Страница 26: ... de l adaptateur de tuyau d arrosage 10 Attachez le collet de l adaptateur de tuyau d arrosage K directement à l entrée d eau de la laveuse à pression A Serrez à la main 11 Retirez le filtre de la laveuse de l adaptateur de tuyau d arrosage K En utilisant une clé Allen de 8 mm serrez jusqu à l ergot NE PAS serrer à l excès 9 H G 1 2 10 K A 2 11 1 K ...

Страница 27: ...et le remettre de nouveau dans la gâchette Tout en pointant le pistolet dans une direction sûre presser sur la gâchette du pistolet jusqu à ce qu il y ait un flux régulier d eau laissant ainsi l eau et l air s écouler du tuyau Poussez le verrou de la gâchette vers le bas pour le reverrouiller en place Mettez l interrupteur d alimentation sur la position MARCHE L appareil s allumera pendant une à d...

Страница 28: ...rrespondant aux instructions indiquées sur le contenant Le réservoir de détergent est livré avec une paille montée dans la partie supérieure à visser Si vous n apercevez pas la paille regardez à l intérieur du réservoir et l attacher à la partie supérieure à visser refermer le réservoir lorsque vous avez terminé le remplissage Lorsque vous retirez le réservoir à détergent enlevez le couvercle et p...

Страница 29: ...c une graisse non soluble telle que la vaseline Conservez le fil de nettoyage de buse pour déboucher la buse de lance Si vous perdez le fil de nettoyage un trombone déplié fait aussi l affaire Comment éviter d endommager les surfaces Les dommages aux surfaces en cours de nettoyage se produisent parce que la force de la pression de l eau dépasse le niveau de durabilité de la surface Le bois nu peut...

Страница 30: ...er le détergent sécher sur la surface Sur les surfaces verticales à nettoyer appliquez le détergent sur la partie inférieure et travaillez vers le haut pour éviter que le détergent ne laisse des stries dans la saleté et la crasse Rincez le détergent par lavage sous pression de bas en haut pour une raison identique Si une tache est particulièrement difficile il peut être nécessaire de réappliquer l...

Страница 31: ...yau de la laveuse Retirez la lance du pistolet Placez le pistolet dans le support situé sur le côté Les lances sont placées dans l une des fentes à l arrière de l appareil Veillez à éliminer toute trace de détergent de la bouteille Rincer la bouteille et la tête de la buse à l eau douce pour éviter le colmatage Accrochez le cordon d alimentation autour de la languette en forme de L située sur le c...

Страница 32: ...ouper l extrémité du manchon avec un couteau pointu si vous êtes incapable de déplacer celui ci vers le bas Veillez à ne pas couper ou percer le tuyau L appareil fonctionne mais il n y a aucun afflux d eau 1 Vérifiez l alimentation en eau Débouchez la buse de lance voir les instructions pour déboucher la buse à la section Nettoyage des buses Ou retirez la buse et pulvérisez seulement à l aide du p...

Страница 33: ... garantie Processus de garantie Veuillez conserver votre facture d achat originale pour l éventualité d une demande en garantie Si votre laveuse à pression développe un problème contactez le Service à la clientèle en composant notre numéro sans frais au 1 866 206 0888 Le Service à la clientèle est disponible du lundi au vendredi de 8 h à 16 h 30 heure normale de l Est HNE Le représentant du Servic...

Страница 34: ... DE PIÈCE G Adaptateur de tuyau d arrosage PW3084210 H Pistolet de pulvérisation PW3400811 I Lance PW3400960 J Ensemble de joint torique non illustré PW909104K 0 Rouge 25 Vert Détergent Noir H I G A B C D E F LISTE DES PIÈCES DE RECHANGE Pour obtenir des pièces de rechange veuillez appeler notre Service à la clientèle au 1 866 206 0888 de 8 h à 16 h 30 HNE du lundi au vendredi Imprimé en Chine KOB...

Отзывы: