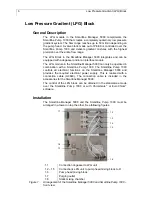
Low Pressure Gradient (LPG) Block
7
2.1
2.2
2.3
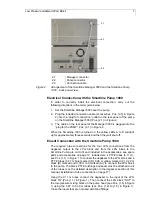
2.1 Manager
connector
2.2 Pump
connector
2.3 Connection
cable
Figure 2
Arrangement of the Smartline Manager 5000 and the Smartline Pump
1000 – back panel view -
Electrical Connection with the Smartline Pump 1000
In order to correctly install the electrical connection, carry out the
following directions in the order given below:
1. Set the Smartline Manager 5000 over the pump.
2. Plug the included connection cable (accessories, Pos. {2.3} in Figure
2) into the “plug for connection” outlet on the rear panel of the pump
on the Smartline Manager 5000, Pos. {2.1} in Figure 2.
3. The cable on the rear panel of the Manager 5000 is plugged into the
“plug for the PUMP”, Pos. {2.1} in Figure 2.
When the Smartline 1000 is turned on, the yellow LEDs A to D will light
up for approximately three seconds and then they will shut off.
Eluent Connection with the Smartline Pump 1000
The required tube connections for the four LPG connections from the
degasser output to the LPG block and from the LPG block to the
Smartline Pump are cut to fit and included in the accessories, see spare
parts and accessories on page 12. Included are 4 PTFE tubes (0.11 m),
see Pos. {1.1} in Figure 1, to connect the degasser to the LPG block and 4
PTFE tubes (0.27 m blue marked (D), 0.28 m yellow marked (C), 0.29 m
black (B) marked and 0.30 m red marked (A)) to connect the LPG block
to the pump. The black PTFE bushings and seals must be attached to all
of the tubes (see the detailed description in the degasser section of this
manual, installation of tube connections on page 17).
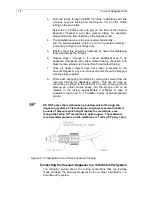
Using the 0.11 m tubes connect the degasser to the input of the LPG
block “IN” (Pos. {1.1} in Figure 1). Then connect the LPG block “OUT” to
the low-pressure mixing block on the pump head (see Pos. {1.6} inFigure
1) using the 0.27 to 0.30 m tubes (see Pos. {1.2} to {1.5} in Figure 1).
Close the inputs that are not used with blind fittings.

