G
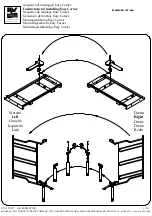
Sequenza di montaggio Easy Corner
Instructions for installing Easy Corner
Séquence de montage Easy Corner
Secuencia de montaje Easy Corner
Montageanleitung Easy Corner
Monteringssekvens Easy Corner
Monteringsrækkefølge Easy Corner
B
X
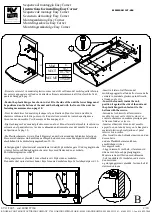
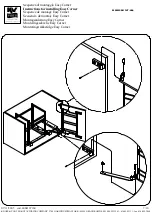
-Fissare le cerniere I in materiale plastico come in dett. B sul fianco del mobile,quella inferiore
deve essere appoggiata sul fondo ed entrambe allineate anteriormente al filo del mobile.Vedi
quote di fissaggio a pag. 10
.
-Fasten the plastic hinges I as shown in det. B to the side of the unit the lower hinge must
be positioned on the bottom of the unit and both aligned with the front of the unit. See
fastening measurements on page 10.
-Fixer les charnières I en matière plastique tel que illustré en B,sur le côté du meuble, la
charnière inférieure doit être posée sur le fond et elles doivent être toutes deux alignées à
l'avant au ras du meuble. Voir hauteurs de fixation page 10.
-Fijar las bisagras I de material plástico como en el det. B en el lateral del mueble, la inferior se
colocará en el panel inferior y las dos se alinearán anteriormente a ras del mueble.Véase cotas
de fijación en la pág. 10.
-Die Plastikscharniere I wie in Detail B gezeigt an der Seitenwand des Schrankes befestigen:
Das untere Scharnier muß am Boden aufliegen,beide müssen vorne bündig mit dem Schrank
abschließen.Siehe die Befestigungsmaße auf S. 10.
-Infäst gångjärn I i plastmaterial som indikerat i detalj B på möbelns gavel. Undre gångjärn ska
vila mot botten och både gångjärn ska vara i linje med främre änden av möbeln.
För infästningsmått se sida 10
-Fest gangejernene i plastikk I som er beskrevet i B på siden av møbelen.
Den undre skal være støtt mot bunn i linje foran med møbelens linje.Se festehøyder på sid. 10.
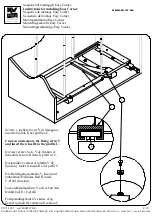
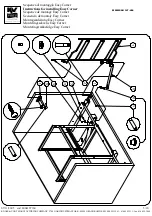
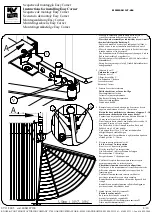
-Inserire il telaio G all'Interno del
mobile,appoggiarlo al lato dello stesso ed alla
cerniera in materiale plastico quindi fissarlo
al fondo con le viti.
-Insert the frame G inside the unit,
position it against the side of the unit and
the plastic hinges then fasten it to the
bottom with the screws.
-Introduire le châssis G à l'intérieur du
meuble, le poser sur le côté de celui-ci et
contre la charnière en matière plastique puis
le fixer au fond avec les vis.
-Insertar el bastidor G dentro del mueble,
apoyarlo en un lado de éste y en la bisagra de
material plástico, ahora fijarlo en el panel
inferior con tornillos.
-Das Gestell in den Schrank einsetzen und an
dessen Seite
und am Plastikscharnier anlehnen,
anschließend wird es
fest angeschraubt.
-Lägg in ramen G i möbeln, vila ramen vid
sidan av möbeln och på plastgångjärn.
Montera ramen till botten med skruvarna.
-Sett inn struktur G i møbelen ved å støtte
den mot siden
og mot gangejernet i plastikk, fest den helt til
slutt med skruene.
x
Mod
NECT
NECMT
502
1002
07/11/2005 cod. 4004107160
2/10
KNAPE & VOGT MANUFACTURING COMPANY 2700 OAK INDUSTRIAL PARK - 49505 GRAND RAPIDS, MI 800.253.1561 - 616.459.3311 - fax 616.459.3860
19,763"
39,448"
WSI MSSU 147-404
Содержание Easy Corner
Страница 11: ...WSI MSSU 147 404...
Страница 12: ...WSI MSSU 147 404...

