Configuring the unit for the first time
DN9650/DN9652 Network Bridge
Operator Manual
5
6
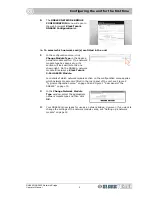
The
DN965X NETWORK BRIDGE
CONFIGURATION
menu will open in
the web browser’s
Klark Teknik
DN965X Configuration
tab.
>> To select which network card(s) are fitted in the unit
1
In the configuration menu, click
Change Module Type
in the desired
network module section. If no network
module type has been set up, its
section will look similar to the one
shown right. On the DN9650, network
module B is always a
Klark Teknik
3-Port AES50 Module.
For details of which network module section on the configuration menu applies
which network module card fitted in the rear panel of the unit, see Figure 2
“Typical configuration menu” on page 18 and Figure 1 “Rear panel of the
DN965X” on page 15.
2
In the
Change Network Module
Type
window, select the appropriate
network module type and then click
OK.
3
Your DN965X is now ready for use as a network bridge. However, if you want to
change the settings of the network module cards, see “Setting up a network
module” on page 19
Содержание DN9650
Страница 2: ......
Страница 6: ......
Страница 8: ......
Страница 12: ......
Страница 20: ...Chapter 1 Getting Started DN9650 DN9652 Network Bridge 6 Operator Manual ...
Страница 28: ...Chapter 3 Front Panel DN9650 DN9652 Network Bridge 14 Operator Manual ...
Страница 40: ...Chapter 6 Operation DN9650 DN9652 Network Bridge 26 Operator Manual ...
Страница 42: ...Appendix A Technical Specification DN9650 DN9652 Network Bridge 28 Operator Manual ...
Страница 44: ...Appendix B Functional Block Diagrams DN9650 DN9652 Network Bridge 30 Operator Manual DN9650 ...
Страница 45: ...DN9652 DN9650 DN9652 Network Bridge Operator Manual 31 DN9652 ...
Страница 46: ...Appendix B Functional Block Diagrams DN9650 DN9652 Network Bridge 32 Operator Manual ...


