background image

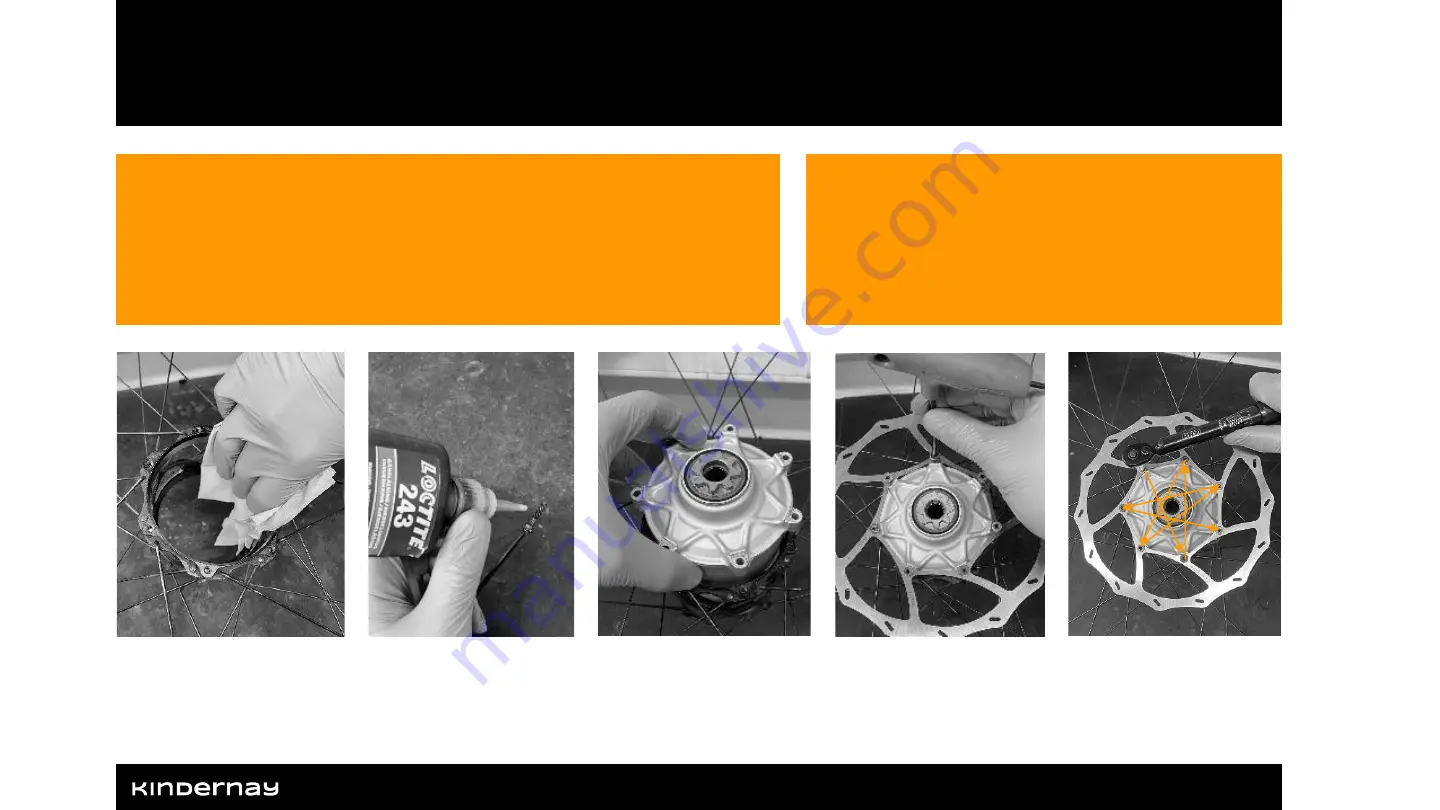
SWAP & BRAKE ROTOR INSTALLATION

8

1.1: Clean the SWAP-shell 

and gearhub housing.

1.3: Install the gearhub

in the SWAP.

1.5: Tighten the bolts to 

3 Nm in a star pattern. 

Repeat 3 times.

NOTE !

The Kindernay XIV SWAP bolts are 

proprietary and cannot be 

exchanged with regular M4 bolts.

CAUTION !

Failure to install the bolts according to the described 

procedure below can cause the bolts loosening, 

leading to serious malfunction and injury.

1.2: Apply Loctite 243 

to the supplied SWAP 

bolts.

1.4: Install the brake rotor, 

align the bolt holes and 

install the bolts.

x3

3 Nm

Содержание XIV

Страница 1: ...KINDERNAY XIV INSTALLATION MANUAL 1 ...

Страница 2: ... warranty The maximum crank torque is 160 Nm Using a bike mid drive motor with more than 160 Nm will void the hub warranty The max sprocket thickness is 2 3 mm Using a thicker sprocket or a non original lockring will void the warranty Wear eye protection and rubber gloves USE ONLY MINERAL OIL WHEN BLEEDING THE SYSTEM DOT fluid will destroy the seals inside the shifters Remove or protect any brake ...

Страница 3: ...This instruction is intended for professional and home mechanics to Install the Kindernay gearhub system on a bicycle Find product specifications for the Kindernay XIV gearhub 3 SCOPE ...

Страница 4: ...llation 10 Torque arm removal 11 Gear ratio specification 12 Chain sprocket installation 13 Belt sprocket installation 14 Sprocket removal 15 PM torque retainer installation 16 HYSEQ installation 17 Hub wheel installation 18 Chain installation 19 Oil change procedure 20 Wheel building manual 21 Support contact information ...

Страница 5: ...sprocket SWAP shell 28h 32h or 36h HYSEQ hydraulic shifter unit PM Torque reaction mount M6 Mounting bolts for torque reaction mount M4 Mounting bolts for SWAP shell 7pcs Gear oil 30 ml NOTE Must be added to the hub before use Spare bolts for SWAP shell 3pcs and spare olives 2pcs for the hydraulic lines ...

Страница 6: ...the Kindernay XIV Initial oil change After first 500 km Periodic oil change Next 5000 km or annually whichever comes first Please see page 19 for the oil change procedure NOTE Failure to follow the Kindernay XIV service procedures will void the Kindernay gearhub warranty ...

Страница 7: ...T30 Torx driver 5 mm and 8 mm combination spanner Torque wrench Chain cutter and chain link tool 38 mm chamferless socket or 16 notch 44 mm BB tool i e Park Tool BBT 69 2 depending on lockring Flathead screwdriver Optional 13 mm and 17 mm combination spanner Match cap removal tool or 12mm ID bearing extractor tool Two jaw bearing extractor tool ...

Страница 8: ... NOTE The Kindernay XIV SWAP bolts are proprietary and cannot be exchanged with regular M4 bolts CAUTION Failure to install the bolts according to the described procedure below can cause the bolts loosening leading to serious malfunction and injury 1 2 Apply Loctite 243 to the supplied SWAP bolts 1 4 Install the brake rotor align the bolt holes and install the bolts x3 3 Nm ...

Страница 9: ...d cap press fit surface 2 4 Gently tap the match cap in place with a rubber mallet NOTE The XIV torque arms must be oriented with the flat face outwards as shown The XIV torque arm may have a slight press fit that will require a rubber mallet for installation 2 2 Gently tap the torque arm in place with a rubber mallet ...

Страница 10: ...he match cap removal tool 3 2 Tighten the 13 mm and 17 mm nuts to secure the match cap tool 3 3 To protect the shift cam from accidental damage insert the HYSEQ actuator on the drive side 3 6 Remove the torque arm 3 4 Slide a thru axle or suitable punch through the hub from the drive side 3 5 Gently tap the axle or punch to remove the match cap 3 7 If the torque arm press fit is too tight to be re...

Страница 11: ...optimizing the gear ratio to have a comfortable cadence in 10th gear 0 88 at 25km h Gates Carbon Drive Calculator Link NOTE The minimum sprocket ratio of the XIV is 1 9 The minimum front chainring is 32T on E bike and 30T on a non assisted bike Using a lower sprocket ratio or front chainring will void the hub warranty The sprocket ratio is determined as follows 𝑟𝑠𝑝𝑟𝑜𝑐𝑘𝑒𝑡 𝐹𝑟𝑜𝑛𝑡 𝑐ℎ𝑎𝑖𝑛𝑟𝑖𝑛𝑔 𝑡𝑜𝑜𝑡ℎ 𝑐𝑜𝑢𝑛...

Страница 12: ...e with 9 10 or 11 speed chains Wider chains may contact the HYSEQ actuator and cause damage 4 1 Install sprocket 4 2 Install the hub sprocket lockring by rotating clockwise 4 4 Verify that the HYSEQ actuator has clearance to the lockring and that there is not gap to the input shaft The sprocket should rotate freely when the actuator is installed 4 3 Torque the lockring to 30 Nm Clearance No gap ...

Страница 13: ... is 45 5 mm 5 1 Install sprocket 5 2 Install the hub sprocket lockring by rotating clockwise 5 4 Verify that the HYSEQ actuator has clearance to the lockring The sprocket should rotate freely when the actuator is installed 5 3 Torque the lockring to 30 Nm CAUTION Using a sprocket with a thickness 2 3 mm or a non original lockring may cause the lockring to contact the actuator damaging the hub ...

Страница 14: ...ve a Gates belt sprocket a Gates Strap Wrench is recommended https www gatescarbondrive com products tools 6 1 Align the chain whip belt strap wrench and lockring tool as shown 6 2 Loosen the lockring 6 3 Remove the lockring by rotating counterclockwise ...

Страница 15: ... or manufacturer specifications NOTE The torque retainer will offset the braking caliper inwards For Boost 148 mm frames the Boost specific retainer must be used to get the correct offset 7 5 Install the hub and align the brake caliper NOTE Only Kindernay 7 bolt rotors are compatible The torque retainer will add 13 mm to the original frame rotor size 7 4 Install the brake caliper according to manu...

Страница 16: ...ompletely removed from the bike or dismounted in one eyelet This will make it easier to see what effect the movement of the rear frame will have on the cable If there is no natural fastening point use a rubber band and zip tie An easy way to ensure that the cable moves correctly is adding slack to the cable in the direction you want it to fold See picture Mount the rear shock again after the first...

Страница 17: ...cket 9 2 Install the actuator by pressing it on the drive side of the hub 9 3 Align the torque arm and insert the wheel into frame 9 6 Verify that the torque arm is installed in the retainer as shown Correctly installed Incorrectly installed 9 4 Install but do not tighten the thru axle Position the actuator in the desired position 9 5 Tighten the thru axle according to frame manufacturer specifica...

Страница 18: ...with sliding dropouts or eccentric BB you will need to install a chain tensioner 10 2 For full suspension bikes Unbolt or let the air out of the shock Zip tie the rear triangle in the maximum travel position 10 3 Wrap the chain around the front and rear sprocket Add additional chain links according to you bike type 10 4 Cut route and connect the chain ...

Страница 19: ...illing the gearhub will cause leakage that can damage braking components 11 5 Position the wheel against the wall at a 45 angle with the oil plug facing downwards Let the oil drain for 1 2 hours or more in room temperature NOTE Please collect the used gearhub oil and deliver it to your nearest recycling center 11 6 Turn the wheel around with the oil plug facing upwards 11 7 Refill the gearhub with...

Страница 20: ...WHEEL BUILDING MANUAL For updated wheel building manuals relevant for your SWAP specification please see our website https kindernay com support support portal 20 ...

Страница 21: ...Need support Contact our support team directly at support kindernay com ...

Отзывы: