


PNEUMATIC LEVEL CONTROLLER
PNEUMATIC LEVEL CONTROLLER
MODEL: GEN 3
Installation, Operation & Maintenance Guide
MODEL: GEN 3
Installation, Operation & Maintenance Guide
5
www.kimray.com
Kimray reserves the right to modify or improve the designs or specifications of such products at anytime without notice.
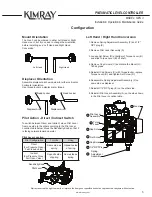
Configuration
Left Hand / Right Hand Conversion
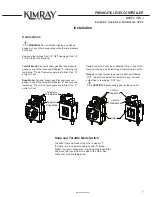
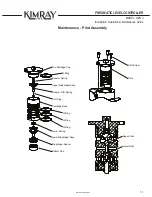
1. Remove Spring Adjustment Assembly (F) and 1/2"
NPT plug (E).
2. Remove Pilot Lever Assembly (A).
3. Loosen Set Screw (D) at bottom of Torque Lever (B)
and slide Torque Lever (B) off shaft.
4. Remove Cap Screws (C) and rotate the Mount (G)
180 degrees.
5. Reinstall Cap Screws (C) with thread locker, replace
Torque Lever (B), and tighten Set Screw (D).
6. Reassemble Spring Adjustment Assembly (F) on
same side as displacer.
7. Reinstall 1/2” NPT plug (E) on the other side.
8. Reinstall Pilot Lever Assembly (A) on the side shown
in the Pilot Lever Location table.-
Pilot Lever
Assembly
Torque
Lever
Cap Screw
Set Screw
1/2" NPT Plug
Cap Screw
Spring
Adjustment
Assembly
Mount
A
B
C
D
C
E
F
G
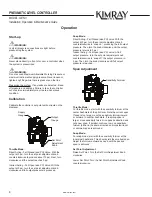
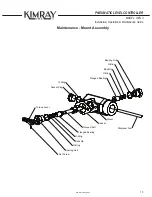
Mount Orientation
The Gen 3 can be ordered in either Left Hand or Right
Hand mount, but if you need to change the orientation
before installing, see “Left Hand and Right Hand
Conversion”
Left Hand
Right Hand
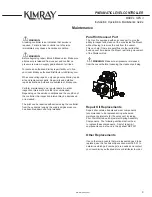
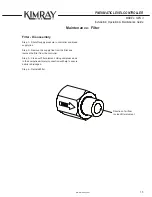
Displacer Orientation
Assemble displacer as shown below for either vertical or
horizontal orientation.
Use thread locker on displacer arm thread.
Displacer Arm
Thread Locker
Displacer Arm
Thread Locker
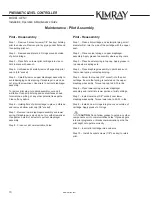
Pilot Action - Direct / Indirect Switch
To switch between Direct and Indirect, move Pilot Lever
from one side to the other according to the Pilot Lever
Location table below. Move the Sensitivity Knob so that it
is facing outward toward operator.
Pilot Lever Location
Pilot Configuration
Throttle
Snap
Direct
(For Pressure Open /
Fail Closed Valve)
Same side as
spring
Opposite side
of spring
Indirect
(For Pressure Close /
Fail Open Valve)
Opposite side
of spring
Same side as
spring
Pilot Lever
Sensitivity Knob
Содержание GEN 3
Страница 1: ...PNEUMATIC LEVEL CONTROLLER GEN 3...
Страница 20: ...2018 Kimray Inc RM 0021 Issued 3 21 Kimray com...